Building jobs
This section describes how to start a build.
Before you start
The job must be configured, there are a number of options for this. For details about configuring Jobs, see one of the following guides:
Automatic build using a Perforce triggered build
You can add a Perforce triggered build to a Jenkins job in the Build Triggers section of the job.
Perforce triggered build: Select to enable the PerforceHelix Server to trigger Jenkins to build based on an event, such as a submitted change. A triggered build requires an administrator to add a Perforce trigger. For more information on configuring Perforce triggered builds, see Perforce Triggered Build.
Caveats:
- You must use workspaces named using the recommended environment variables, see Variable Expansion.
- Do not use parameterized builds.
Manual build using Build Now
Start a build manually:
- From the Jenkins dashboard, click the job link.
- Click Build Now in the sidebar menu.
The job will start to build. You can see the build progress in Build History in the job sidebar.
To start a build from a URL, right click on the Build Now link and save the link. You can now use this link to start the build from another webpage.
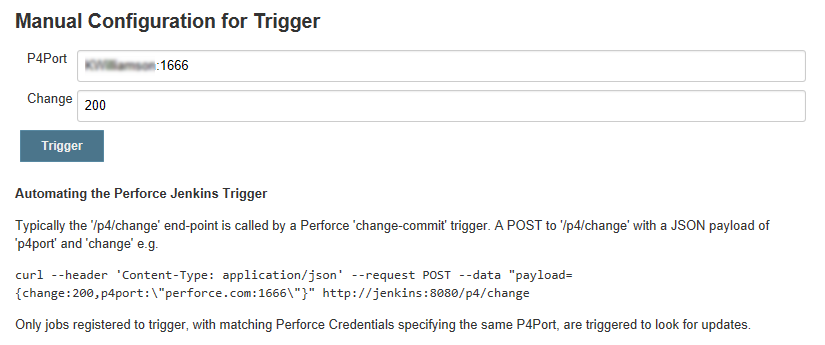
Manual build using P4 Trigger
Jobs can be manually triggered from the Jenkins home page by using P4 Trigger in the sidebar menu
Manually trigger a build with P4 Trigger:
- From the Jenkins dashboard, click P4 Trigger in the sidebar menu.
- Complete the trigger form.
- Click the Trigger button.
You can add a Perforce triggered build to a Jenkins job in the Build Triggers section of the job, see Perforce Triggered Build.
Building at a change
A Jenkins job can build at any point in the codes history, identified by a Perforce Helix Server change or label.
The Jenkins job can be pinned to a Perforce Helix Server change, or label by setting the Pin build at Perforce Label field under the Populate options. Any time the Jenkins job is triggered, it will only build up to the pinned point.
If you are using downstream jobs (for example) you can use the Parameterized Trigger Plugin to pass ${P4_CHANGELIST} as the parameter to the downstream job. The downstream job can then pin the build at the passed in changelist so that both upstream and downstream jobs run against the same point in the history of the code.
Alternatively, a change or label can be passed using the Build Review parameters or URL end point (see the Build Review section for details)
Parallel builds
The plugin supports parallel execution of Jenkins Jobs. Jenkins will create a new workspace directory workspace@2 and so on. The plugin will automatically template the current workspace appending .clone2 for the name of the template.
Custom parallel builds
Used for custom workspaces, where an alternative location has been set. For example: Advanced, Use custom workspace, Provide a Directory. Then you will need to add the executor number to the end of your path.
/Users/aclaybourne/Workspaces/custom@${EXECUTOR_NUMBER}
The plugin will then correctly template the workspaces as needed.
Build using a review
The plugin supports a Build Review Action with a review/build/ URL endpoint. The endpoint enables you to trigger a build from a review. Parameters can be passed informing Jenkins about a Perforce Helix Server shelf to unshelve and the changelist to sync to. There are also Pass/Fail callback URLs for use with Helix Swarm.
-
Helix Plugin for Jenkins 1.10.11 and later: Swarm must send the parameters for the build to Jenkins as a POST request. To do this, enter the parameters in the Post Body of the Swarm project Automated Tests dialog and not in the URL.
-
Only Jenkinsfiles in submitted reviews are executed by the build system. Currently, Jenkinsfiles in shelved reviews are not executed by the build system.
For example:
The URL below will build the review, parameters are passed to Jenkins using the variables in the Post Body:

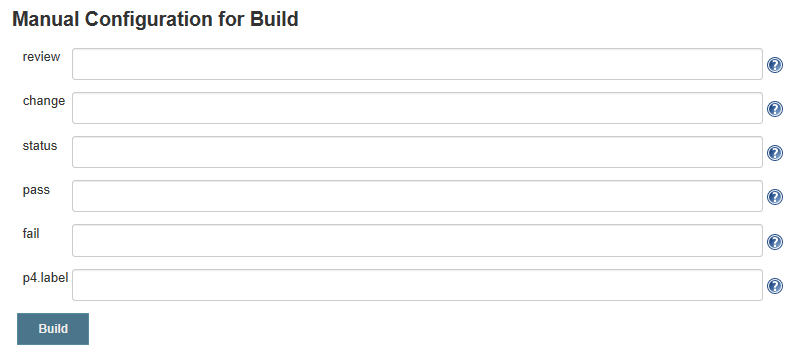
The Build Review Action supports the following parameters in the Post Body:
- status (shelved or submitted)
- review (the pending shelved change)
- change (the submitted change)
- label (a Perforce label, instead of change)
- pass (URL to call after a build succeeded)
- fail (URL to call after a build failed)
These parameters are stored in the Environment and can be used with variable expansion for example ${label}. For this reason, please avoid these names for slaves and matrix axis.
Review authorization
If Jenkins requires users to login, your Perforce trigger needs to use a Jenkins authorized account.
Find the API Token for the trigger:
- From the Jenkins dashboard, click People in the sidebar menu.
- Click the Jenkins authorized user account link in the table.
- Click Configure in the sidebar menu.
- Click the Show API Token... button in the API Token section of the page.
- Use the API Token with BasicAuth in the URL, for example:

Manual Review
The Build Review Action can be invoked manually from within Jenkins.
- From the Jenkins dashboard, click the job name in the table.
- Click Build Review in the sidebar menu. Complete the form to specify the parameters for build.
- To trigger the build, click the Build button.
Build steps and environment variable
When using build steps such as "Execute Shell", the standard Perforce variables P4PORT, P4USER, and P4CLIENT are not set in the environment. This is to ensure that the P4 Plugin does not overwrite variables on preconfigured build environments. If a build step needs access to these values, the P4_PORT, P4_USER, and P4_CLIENT variables can be used, for example, in a shell script:
export P4CLIENT=$P4_CLIENT
To make the standard variables accessible by default, set them in the Global properties section of the Jenkins Configure System page:

Post Build Options and Viewing the Build Results
When your build is complete you can view the change summary, and manually tag the build. For more information on you post build options, see Post build options.


