Helix authentication prerequisites
-
An installation of the following products, each on its own, dedicated computer:
-
Helix TeamHub
-
Helix TeamHub works with supported versions of Helix Core Server (Standard Maintenance).
The versions supported in this release of Helix TeamHub are (latest patch of server version required):
-
Helix Core Server 2022.1 - minimum recommended version, Helix Core Server 2022.1 and later contain performance improvements over earlier versions
-
Helix Core Server 2022.2
-
Helix Core Server 2023.1
-
Helix Core Server 2023.2
We recommend a server security level of +1. For more information, see Server security levels in Helix Core Server Administrator Guide.
-
-
Git Connector
WarningIf Helix TeamHub resides on the same computer as Git Connector, port conflicts occur. For best results, we recommend setting up all 3 components on separate computers.
-
-
A Helix Core Server license with the correct number of seats for your users, your gconn-user (Git Connector), and your Bots. For instructions on how to calculate the number of licensed seats you need, see Helix TeamHub license.
-
One Helix Core license seat to give TeamHub
superlevel access to Helix Core Server with an optional unlimited timeout ticket if ticket-based authentication will be used (recommended). For more information, see Setting protections with p4 protect and Ticket-based authentication in Helix Core Server Administrator Guide. -
Host name, protocol, port, and user information for the Git Connector. For more information, see Work with Git in Helix Core Server Administrator Guide.
-
Adminpermission for the gconn-user on any manually created graph depots. See Grant permissions in Helix Core Server Administrator Guide. -
Users with appropriate access to Helix Core Server. All user and group administration occurs in Helix Core Server.
NoteMake sure that the names of Helix Core Server users that need access to Helix TeamHub do not exceed 100 characters. TeamHub only supports usernames up to 100 characters.
-
An entry in the protections table for all users that need access to TeamHub. To learn more, see Setting protections with p4 protect in Helix Core Server Administrator Guide.
superuseraccess to the protections table to view permissions. -
An access level of either
adminorcreate-repofor users that need the ability to add repos in specific depots For more information, seep4 grant-permissionin Helix Core Command-Line (P4) Reference.
After you configure Helix authentication and the TeamHub instance is in use, you cannot revert to a different authentication method.
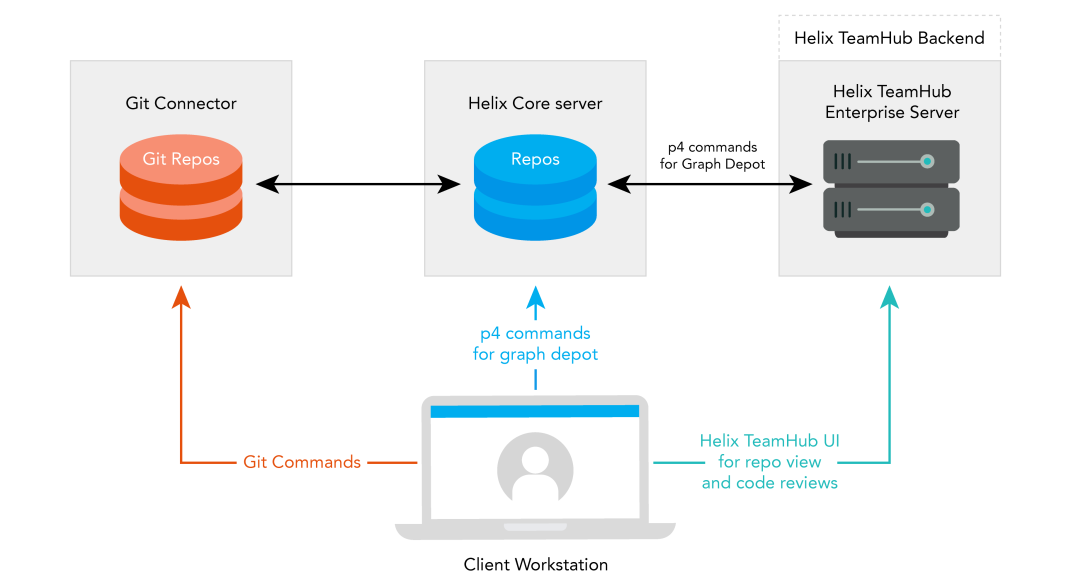
High level architecture diagram
To get a better understanding of the underlying architecture, the following diagram gives a high-level overview of the architecture:
Installation and configuration flow
The following table outlines the flow of setting up Helix authentication in Helix TeamHub and specifies the product it pertains to.
| Step | Description | Product | Instructions |
|---|---|---|---|
|
1. |
Install Helix TeamHub. |
Helix TeamHub |
|
|
2. |
If you start from a new Helix Core Server, add users and groups in Helix Core Server. For existing Helix Core Server installations, verify that the protections table includes the required entries for the users that need access to Helix TeamHub. |
Helix Core Server |
Add users and groups in Helix Server Helix Core Server Administrator Guide:
Helix Core Command-Line (P4) Reference:
|
|
3. |
Configure Helix TeamHub to use Helix Server authentication. |
Helix TeamHub |
|
|
4. |
Install extensions on Helix Core Server to enable the activity stream in Helix TeamHub. |
Helix TeamHub |
|
|
5. |
Create a new project and repository. |
Helix TeamHub |
|
|
6. |
Configure group access to the newly created project. |
Helix TeamHub |
|
|
7. |
Clone the new repository to your local workspace. |
Helix TeamHub |


