Version control with Git
Helix TeamHub Cloud plans only support native Git repositories. Git LFS (Large File Storage) is only supported by Helix Git with TeamHub on-premise plans.
Git is an open source distributed version control system initially designed for Linux kernel development. In Helix TeamHub, you can create any number of Git repositories in your projects. Git is also used to host Wiki pages and attachments.
The below is the list of resources to help you learn Git:
If your TeamHub instance is set up with Helix authentication, all Git repositories are stored in Helix Core Server. Helix Core Server is a secure, scalable, and highly available version control system that supports parallel development. An unlicensed Helix Core Server is limited to 3 repositories. With a licensed Helix Core Server, you can create any number of Git repositories in your projects.
Following is a list of resources to help you get familiar with Helix Server:
This section includes information on:
- Setting up
- Creating Git repositories stored in Helix Server
- Cloning a repository
- Migrating existing Git repositories to Helix TeamHub
- Migrating existing Git repositories into Helix Server via Helix TeamHub
- Importing an existing graph depot (Git Connector repo) into Helix TeamHub
Setting up
Download and install latest version of Git client and open your terminal.
Introduce your name and email to Git, so that Helix TeamHub can display your user account correctly. Please specify the same email address you use to sign in to Helix TeamHub:
git config --global user.name YOUR NAME
git config --global user.email HELIX TEAMHUB EMAIL ADDRESS
Configure your SSH keys under your TeamHub Profile settings and start working with Git.
If your instance uses Helix authentication, wait 10 minutes for the SSH keys to sync. Otherwise, the Git Connector will not have the updated SSH keys in the list of authorized keys, and you will not be able to connect.
Creating Git repositories stored in Helix Server
The steps for creating a Git repository to be stored in Helix Server depend on whether the Automatic depot creation feature is turned on or off for the related project. For more information this feature, see Creating a new project.
To connect to your clean repository using Git or the P4 command line client, follow the instructions in TeamHub. If your repository already has data, it is displayed on the page. In this case, continue with cloning the repository. For more information on setting up Git repositories, see Version control with Git.
Without automatic depot creation
You need to provide the name of an existing graph depot and a short name for the new repository. As you provide this information, TeamHub dynamically creates the path to the new repository using the following format: //<graph-depot-name>/<project-short-name>/<repository-short-name>
For example: //test-depot/test/test-repo
You can edit this path to meet your needs, but it is recommended that you use the path provided.
To create a Git repository to be stored in Helix Server:
- On the Repositories tab, click the add button
 .
. - In the New repository form, from the list of repository types, select Git.
- Select a depot from the list of existing graph depots in Helix Server.
- Enter a short name for the repository. This is the repository name displayed in the TeamHub UI.
-
(Optional) If needed, edit the path to the repository within the depot you selected.
NoteModifying the path is not recommended.
- Verify that the full path displayed at the bottom of the form is correct.
- Click Create.
With automatic depot creation
You only need to provide a repo short name for the new repository. The repository is created using the following format: //<project-short-name>/<repository-short-name>
- On the Repositories tab, click the add button .
- In the New repository form, from the list of repository types, select Git.
- Enter a short name for the repository. This is the repository name displayed in the TeamHub UI.
- Click Create.
Cloning a repository
For a repository that includes content, go ahead and clone the repository.
If your instance uses Helix authentication and you want to use p4 commands, see the Helix Core Command-Line (P4) Reference, in particular the graph depot commands.
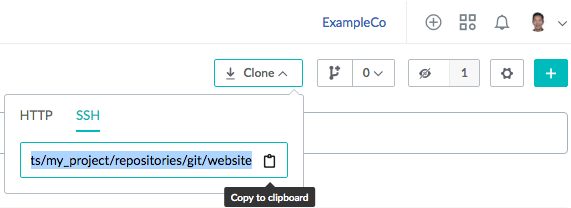
- In the Repositories view, click the Git repository you want to clone.
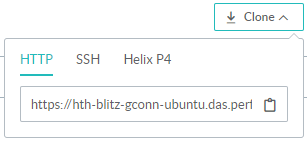
-
Click Clone, select the authentication method (HTTP, SSH, or Helix P4), and copy the path.

-
Do one of the following:
-
If you selected HTTP or SSH, open the command line client and run the following command:
git clone <paste the path you copied>
For example, for user 'hth' to clone the "bar" Git repository from the "foo" project in "acme" company to host 'helixteamhub.cloud' with SSH, issue the following command in the Terminal:
git clone [email protected]:acme/projects/foo/repositories/git/bar
To clone the same repository with HTTP:
git clone http://hth@helixteamhub.cloud/acme/projects/foo/repositories/git/bar
-
If you selected Helix P4, open a p4 command line client and run the following command to create a client of type graph; then edit the client spec to update the view mapping.
p4 -p <paste the port you copied> -u <user> client -T graph <client name>
For example, to create a client workspace of type graph called 'hth-testing' for user 'hth' on host (p4port) 'hth.test.perforce.com:1666', issue the following command in the p4 command line client:
p4 -p hth.test.perforce.com:1666 -u hth client -T graph hth-testing
For more information about creating client workspaces for graph depots, see Grant permissions in Helix Core Server Administrator Guide and Including Graph Depots repos in your client and p4 client (graph) in Helix Core Command-Line (P4) Reference.
-

Migrating existing Git repositories to Helix TeamHub
The following steps are needed in order to migrate existing Git repositories to TeamHub:
-
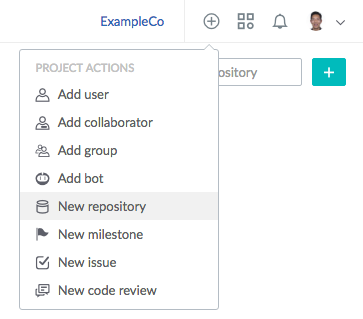
Create a new repository in your TeamHub project. You can accomplish this either through quick actions or from the Repositories view:

-
Clone the repository you wish to migrate:
git clone --bare <OLD-REPOSITORY-URL> -
Go to the repository directory:
cd <YOUR-REPOSITORY-NAME> -
Obtain the clone URL for the repository you created in TeamHub from the repository view:
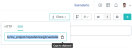
- Disable your repository hooks from the Maintenance tab of the Repository settings page, see Repository hooks .
-
Change the clone URL of the repository you cloned to point to the repository you created in TeamHub with the following command:
git remote set-url origin <HELIX-TEAMHUB-REPOSITORY-URL> -
Push the repository to TeamHub:
git push --mirrorIf you copied the clone URL with SSH as an access method, you need to have your SSH key added to TeamHub in order to push the changes.
- When the data has been migrated, enable your repository hooks from the Maintenance tab of the Repository settings page, see Repository hooks .
Disabling repository hooks is only recommended when you import a repository to TeamHub. When repository hooks are disabled, no events are created for this repository and features that depend on events will no longer work. After importing the repository, enable hooks to allow repository events to be created.
Migrating existing Git repositories into Helix Server via Helix TeamHub
For Git repositories not in Helix Server, you need to perform the following steps to migrate existing Git repositories to Helix Server via TeamHub.
-
Create a new repository in your TeamHub project:
You can accomplish this either through quick actions or from the Repositories view:
For details, see Creating Git repositories stored in Helix Server.
-
Clone the repository you wish to migrate:
git clone --bare <OLD-REPOSITORY-URL> -
Go to the repository directory:
cd <YOUR-REPOSITORY-NAME> -
Obtain the clone URL for the repository you created in TeamHub from the repository view:

-
Change the clone URL of the repository you cloned to point to the repository you created in TeamHub with the following command:
git remote set-url origin <HELIX-TEAMHUB-REPOSITORY-URL> -
Push the repository to TeamHub:
git push --mirror
For existing Git repositories in Helix server, the following steps are needed to migrate existing Git repositories to Helix Server via TeamHub.
Follow steps here: Creating Git repositories stored in Helix Server. Make sure that you select the correct depot and modify the path to point to your existing repository.
Importing an existing graph depot (Git Connector repo) into Helix TeamHub
If you are a current user of Git Connector and you want to start using Git or new users who joined the project want to use Git, you can import existing graph depots into TeamHub. This involves creating a new Git repository in TeamHub and providing the correct path to the graph depot.
Because you are just adding repositories that already exist to your Helix TeamHub project, they can have unusual paths.
With automatic depot creation: when you import an existing repo in a graph depot, create a project with the same name as the graph depot you are importing the repository from. Then select Import Helix Repository when adding the Git repository to the project.
Without automatic depot creation: Helix TeamHub allows you to add existing repositories from any graph depot available for import. You can modify its short name in Helix TeamHub but the existing graph depot path remains unchanged. Use Helix Server to manage permissions for users and the Git Connector (gconn-user) for the repository to be available.
Import an existing graph depot repository
Grant admin permissions to the gconn-user and the import user:
Before you start, make sure that the Git Connector user (gconn-user) and the user importing the repository have admin permissions for the graph depot and its repositories.
- If you encounter a reference to GConn P4 user, this is the gconn-user user.
- For information on setting permissions, see Grant permissions in Helix Core Server Administrator Guide.
-
If the gconn-user is not already in the protections table, add the gconn-user to the protections table with list permission.
As a super user, run the following command on the Helix Server to open the protections table in text form:
p4 protect
Add the following line to the Protections field:
list user gconn-user * //...
Save the spec.
-
As a super user, grant the gconn-user user admin permissions to the graph depot repository you want to import:
p4 grant-permission -d graphDepotName -u gconn-user -p admin
-
As a super user, grant admin permissions to the user importing the graph depot repository:
p4 grant-permission -d graphDepotName -u username -p admin
Import the graph depot repository:
- Create a new repository:
- On the Repositories tab, click the add button .
- In the New repository form, from the list of repository types, select Git.
- Click Import Helix repository at the top of the form.
- Select the repository to add.
- The Short name is the repository name displayed in the TeamHub UI. We recommend that you leave it as it is, but you can change it if you need to.
- Click Create.
- Clone the repository.


