GitSwarm 2016.3-2 Documentation
GitSwarm JIRA integration
Note: Full JIRA integration was previously exclusive to GitSwarm Enterprise Edition. With GitSwarm 2016.1 forward, this feature in now backported to GitSwarm Community Edition as well.
GitSwarm can be configured to interact with JIRA Core either using an on-premises instance or the SaaS solution that Atlassian offers. Configuration happens via username and password on a per-project basis. Connecting to a JIRA server via CAS is not possible.
Each project can be configured to connect to a different JIRA instance or, in case you have a single JIRA instance, you can pre-fill the JIRA service settings page in GitSwarm with a default template. To configure the JIRA template, see the Services Templates documentation.
Once the GitLab project is connected to JIRA, you can reference and close the issues in JIRA directly from GitSwarm's merge requests.
Configuration
The configuration consists of two parts:
Configuring JIRA
First things first, we need to create a user in JIRA which will have access to all projects that need to integrate with GitSwarm.
We have split this stage in steps so it is easier to follow.
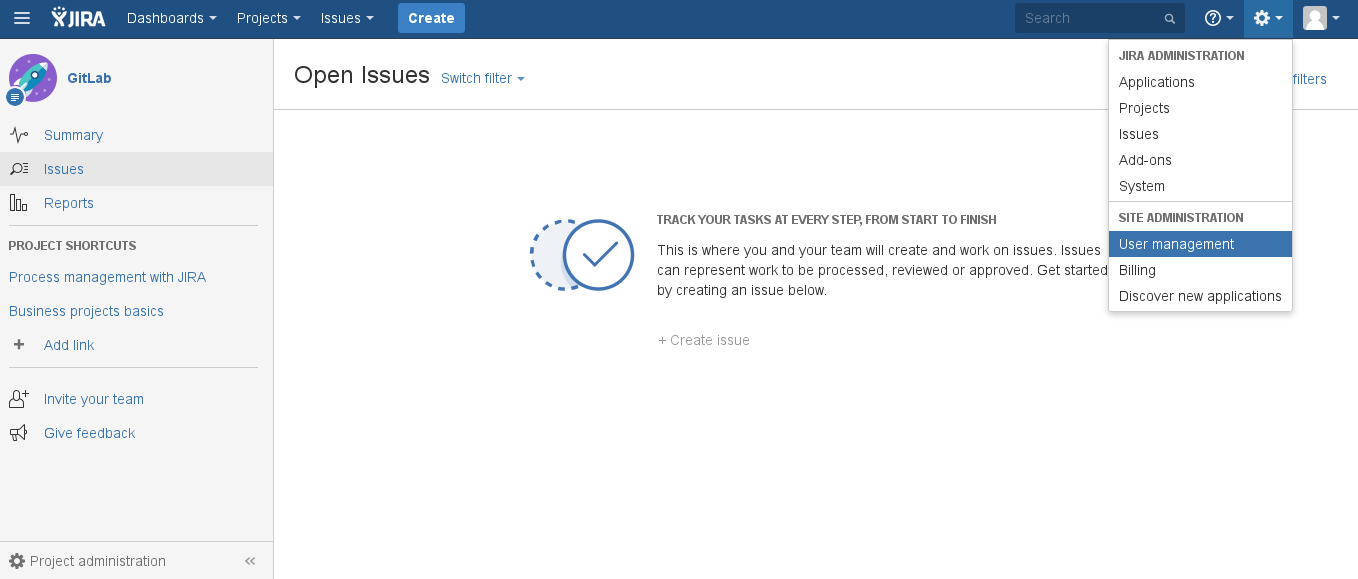
Login to your JIRA instance as an administrator and under Administration go to User Management to create a new user.
The next step is to create a new user (e.g.,
gitswarm) who has write access to projects in JIRA. Enter the user's name and a valid e-mail address since JIRA sends a verification e-mail to set-up the password. Note: JIRA creates the username automatically by using the e-mail prefix. You can change it later if you want.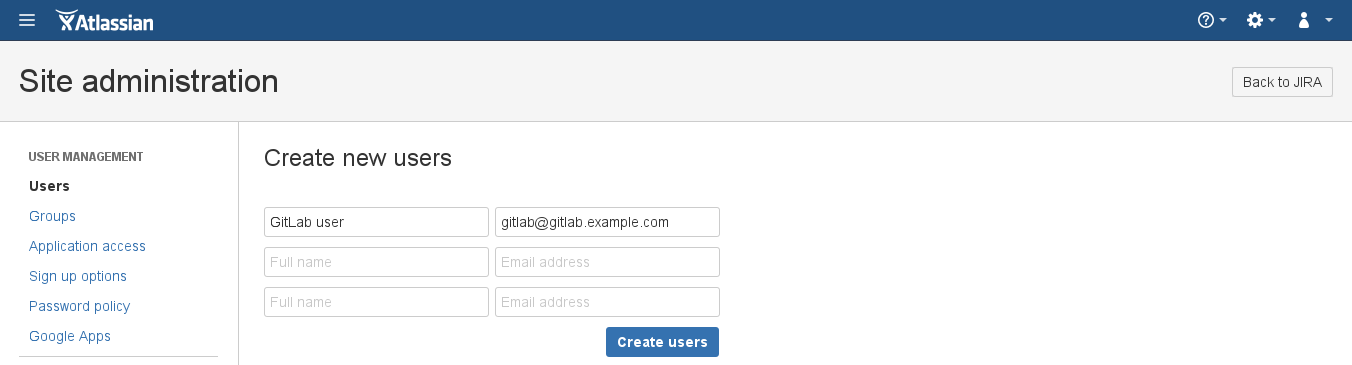
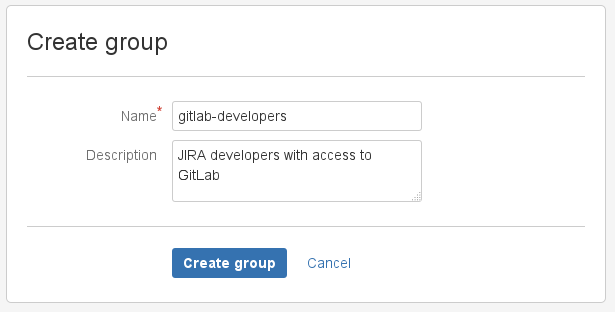
Now, let's create a
gitlab-developersgroup which will have write access to projects in JIRA. Go to the Groups tab and select Create group.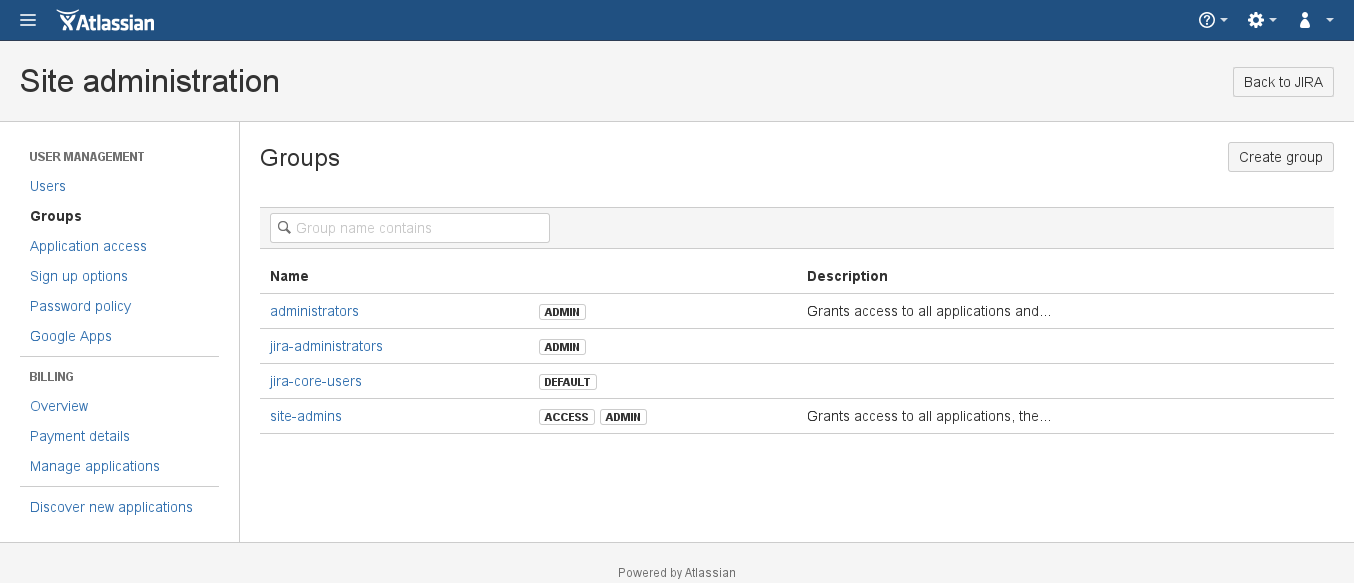
Give it an optional description and hit Create group.
Give the newly-created group write access by going to Application access > View configuration and adding the
gitlab-developersgroup to JIRA Core.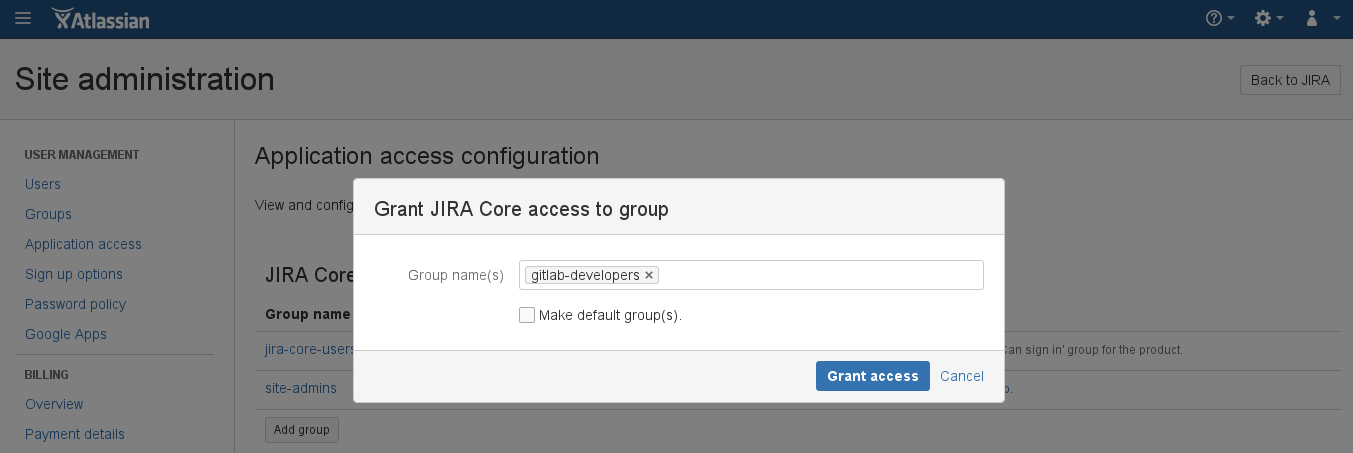
Add the
gitswarmuser to thegitlab-developersgroup by going to Users > GitSwarm user > Add group and selecting thegitlab-developersgroup from the dropdown menu. Notice that the group says Access which is what we aim for.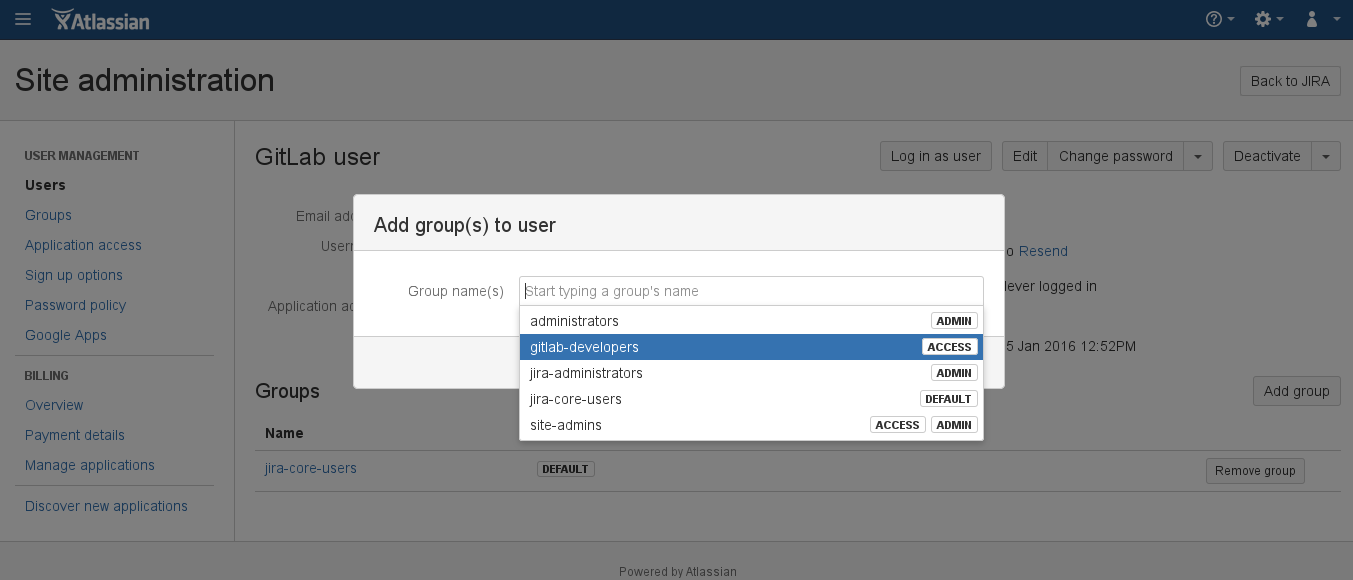
The JIRA configuration is over. Write down the new JIRA username and its password as they will be needed when configuring GitSwarm in the next section.
Configuring GitSwarm
Note: The currently supported JIRA versions are v6.x and v7.x. and GitSwarm 2015.2 or higher is required.
Assuming you have already configured JIRA, now it's time to configure GitSwarm.
JIRA configuration in GitSwarm is done via a project's Services.
To enable JIRA integration in a project, navigate to the project's Settings > Services > JIRA.
Fill in the required details on the page, as described in the table below.
| Setting | Description |
|---|---|
Description |
A name for the issue tracker (to differentiate between instances, for example). |
Project url |
The URL to the JIRA project which is being linked to this GitLab project. It is of the form: https://<jira_host_url>/issues/?jql=project=<jira_project>. |
Issues url |
The URL to the JIRA project issues overview for the project that is linked to this GitLab project. It is of the form: https://<jira_host_url>/browse/:id. Leave :id as-is, it gets replaced by GitSwarm at runtime. |
New issue url |
This is the URL to create a new issue in JIRA for the project linked to this GitLab project, and it is of the form: https://<jira_host_url>/secure/CreateIssue.jspa |
Api url |
The base URL of the JIRA API. It may be omitted, in which case GitSwarm will automatically use API version 2 based on the project url. It is of the form: https://<jira_host_url>/rest/api/2. |
Username |
The username of the user created in configuring JIRA step. |
Password |
The password of the user created in configuring JIRA step. |
JIRA issue transition |
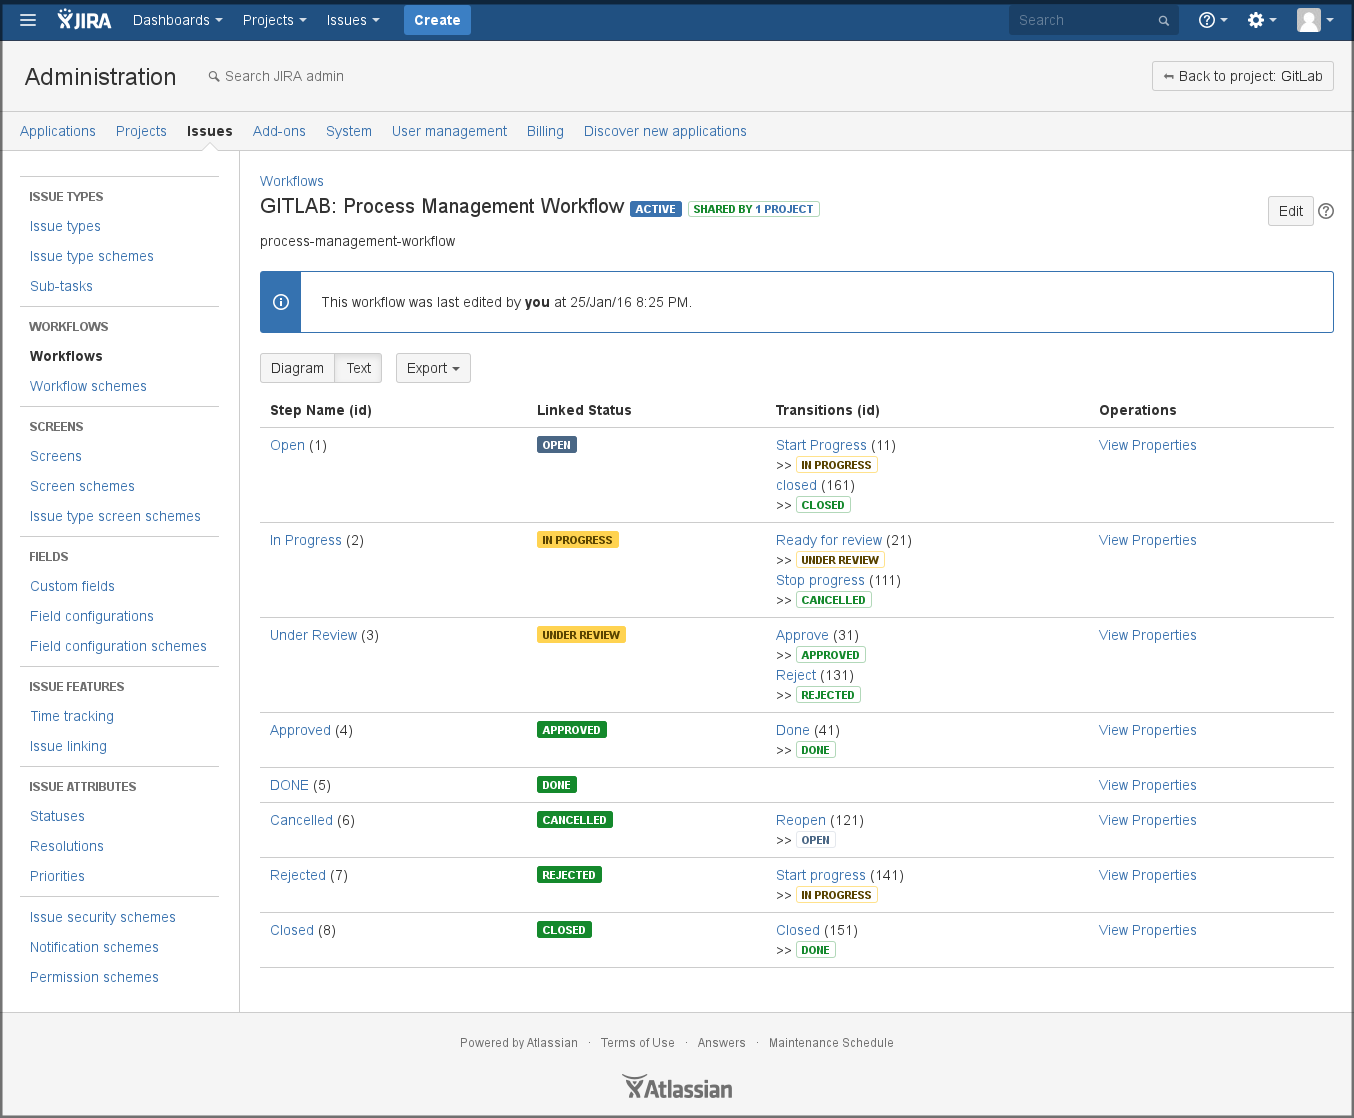
This setting is very important to set up correctly. It is the ID of a transition that moves issues to a closed state. You can find this number under the JIRA workflow administration (Administration > Issues > Workflows) by selecting View under Operations of the desired workflow of your project. The ID of each state can be found inside the parenthesis of each transition name under the Transitions (id) column (see screenshot). By default, this ID is set to 2. |
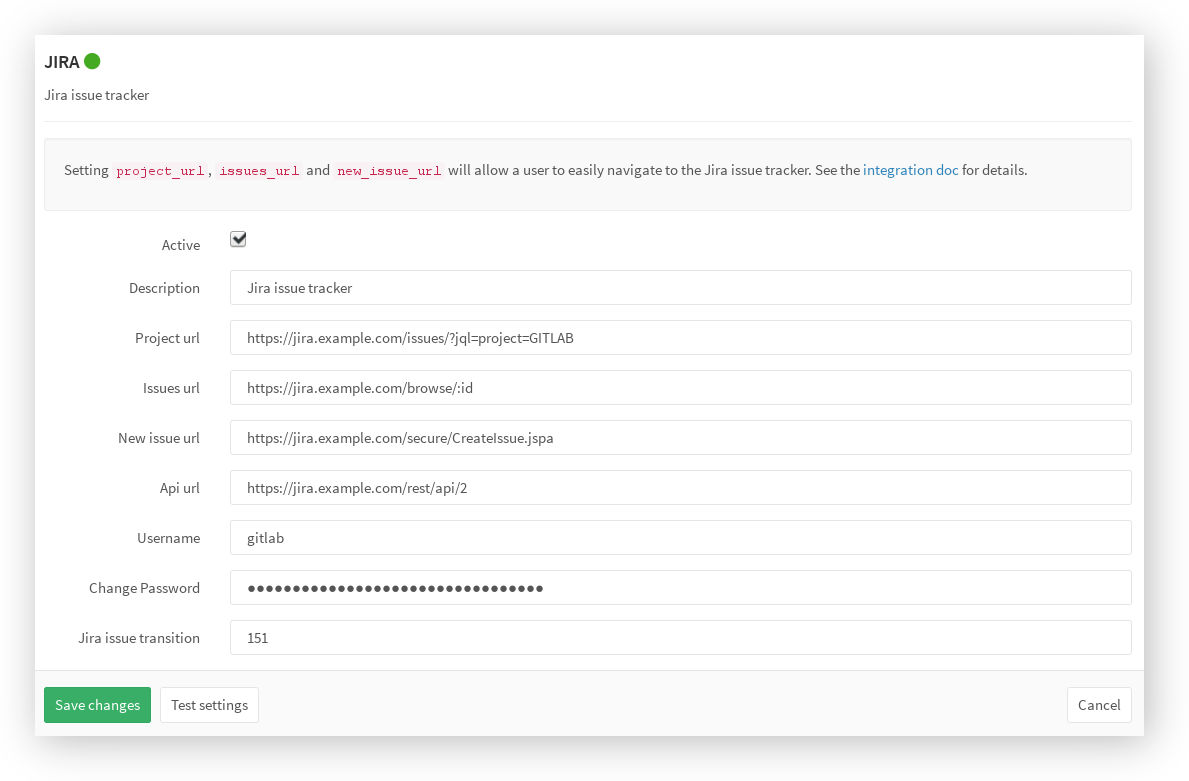
After saving the configuration, your GitLab project will be able to interact with the linked JIRA project.
For example, given the settings below:
- the JIRA URL is
https://jira.example.com - the project is named
GITLAB - the user is named
gitswarm - the JIRA issue transition is 151 (based on the JIRA issue transition)
the following screenshot shows how the JIRA service settings should look like.
JIRA issues
By now you should have configured JIRA and enabled the JIRA service in GitSwarm. If everything is set up correctly you should be able to reference and close JIRA issues by just mentioning their ID in GitSwarm commits and merge requests.
Referencing JIRA Issues
If you reference a JIRA issue, e.g., GITLAB-1, in a commit comment, a link which points back to JIRA is created.
The same works for comments in merge requests as well.
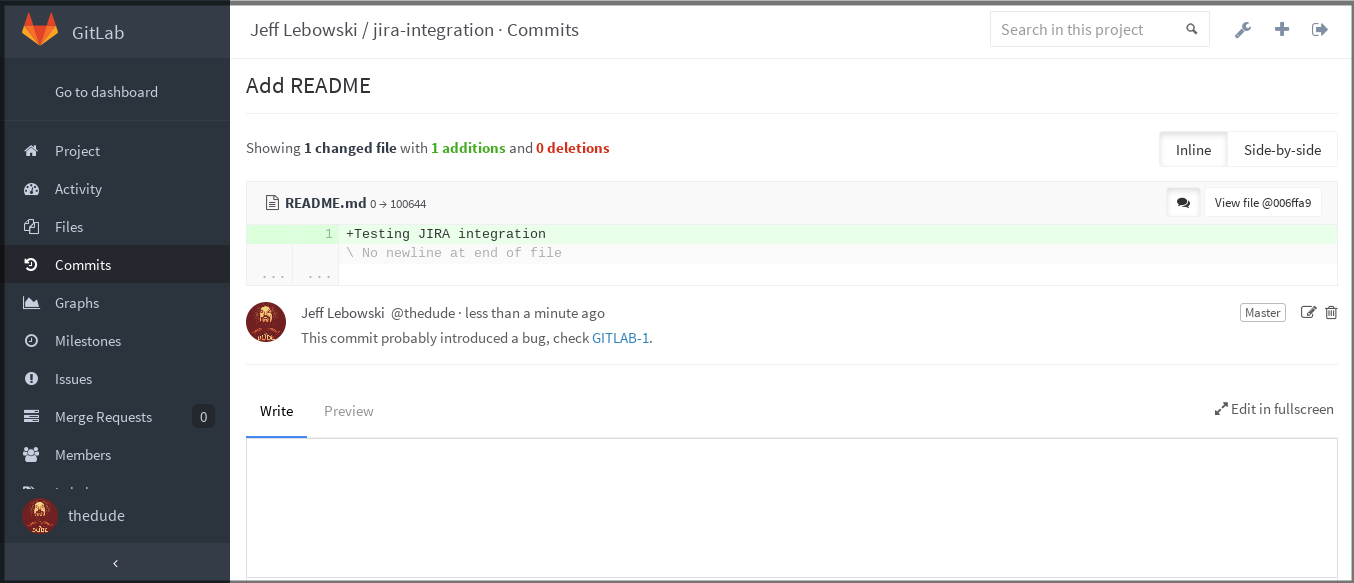
The mentioning action is two-fold, so a comment with a JIRA issue in GitSwarm will automatically add a comment in that particular JIRA issue with the link back to GitSwarm.
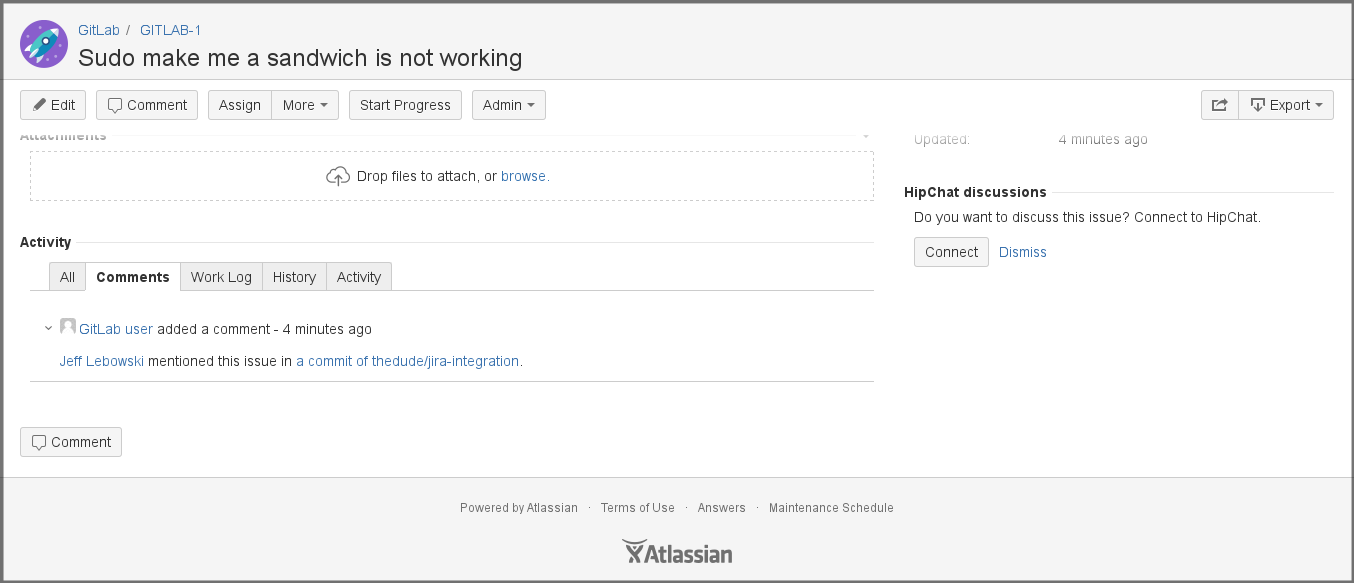
The comment on the JIRA issue is of the form:
USER mentioned this issue in LINK_TO_THE_MENTION
Where:
| Format | Description |
|---|---|
USER |
A user that mentioned the issue. This is the link to the user profile in GitSwarm. |
LINK_TO_THE_MENTION |
Link to the origin of mention with a name of the entity where JIRA issue was mentioned. Can be commit or merge request. |
Closing JIRA issues
JIRA issues can be closed directly from GitSwarm by using trigger words in commits and merge requests. When a commit which contains the trigger word followed by the JIRA issue ID in the commit message is pushed, GitSwarm will add a comment in the mentioned JIRA issue and immediately close it (provided the transition ID was set up correctly).
There are currently three trigger words, and you can use either one to achieve the same goal:
Resolves GITLAB-1Closes GITLAB-1Fixes GITLAB-1
where GITLAB-1 the issue ID of the JIRA project.
JIRA issue closing example
Let's say for example that we submitted a bug fix and created a merge request in GitSwarm. The workflow would be something like this:
- Create a new branch
- Fix the bug
- Commit the changes and push branch to GitSwarm 2015.2. Open a new merge request and reference the JIRA issue including one of the trigger words, e.g.:
Fixes GITLAB-1, in the description - Submit the merge request
- Ask someone to review
- Merge the merge request
- The JIRA issue is automatically closed
In the following screenshot you can see what the link references to the JIRA issue look like.

Once this merge request is merged, the JIRA issue will be automatically closed with a link to the commit that resolved the issue.

You can see from the above image that there are four references to GitSwarm:
- The first is from a comment in a specific commit
- The second is from the JIRA issue reference in the merge request description
- The third is from the actual commit that solved the issue
- And the fourth is from the commit that the merge request created
Troubleshooting
GitSwarm is unable to comment on a ticket
Make sure that the user you set up for GitSwarm to communicate with JIRA has the correct access permission to post comments on a ticket and to also transition the ticket, if you'd like GitSwarm to also take care of closing them.
GitSwarm is unable to close a ticket
Make sure the the Transition ID you set within the JIRA settings matches the one your project needs to close a ticket.