Perforce is an enterprise version management system in which users connect to a shared file repository. Perforce applications are used to transfer files between the file repository and individual users' workstations.
This document assumes that the Perforce versioning service has already been installed, configured and running. To set up and configure Perforce, see the
System Administrator's Guide.
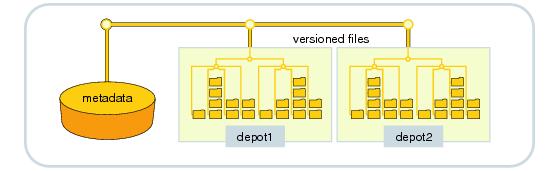
The Perforce versioning service manages shared file repositories, or depots. Depots contain every revision of every file under Perforce control. Perforce organizes files in depots into directory trees, like a large hard drive. Files in a depot are referred to as
depot files or
versioned files. The service maintains a database to track change logs, user permissions, and which users have which files checked out at any time. The information stored in this database is referred to as
metadata.
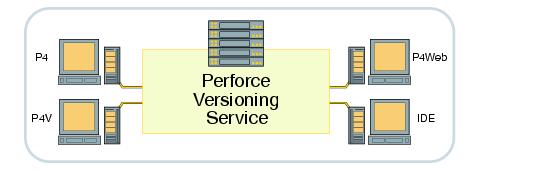
You use Perforce applications to communicate with the versioning service. Perforce applications enable you to check files in and out, manage conflicts, create development branches, track bugs and change requests, and more. Perforce applications include:
|
•
|
Integrations, or plug-ins, that work with commercial IDEs and productivity software
|
With Perforce, you never work directly on files in the depot. Instead, you use Perforce applications to manage a specially-designated area of your workstation called a
client workspace. A workspace contains a local copy of a portion of a depot.
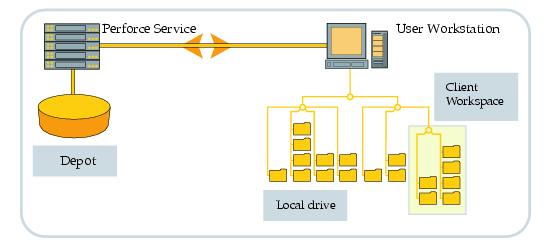
When you retrieve files into your workspace, your Perforce application requests the files from the shared file repository. To keep network traffic to a minimum, the service keeps track of which files you (and other users) have retrieved. Perforce applications do not require a persistent connection to the versioning service.
To use Perforce, you must configure your Perforce application to connect to a Perforce service, specify a location on your local hard drive to hold your workspace, and select a subset of depot files with which you intend to work.
To work with Perforce, you must connect to the shared versioning service. Your Perforce application communicates with the service over TCP/IP, optionally secured with SSL. Perforce applications need to know the protocol, address and port of the Perforce repository with which they communicate.
The address and port are stored in the P4PORT environment variable. Depending on the application you are using, the process of configuring this variable is referred to as "
setting your port", or "
connecting to the service".
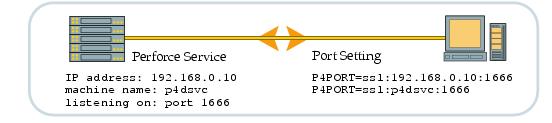
The documentation and online help for your Perforce application contain information on how to set your port. If you don't know the port setting used for connecting to your organization's Perforce installation, ask your Perforce administrator.
Perforce applications manage files in a designated area of your local disk, called your workspace. As the name implies, your workspace is where you do most of your work. You can have more than one client workspace, even on the same workstation. The top level directory of any workspace is called the
workspace root.
To control where the depot files appear under your workspace root, you must map the files and directories on the shared versioning service to corresponding areas of your local hard drive. These mappings constitute your
workspace view.
Client workspace views consist of one or more lines, or mappings. Each line in your workspace view has two sides: a "
depot side" that designates a subset of files within the depot and a "
client side" that controls where the files specified on the depot side are located under your workspace root.
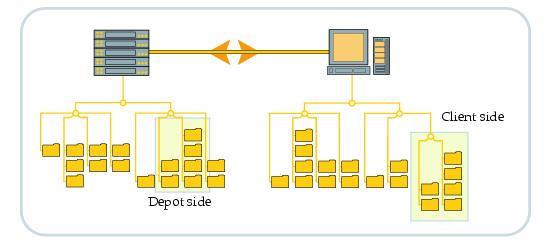
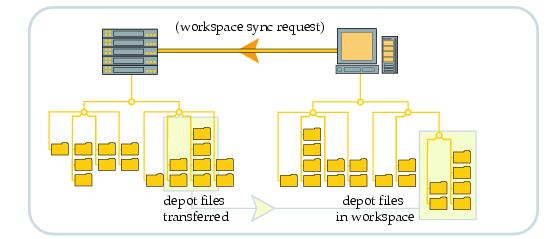
Creating a workspace doesn't transfer any files from the depot to your computer. The workspace and its view merely define the mapping that controls the relationship between the depot and your workspace when files are transferred.
Other options for your workspace enable you to control the default behavior of various operations within Perforce. For instance, you can control carriage return/linefeed translation for cross-platform development, or select a preferred text editor or merge utility for use within Perforce. To learn more about these and other options, see the documentation for your particular Perforce application.
The Perforce versioning service manages the depot, a shared repository that holds every version of every file in the system. Your workspace has a view that maps a subset of the depot's files to an area of your workstation.
To populate your workspace with the depot files, you must retrieve them from the versioning service. In Perforce, updating your workspace with files from the depot is often referred to as
syncing your workspace. Other systems call this "refreshing", "getting the tip revision", or just "getting files".
When you sync your workspace, your Perforce application uses your workspace view to map files in the depot to files in your workspace, compares the result against the contents of your workspace, and then adds, updates, or deletes files in your workspace as needed to bring your workspace into sync with the depot.
Perforce applications manage file permissions in your workspace. By default, files synced to your workspace are read-only, and become writable when you check them out for editing.
Perforce applications also support options that enable you to retrieve earlier revisions of files, or the revisions of files stored as of specified points in time, or sets of revisions that other users have tagged, or
labeled with a user-defined identifying label.
Perforce organizes files in the depot using directory hierarchies, like a large hard drive. Perforce applications use a set of rules that define the relationship between the location of files in the depot and in your workspace. Whether you are setting up the mapping (the workspace view) between the depot and your workspace, loading your workspace with files from the depot, or checking files in or out, these rules for referring to files are common across all operating systems.
When you refer to files in Perforce, you can specify files relative to a client workspace root ("client syntax"), or to the top of the depot tree ("depot syntax"), or by absolute and or relative paths on your local file system ("local syntax").
Files specified in client syntax or depot syntax always begin with two slashes (//), followed by the client workspace or depot name, and the full pathname of the file, relative to the client workspace root or top of the depot tree. Path components in client and depot syntax are always separated by forward slashes (
/), regardless of the component separator used by the local operating system.
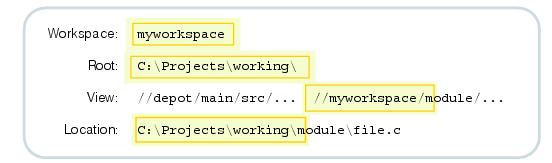
For example, if the workspace is named myworkspace, and the workspace root is
C:\Projects\working, then the mapping specified by the view
maps the depot file //depot/main/src/file.c into the workspace as
C:\Projects\working\module\file.c.
Perforce uses the # character to denote file revisions. File revisions in Perforce are sequentially-increasing integers, beginning from #1 for the first revision, and so on. The most recent revision of a file is the highest-numbered revision of that file on the server, and is called the
head revision. The revision you last synced to your workspace is called the
have revision. The zeroth revision of a file is called the
null revision, and contains no data.
When you work in Perforce, development branches (or codelines) are represented as directory paths. Files in different codelines have their own set of revision numbers, starting at revision #1 and increasing upwards. The ancestry of files in different codelines is preserved in
integration records. To learn more about branching in Perforce, see
Codeline Management.
The indicator file.c#3/4 shows that you currently have revision #3 of
file.c synced to your workspace, and that the most recent revision of
file.c is #4. In contrast to other versioning systems, Perforce does not use perturbed version numbers (such as "revision
1.2.3 of
file.c") to denote revisions of files in different development branches.
The syntax for the head, have, and null revisions (#head,
#have, and
#none) is used in the Command-Line Client and in the status window of graphical applications. See the
P4 User's Guide for details.
|
•
|
native apple files on the Macintosh,
|
By default, when anyone adds a file to the depot, Perforce attempts to automatically determine the type of the file. You can change a file's type by opening it for edit as the new file type. If the file is already open for edit, you can reopen it as the different file type.
The six base file types can have modifiers (such as +w,
+x,
+k, and others) applied that control such things as locking behavior, file permissions within a workspace, or how revisions are stored on the service. The
Command Reference contains a complete list of file types and applicable modifiers.
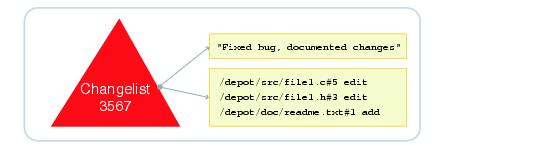
The changelist is the basic unit of work in Perforce. The basic file editing operations common to all versioning systems (such as editing files, adding files, deleting files, backing out changes, and checking in files) are performed in changelists.
After you have set up your workspace view and synced your workspace to the depot, you can begin working in Perforce. Before you can work on a file in your workspace, you must open the file in a changelist. A changelist consists of a list of files, their revision numbers, the changes you have made to the files, and a description that you supply that describes the work you performed.
If you are working on a change to some software that requires changes to three files, open all three files in one changelist. When you check the changelist back into the depot, other users will see your changelist linked to the changes made to all three files.
Perforce changelists are atomic change transactions; if a changelist affects three files, then the changes for all three files are committed to the depot, or none of the changes are. Even if the network connection between your Perforce client program and the Perforce server is interrupted during changelist submission, the entire submit fails.
A changelist with changes not yet submitted to the depot is a pending changelist. A changelist containing changes that have been committed to the depot is a
submitted changelist. Each changelist has a
changelist number (generated by Perforce), and a
changelist description (supplied by the user who performed the changes).
When you open a file in Perforce, the file is opened in a default changelist. The default changelist is assigned a changelist number when you check its files back into the depot. You can partition your work in progress into multiple pending changelists. Pending changelists other than the default changelist are assigned numbers when you create the changelist. (A new number may be assigned to a pending changelist when you submit the changelist to the depot.)
To edit a file, you check out the file in a changelist. Your Perforce application makes the copy of the file in your client workspace writable, and informs the shared service that you have opened the file for editing.
For your changes to be available to other users, you must submit the changelist back to the depot. After your changelist has been submitted, other users can sync their workspaces and obtain their own copies of your changes.
To add a file, you create a file in your workspace and mark the file for add in a changelist. Your Perforce application determines the file's type (you can override this file type), and informs the service that you intend to add a file.
For your new file to be available to other users, you must submit the changelist with the added file back to the depot. After the changelist has been submitted to the depot, other users can sync their workspaces and obtain their own copies of the new file.
To delete a file, you mark the file for delete in a changelist. The file is deleted from your workspace immediately. Your Perforce application informs the versioning service that you intend to delete a file, but the file is not marked as deleted in the depot until you submit the changelist.
After you have submitted the changelist, other users see your file marked as deleted. Local copies of the deleted file remain in other users' workspaces until those users sync their workspaces to the depot.
Deleted file revisions are never actually removed from the depot. You can always recover older revisions of deleted files by syncing revisions that predate the file's deletion into your workspace.
You can discard any changes you made to a file in a changelist by
reverting the file. Reverting a file removes the file from its changelist and restores the copy of the file in your workspace to the revision last synced to your workspace.
If you revert a file opened for edit or marked for delete, whatever version of the file you last synced is restored to your workspace. If you revert a file marked for add, the file is removed from your changelist, but your local copy of the file remains in your workspace.
When you are satisfied with the changes you have made to the files you opened and want your work to be available to others, check your work back in to the depot by
submitting the changelist.

There is no such thing as a partially-submitted changelist. Changelist submission is an atomic transaction; either all of the files in a changelist are submitted successfully, or none are.
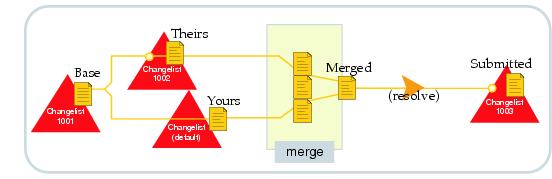
When two users edit the same file at the same time, their changes can conflict. If your changes conflict with earlier changes submitted by another user, Perforce requires that you
resolve the conflicting files and
re-submit the changelist. Because changelists are atomic transactions, until you resolve the conflict, none of the changes to any of the files in your changelist can appear in the depot.
The resolve process enables you to decide what needs to be done: should your file overwrite the other user's? Should your own file be thrown away in favor of the other user's changes? Or should the two conflicting files be merged into one file? At your request, Perforce can perform a three-way merge between the two conflicting text files and the file from which the two conflicting files were derived.
Perforce helps teams to work concurrently. The conflict resolution and three-way merge process enables multiple users to work on the same files at the same time without interfering with each other's work.
The three-way merge process for resolving file conflicts helps you to resolve conflicting changes to text files, but is not necessarily meaningful for
binary files such as graphics or compiled code. If you are working on files where merges are not meaningful, you can lock such files to prevent others from making changes that conflict with your work.
For example, users working within an IDE that does not permit change resolution might also want to lock the files they're working on so they don't have to switch to a Perforce application to submit their work, and users working on graphics or video content might want to automatically classify all
.gif or
.mpg files as exclusive-open.
|
|
|
|
|
|
|
Anyone can check out file and submit their changes.
If a user submits changes to file while you have file open, you must resolve your changes against their changes when you submit your changelist.
|
|
|
|
Anyone can check out file, but no users can submit changes to file until you submit your changes to file, or until you remove the lock on file.
|
|
|
|
Only one user at a time can have file open in a changelist. The status of the lock is irrelevant; no other users can submit changelists involving the file because no other users can check out the file.
|
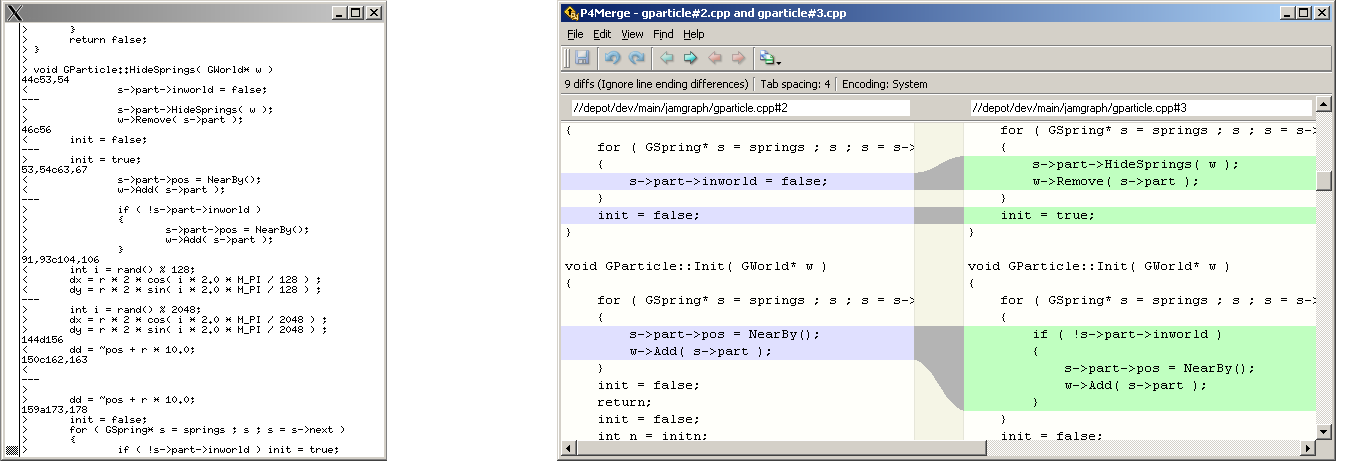
The p4 diff and
p4 diff2 commands produce output similar to that of the standard diff program included in UNIX and Linux systems. Other Perforce client programs (including P4V) include P4Merge, which provides a graphical view of file differences. For example:
The history of a file is represented by a series of file revisions, one per file. Each revision to the file is associated with a changelist. You can compare files against the revision in your workspace or against any of the revisions stored in the depot.
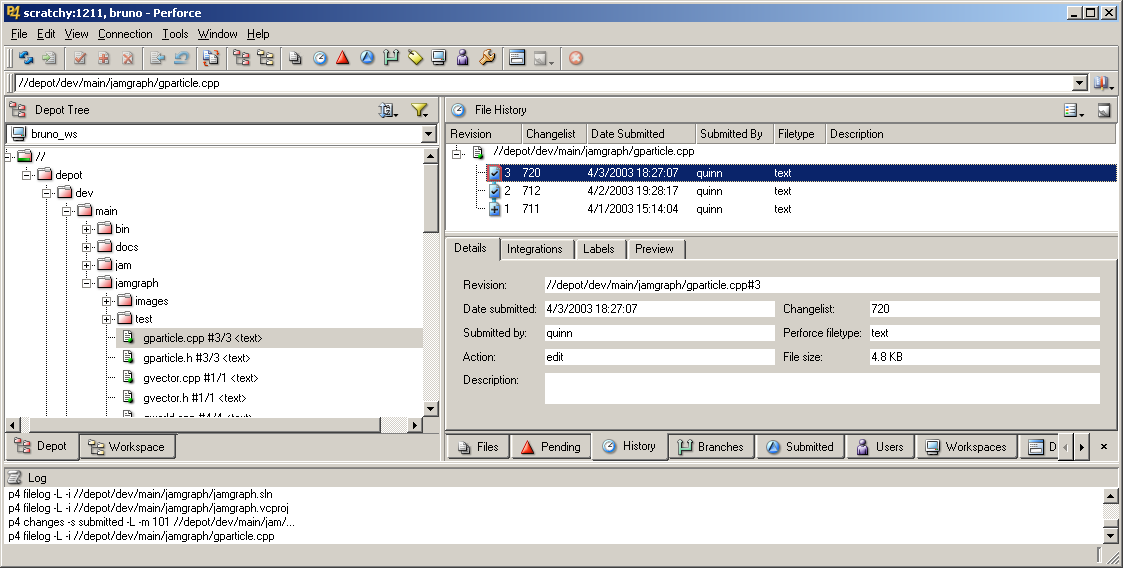
This P4V screenshot shows that the depot holds three revisions of the file //depot/dev/main/jamgraph/gparticle.cpp. The most recent revision, #3, was submitted in changelist 720.
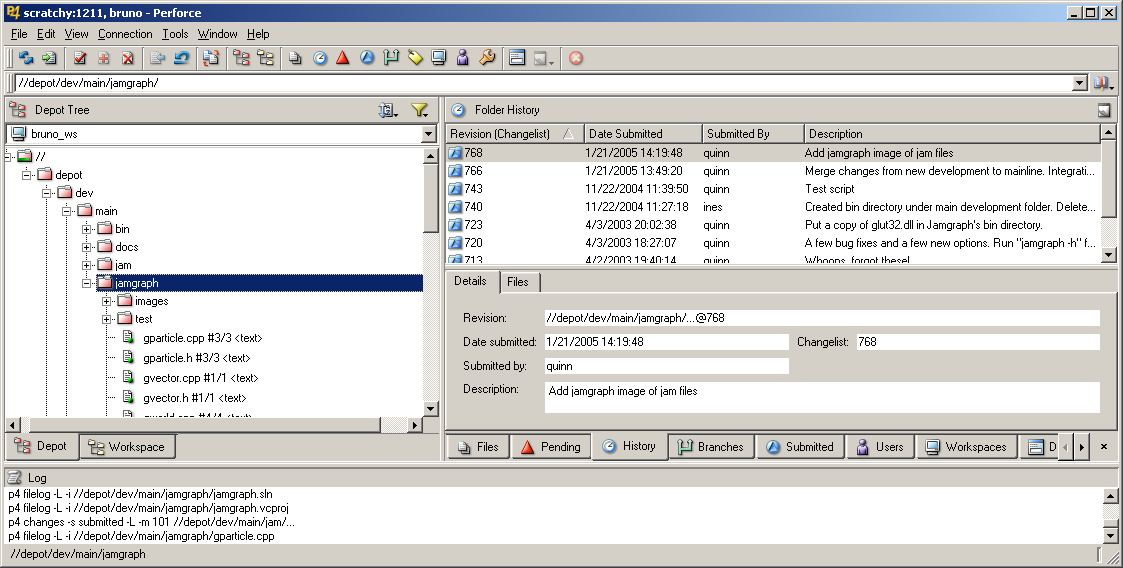
The history of a directory is represented by a series of changelists. Directories do not have individual revision numbers; rather, every changelist that includes at least one file is considered to be part of a directory's history.
Perforce has forms of syntax for referring to a file as it exists in the depot upon submission of a numbered changelist, as tagged by a mnemonic label, or as of certain dates and times. These forms of syntax (
@changelist,
@labelname, or
@date, or
#start,end) are typically used only with the command-line client, but they also appear in the status window of other Perforce applications. See the
P4 User's Guide for more details.
Codelines are sets of related files that evolve together. To structure groups of related files by purpose, such as a new product or release, you create
branches. To propagate changes between branches, you integrate changelists. To create a snapshot of files in a specific state, you can create a
label, or refer to the files collectively by specifying a date or a changelist number.
Branching is a method of managing changes between two or more sets of related files. Perforce's
Inter-File Branching mechanism enables you to copy any set of files to a new location in the depot by allowing changes made to one set of files to be copied, or
integrated, to the other. The new file set (or
codeline) evolves separately from the original files, but changes in either codeline can be propagated to the other by means of
integration.
Most version control systems support some form of branching; Perforce's mechanism is unique because it mimics the style in which users create their own file copies when no branching mechanism is available.
Suppose for a moment that you're writing a program in an environment without version control. You're ready to release your program: what do you do with your code? Chances are that you'd copy all your files to a new location. One of your file sets becomes your release codeline, and bug fixes to the release are made to that file set; your other files are your development file set, and new functionality to the code is added to these files..
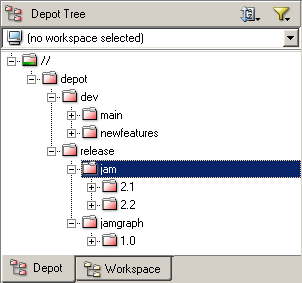
Perforce organizes files in the depot using directory hierarchies, like a large hard drive. When you make a new codeline, it appears in the depot as a subdirectory, such as
//depot/dev/main/jam for ongoing development work,
//depot/release/jam/2.1 for release 2.1, and
//depot/release/jam/2.2 for release 2.2.
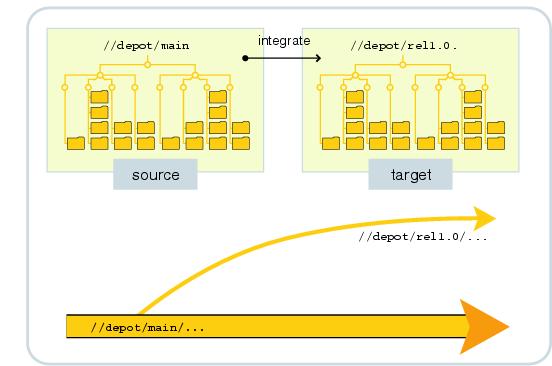
To create a codeline or development branch, decide which files belong in the branch (the source files), and
integrate those files into the new codeline to create the
target files. The Perforce server "opens the target files for
branch/sync" in a changelist.
Opening files for branch/sync is just like opening them for
add,
edit, or
delete; the files are opened in a changelist, and your client workspace view must include the target files. Similarly, no changes are made to the depot until you submit the changelist. The atomic nature of changelists ensures that when you create a codeline, it contains all of the files you branched.
Without a version management system, you might create a branch by copying the files from one directory into another directory. The advantage of integration over copying the files and adding the copies to the depot in a new directory is that when you integrate files from one codeline to another, Perforce can track the connections between related files in an
integration record, facilitating easy tracking and propagation of changes between the two sets of files.
Integration also enables Perforce to perform a "lazy copy" of the files. When you branch files, the versioning service does not actually hold two copies of the files - it holds the source file and a pointer that tracks the relationship between the source and the target file. Lazy copies make branching a low-overhead operation; the versioning service doesn't have to keep track of duplicate copies of files.
You can use integration to propagate changes between related codelines in much the same way you create codelines. (Creating a codeline is equivalent to propagating a set of changes that make up the entirety of the source files into an empty set of target files.)
When you create a codeline, the target files are by definition empty; there is no possibility your changes can conflict. When you propagate changes between existing codelines, conflicts can arise because conflicting changes may have been made in both the source and the target codelines.
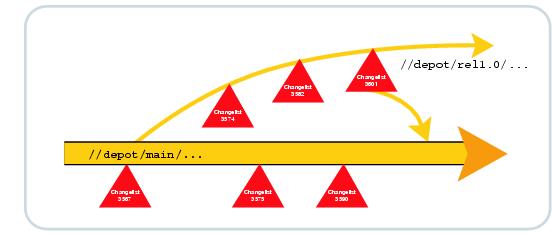
In the example shown, the rel1.0 codeline was created by branching source files from
//depot/main into a target of
//depot/rel1.0 in changelist 3567. Changelists 3574, 3582 and 3601 represent work performed in the release branch, and changelists 3575 and 3590 represent work performed in the main line.
In order to propagate work done in the release branch back into the main line, you integrate from source files in
//depot/rel1.0 into
//depot/main, resolving any conflicting changes between work done in the release branch and work done in the main line.
The revisions in the target files in your client workspace are referred to as yours. The revisions of the source files in the depot are referred to as
theirs. Where changes between these files do not conflict, the changes can be merged automatically. Where changes conflict, you must choose which changes are to be accepted into the file.
|
•
|
Manual merge: Finally, there may be cases where the same lines in "theirs" and "yours" have been changed. Such lines are said to conflict. When changes conflict, Perforce resolves as many differences as possible and produces a merged file containing conflict markers for manual resolution. You must either edit the merged file manually before submitting it, or accept the merged file with the conflict markers included, and fix the conflict in a subsequent changelist.
|
Perforce provides two mechanisms for branching: integrating using a file specification, and
integrating using a branch mapping.
For simple branch structures, you can manually specify the paths of the source and target files, and integrate your source files to the target branch using file specifications. You must manually specify the source and target codelines every time you branch with a file specification.
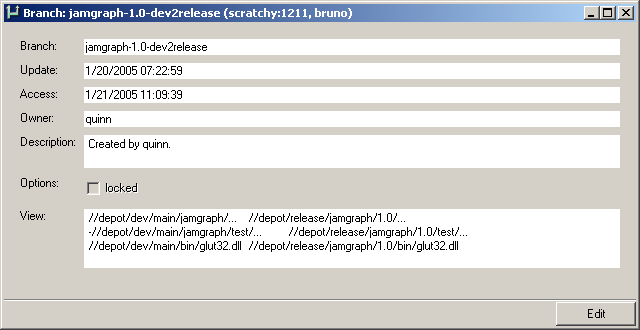
For more complex branch structures, you can set up branch mappings that enable you to reliably duplicate even the most complex branch structures. A branch mapping holds a set of mapping rules (a
branch view) that controls how files in the source branch are integrated in the target branch. After you have set up a branch mapping, you can perform the integration by using the branch mapping to perform all of the integrations specified in the branch view.
For example, the branch mapping in the screenshot shows three mappings:.
The example screenshot shows a simple revision graph. The changes to the file represented by revision #1 through revision #3 were integrated from the main codeline (
//depot/dev/main/...) into a release branch (
//depot/release/jamgraph/1.0/...) and into a development branch (
//depot/dev/newfeatures...).
Perforce streams are structured containers for the files that compose projects, codelines, and components. Applications like the Perforce Command-Line Client and P4V, the Perforce Visual Client, provide extensive support for streams. For detailed information about working with streams, refer to the
Perforce Command Reference, p4 command line help, and P4V online help.
|
•
|
You can't name a branch: Branches are collections of paths. You can name a branch specification, true, but a branch specification lacks parentage and stability. It's hard to create branch views, easy to define streams.
|
|
•
|
You can't define a good branching structure without external tools: Perforce, out of the box, permits you to do anything you want. Small installations can get away with a lot, but enterprise- level customers want and need disciplines and best practices that match their business and technical processes. Streams ensure hierarchical branching and minimize pathological relationships between branches.
|
|
•
|
Change is propagated inefficiently: Using well-defined streams, customers can branch only the files that are going to change and can ensure that a meaningful integration history is created.
|
|
•
|
Change is propagated incorrectly: By default, you can integrate files without restriction. Streams ensure that change flows along a predefined hierarchy and that merging and resolving happen appropriately.
|
Streams don't guarantee efficiency and certitude, but a well-formed hierarchy controls what gets branched and can ensure that change flows correctly.
For details about command syntax and flags, refer to the Perforce Command Reference or use the
p4 help commandname command. For a brief overview, use the
p4 help streamintro command. The following sections describe streams-related tasks in detail.
Next, for each stream in the branching hierarchy that you want to create, you define a stream specification that specifies the stream name, the parent stream and the stream type. By default, a stream inherits its file structure and contents from its parent. To meet more advanced requirements, you can specify mappings that redefine the file paths that a stream contains by defining path mappings. The following sections explain stream types and views.
|
•
|
mainline: A stream with no parent. Expects merging down from more stable streams. Expects copying up from less stable streams. Used as the stable trunk of a stream system.
|
|
•
|
release: A stream that is more stable than its parent. Expects merging down from more stable child streams. Does not expect copying up from its parent stream. Useful for ongoing stabilization, bug fixing and release maintenance.
|
|
•
|
development: A stream that is less stable than its parent. Expects merging down from its parent stream. Expects copying up from its less stable child streams. Does not expect to have more stable child streams. Useful for long-term projects, major new features.
|
|
•
|
task: works like a development stream; used for lightweight short-term branches. Appears as a sparse branch. When in use, only the workspace associated with the task stream can see all the files in the stream; other workspaces see only those files and revisions that you changed within the task stream and copied to its parent.
|
|
•
|
virtual: useful for filtering a view of a parent stream.
|
To update a stream from a more stable parent or child stream, you merge. After the less stable stream is up to date, you
copy its changes to the more stable stream. In a nutshell: merge down, copy up.
To configure the files that a stream contains, you define the stream view. The view is composed of a set of paths to which you assign types that control their characteristics, as follows:
|
•
|
share: (default) Files in shared paths are syncable, submittable, and integratable. Shared paths are used for files whose changes will flow to and from other streams.
|
|
•
|
isolate: Files can be edited but the resulting changes cannot be integrated to other streams. Isolated paths are useful for storing nightly builds and other generated files.
|
|
•
|
import: Files are sourced from a specified location, but cannot be edited or integrated. Use imported paths for components such as third-party libraries that must be present in the stream but are not worked on. An imported path inherits its view from the parent stream unless its depot location is defined explicitly.
|
|
•
|
exclude: Prevents files in the parent stream from becoming part of the child stream. Files in excluded paths can't be synced, submitted, or integrated.
|
When you specify the paths, omit the leading depot and stream name from the target path on the right side of the view (unless you are remapping an imported path). For example:
Example: A build stream might have mappings like this:
share ...import relbin/... //Ace/REL2.1/bin/... import qt4/... //import/Qt4.0/... import jam/... //depot/main/jam/src/...
|
Typically you define and populate the mainline first, then create development streams below the mainline. You keep development streams up to date by merging from the mainline. When the development work is stable, you copy it to main. When it's time to prepare for a release, you can create a release stream in which you stabilize the release, then create a development stream as a child of the release stream where bugs can be fixed.
Although Perforce's branching mechanism is relatively simple, the theory of branching can be very complex. When should a branch be created? At what point should code changes be propagated from one codeline to another? Who is responsible for performing merges? These questions are common to every versioning system, and the answers are not simple.
Perforce includes a basic defect tracking system called jobs. A Perforce job is a description of work to be done, such as a bug fix or a change request. Perforce's job tracking mechanism enables you to link one or more jobs to the changelists that implement the work specified in the jobs. Associating jobs with changelists helps teams know if and when work was completed, who performed the work, and what file revisions were affected by the work. Jobs linked to changelists are marked as closed when the changelist is submitted.
The types of information tracked by the jobs system can be customized; Perforce administrators can add, change, or delete fields used by Perforce jobs. See the
System Administrator's Guide for details.
It is easy to integrate Perforce with third-party defect tracking and workflow systems. P4DTG, the Perforce Defect Tracking Gateway, is an integrated platform that includes both a graphical configuration editor and a replication engine. For more information, see:
Perforce labels are sets of tagged file revisions that enable you to reproduce specific groups of files within workspaces. Labels differ from changelists in that a changelist number represents the state of all files in the depot at the time the changelist was submitted. Labels can be used to tag arbitrary groups of files, even when those file revisions represent work that was submitted in more than one changelist.
Another difference between changelists and labels is that changelists are referred to by Perforce-assigned numbers, while labels take names chosen by users. For example, you might want to tag the file revisions that compose a particular release with the label
rel2.1. At a later time, you can update the revisions tagged with
rel2.1 to reflect fixes performed in subsequent changelists, and retrieve all the tagged revisions into a workspace by syncing the workspace to the label.
Perforce applications have options that enable you to specify a preferred text editor or merge tool. For example, the Command-Line Client uses the environment variables
P4EDITOR and
P4MERGE to invoke a preferred editor or merge tool.
Perforce provides a protection scheme to prevent unauthorized or inadvertent access to the depot. The protections determine which Perforce commands can be run, on which files, by whom, and from which workstations. Perforce administrators can set protections by using the
p4 protect command in the Perforce Command-Line Client, or by using P4Admin, the Perforce Administration Tool.
The shared versioning service is licensed according to how many users it supports. This licensing information resides in a file called
license in the server root directory. The
license file is a plain text file supplied by Perforce Software. Without the
license file, the Perforce Versioning Service limits itself to either 20 users and 20 client workspaces (and unlimited files), or to an unlimited number of users and workspaces (but with a limit of 1000 files).
For further information, see the System Administrator's Guide, or contact technical support.
|
•
|
Type p4 help from the command line for help with the Command-Line Client
|
The perforce-user mailing list is mirrored on the Perforce Forums:
Copyright 2005-2014 Perforce Software.