Add a project
-
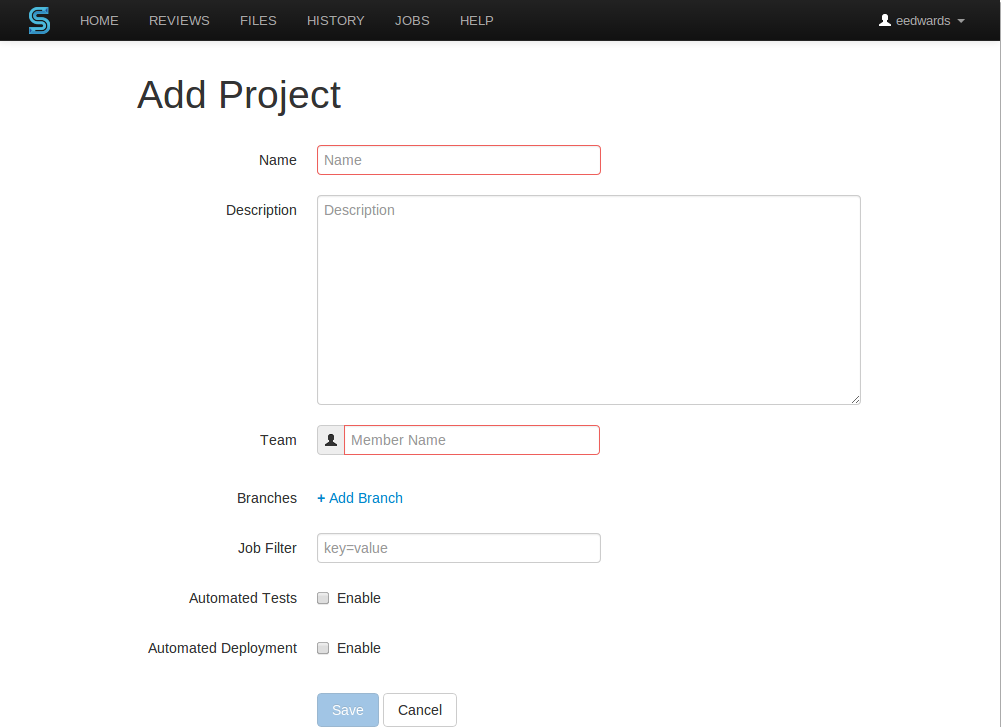
 On the Swarm home page, click the icon at the
top-right of the projects sidebar. The Add Project
page appears:
On the Swarm home page, click the icon at the
top-right of the projects sidebar. The Add Project
page appears:
-
Provide a name for the project.
-
Optionally provide a description.
-
Specify at least one team member. This field auto-suggests users within the Perforce service as you type.
-
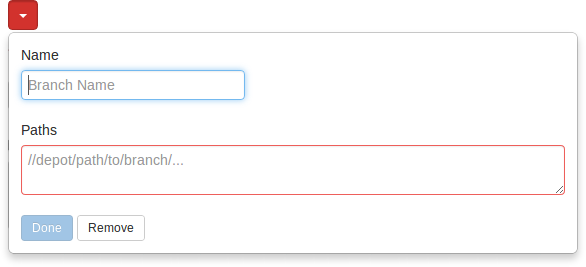
 Optionally click the link to display
the branch drop-down dialog:
Optionally click the link to display
the branch drop-down dialog:
-
Enter a short Name for the branch.
-
Enter one or more branch paths, one per line.
Tip
Each branch path can use wildcards and depot syntax.
For more information, see Command Reference: File Specifications.
-
 Click the button to accept your branch
specification.
Click the button to accept your branch
specification.
-
-
Optionally specify a job filter. The job filter allows you to specify criteria that are used to associate jobs with projects. For example, entering
Subsystem=ProjectAassociates jobs whose subsystem field is set toProjectAwith the current project.Note
This job filter is simpler than the filters available in other Perforce clients. The filter must be expressed as
>field=value -
 Optionally click the checkbox beside
Automated Tests to display the automated tests
configuration fields.
Optionally click the checkbox beside
Automated Tests to display the automated tests
configuration fields.
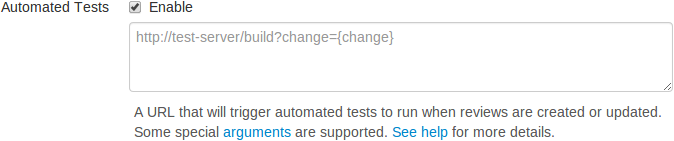 Specify a URL that triggers a test execution. Use the special arguments
described in the dialog to help compose a URL that informs your test
suite with important details. For more details, see
“How can I integrate my test suite to inform review acceptance or rejection?”.
Specify a URL that triggers a test execution. Use the special arguments
described in the dialog to help compose a URL that informs your test
suite with important details. For more details, see
“How can I integrate my test suite to inform review acceptance or rejection?”.
-
 Optionally click the checkbox beside
Automated Deployment to display the automated
deployment configuration fields:
Optionally click the checkbox beside
Automated Deployment to display the automated
deployment configuration fields:
 Specify a URL that triggers a deployment of the project's code. Use the
special arguments described in the dialog to help compose a URL that
informs your deployment program with important details. For more
details, see “How can I automatically deploy code within a review?”.
Specify a URL that triggers a deployment of the project's code. Use the
special arguments described in the dialog to help compose a URL that
informs your deployment program with important details. For more
details, see “How can I automatically deploy code within a review?”.
-
 Click .
Note
The button is disabled if any required fields are empty.