Understanding Remotes
A remote describes how depot files are mapped between a personal server and a
shared server. A remote spec — which describes a remote — is created by the
user and has a unique name. A remote is used with the p4 push, p4 fetch,
and p4 clone commands to describe source and target directories. The
following picture illustrates mapping depot files between a personal and a
shared server:
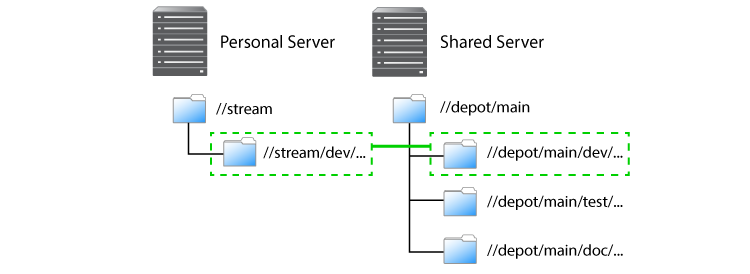
As depicted in the figure above, a remote holds file mappings between depot paths on the shared server and depot paths on the personal server.
- For fetch and clone operations, it defines the files from the remote server that you want in your personal server and specifies where you want them to reside.
- For a push operation, it defines the files from the personal server that you want in the shared server and specifies where you want them to reside.
Remotes provide a convenient way to give you the exact files you need to work on
a particular project. You can simply clone from a shared server, specifying the
remote id of the remote that maps the desired files. These files are then copied
to your personal server. Once they’ve cloned, you can use p4 fetch to
refresh the files initially obtained with the p4 clone command. Over time,
you can edit remote specs to account for the addition of new streams or the
removal or old streams.
Using remotes allows you to fetch a subset of all the files on the shared server. This is in contrast to other distributed versioning systems, such as Git, which require that you fetch all files.
Note that when you clone a set of files from a shared server by specifying a
remote, Helix creates a new remote named origin and copies the remote into
your local system. Future invocations of p4 fetch do not need to pass in
-r remote, as origin is now assumed to be the remote.
There are two different scenarios in which remotes are created:
- An administrator creates a remote on a shared server so that users can clone from this server and obtain the files they need to work on a project.
- You, the individual user, create one or more remotes on your personal server so that you can eventually push your work to and fetch files from one or more shared servers.
You can create a remote both on a shared server and on a personal server. An
administrator would create a remote on a shared server to dictate which subset
of the shared server’s repository a personal server retrieves when it clones
from the shared server. After cloning, you use the origin remote on your
personal server. You can then either edit the origin remote or create a
different remote to control which streams the personal server fetches and pushes
when using that remote.
Choose a remote
How you choose a remote depends on whether you’re doing your initial clone or your daily fetching and pushing.
If you’re cloning, run the p4 remotes command on the shared server from
which you’re cloning and choose the remote you want to work with. To look at the
details of each remote, run p4 remote -o. Alternatively, you can obtain the
id of the remote from a shared server administrator or project leader.
If you want the content of just one depot path, pass the filespec of the path by
running p4 clone -f.
In a typical use case, you’ve cloned from a shared server and the remote has
been copied to your personal server and named origin. Because origin is the
default remote, you don’t have to pass a remote id during subsequent fetches and
pushes.
In the more complicated case, you’re pushing to or fetching from multiple shared
servers, in which case you would run p4 remotes on your personal server and
choose from among the remotes based on which shared server you’re fetching from
or pushing to. Again, you can use p4 remote -o to get the details of each
remote.