Commit-edge Architecture
Introduction
Commit-edge architecture is a specific replication configuration. It is a good solution for geographically distributed work groups, and it offers significant performance advantages. At a minimum it is made up of the following kinds of servers:
-
A commit server that stores the canonical archives and permanent metadata. In working terms, it is similar to a Perforce master server, but might not contain all workspace information.
-
An edge server that contains a replicated copy of the commit server data and a unique, local copy of some workspace and work-in-progress information. It can process read-only operations and operations like p4 edit that only write to the local data. In working terms, it is similar to a forwarding replica, but contains local workspace data and can handle more operations with no reliance on the commit server. You can connect multiple edge servers to a commit server.
Since an edge server can handle most routine operations locally, the edge-commit architecture offloads a significant amount of processing work from the commit server and reduces data transmission between commit and edge servers. This greatly improves performance.
From a user's perspective, most typical operations until the point of submit are handled by an edge server. As with a forwarding replica, read operations, such as obtaining a list of files or viewing file history, are local. In addition, with an edge server, syncing, checking out, merging, resolving, and reverting files are also local operations.
Note
You may not issue the p4 unsubmit and p4 resubmit commands to an edge server. You may only issue these commands to a commit server.
Commit-edge architecture builds upon Perforce replication technology. You should read “Perforce Replication” before attempting to deploy a commit-edge configuration.
An edge server can be used instead of a build farm server, and this usage is referred to as a build edge server. If the only users of an edge server are build processes, then your backup (disaster recovery) strategy may be simplified as you do not need to backup the local edge server-specific workspace and related information. See Migrating from existing installations.
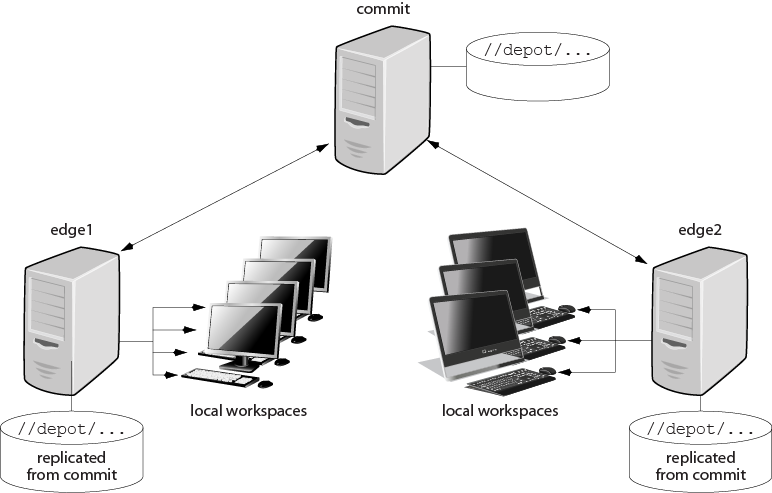
The next figure illustrates one possible commit-edge configuration: a commit server, communicating with two edge-servers, each of which handles multiple workspaces.
Setting up a commit/edge configuration
This section explains how you set up a commit/edge configuration. It assumes that you have an existing server that you want to convert to a commit server and that you are familiar with Perforce server management and operation. For the sake of this example, we'll assume that the existing server is in Chicago, and that we need to set up an edge server at a remote site in Tokyo.
-
Commit server
P4PORT=chicago.perforce.com:1666
P4ROOT=/chicago/p4root
-
Edge server
P4PORT=tokyo.perforce.com:1666
P4ROOT=/tokyo/p4root
The setup process, which is described in detail in the following sections includes the following major steps:
-
On the commit server: Create a service user account for each edge server you plan to create.
-
On the commit server: Create commit and edge server configurations.
-
Create and start the edge server.
You must have super privileges to perform these steps.
Create a service user account for the edge server
To support secure communication between the commit server and the edge server, a user account of type service must be created. In the example below, we use a unique service user name for the tokyo edge server, but one could also use a generic service user name and use it for multiple edge servers.
-
Create the service user account.
$ p4 user -f svc_tokyo_edgeIn the user spec, set the user
Type:field toservice. -
Add the service user to a group with an unlimited timeout. This prevents the service user login from the edge server from timing out.
$ p4 group no_timeoutIn the
groupspec, set theUsers:field tosvc_tokyo_edgeand theTimeout:field tounlimited. -
Assign a password to the service user by providing a value at the prompt.
$ p4 passwd svc_tokyo_edge -
Assign the
svc_tokyo_edgeservice usersuperprotections in the protect spec.$ p4 protect super user svc_tokyo_edge * //...
Create commit and edge server configurations
The following steps are needed to configure the commit and edge servers.
Note
It is best to set the P4NAME and ServerID to the same
value: this makes it easy to isolate configuration variables on each
server in a distributed environment.
-
Create the commit server specification:
$ p4 server chicago_commitIn the server spec, set the
Services:field tocommit-serverand theName:field tochicago_commit. -
Create the edge server specification:
$ p4 server tokyo_edgeIn the server spec, set the
Services:field toedge-serverand theName:field totokyo_edge. -
Set the server ID of the commit server:
$ p4 serverid chicago_commit -
This step, which sets the
journalPrefixvalue on the commit and edge server to control the name and location of server checkpoints and rotated journals, is not required, but it is a best practice. During the replication process, the edge server might need to locate the rotated journal on the commit server; havingjournalPrefixdefined on the commit server allows the edge server to easily identify the name and location of rotated journals:$ p4 configure set chicago_commit#journalPrefix=/chicago/backup/p4d_backup $ p4 configure set tokyo_edge#journalPrefix=/tokyo/backup/p4d_backup
-
Set
P4TARGETfor the edge server to identify the commit server:$ p4 configure set tokyo_edge#P4TARGET=chicago.perforce.com:1666 -
Set the service user in the edge server configuration:
$ p4 configure set tokyo_edge#serviceUser=svc_tokyo_edge -
Set the location for the edge server's log files:
$ p4 configure set tokyo_edge#P4LOG=/tokyo/logs/tokyo_edge.log -
Set
P4TICKETSlocation for the service user in the edge and commit server configuration:$ p4 configure set chicago_commit#P4TICKETS=/chicago/p4root/.p4tickets $ p4 configure set tokyo_edge#P4TICKETS=/tokyo/p4root/.p4tickets
-
Configure the edge server database and archive nodes:
$ p4 configure set tokyo_edge#db.replication=readonly
$ p4 configure set tokyo_edge#lbr.replication=readonly
-
Define startup commands for the edge server to periodically pull metadata and archive data.
$ p4 configure set tokyo_edge#startup.1="pull -i 1"    \\get metadata every second
$ p4 configure set tokyo_edge#startup.2="pull -u -i 1" \\get versioned data every second
$ p4 configure set tokyo_edge#startup.3="pull -u -i 1" \\get versioned data every second
Create and start the edge server
Now that the commit server configuration is complete, we can seed the edge server from a commit server checkpoint and complete a few more steps to create it.
-
Take a checkpoint of the commit server, but filter out the database content not needed by an edge server. (The
-zflag creates a zipped checkpoint.)$ p4d -r /chicago/p4root -K "db.have,db.working,db.resolve,db.locks,\ db.revsh,db.workingx,db.resolvex" -z -jd edge.ckp -
Recover the zipped checkpoint into the edge server
P4ROOTdirectory.$ p4d -r /tokyo/p4root -z -jr edge.ckp.gz -
Set the server ID for the newly seeded edge server:
$ p4d -r /tokyo/p4root -xD tokyo_edge -
Create the service user login ticket in the location specified in the edge configuration:
$ p4 -E P4TICKETS=/chicago/p4root/.p4tickets -u svc_tokyo_edge\ -p chicago.perforce.com:1666 login -
Copy the versioned files from the commit server to the edge server. Files and directories can be moved using rsync, tar, ftp, a network copy, or any other method that preserves the files as they were on the original server.
For additional information on copying files, see:
-
Start the edge server using syntax appropriate for your platform.
For example:
$ p4d -r /tokyo/p4root -dConsult the following sources for detailed instructions for UNIX and Windows, which appear in the "Installing and Upgrading the Server" chapter of the Helix Versioning Engine Administrator Guide: Fundamentals.
-
Check the status of replication by running the following command against the edge server.
$ p4 pull -lj -
Create the service user login ticket from the commit to the edge server. On the commit server:
$ p4 -E P4TICKETS=/chicago/p4root/.p4tickets -u svc_tokyo_edge\
        -p tokyo.perforce.com:1666 login
Setting global client views
The server.global.client.views configurable determines
whether the view maps of a non-stream client on an edge server or
workspace server are made global when the client is modified. This
configurable can be set globally or individually for each server, thus
allowing client maps to be global on most edge servers while keeping them
local on those edge servers that don't need or want them to be global.
The value of server.global.client.views on an edge
server determines whether it forwards view maps to a commit server.
You should make client view maps on a replica global if up-to-date information is needed by another server running a command that needs a client view map; for example, if that client is to be used as a template on another server.
-
If
server.global.client.views=1on an edge server, then when a client is modified on that edge server, its view map is made global. -
The default value of
0on the edge server means that client view maps on that edge server are not made global when a client is modified.
Setting this configurable does not immediately make client view maps
global; that happens only when a client is modified afterwards. Clearing
this configurable does not delete the view maps of any clients, but it
does prevent subsequent changes to a client's view map from being
propagated to other servers. If a client with global view maps is deleted,
its view maps are also deleted globally regardless of the value of
server.global.client.views; this is to prevent orphaned
view maps.
In summary, view maps of a client are made global only under these conditions:
-
The client is bound to an edge server or workspace server.
-
The edge server has
server.global.client.views=1. -
The client is a non-stream client.
-
The client is modified.
If you are working with an existing client, you can "modify" it by adding a few words to the description. For example, you can add a statement that this client's view maps are now global.
Note
Clients bound directly to a commit server have their view maps
replicated everywhere independently of the setting of
server.global.client.views.
For complicated reasons, it is best to choose one setting for this configurable, and not change it.
Creating a client from a template
You might want to create a client from a template when you want to create a client that is similar to an existing client (especially the view map). For example, you want to create a client that maps the mainline server code so that you can build it yourself. This might require multiple view map entries, so you want to base your client on one that already has those view maps defined.
Clients created on a commit server can be used as templates by clients created on the commit server or on any edge server.
A client bound to an edge server can be used as a template for clients on that same edge server. To use it as a template on a different edge server or on the commit server, its view map should be global (that is, copied to the commit server).
A client's view map is made global when the client is modified and
server.global.client.views=1 on both the edge server to
which it is bound and on the commit server. You can create a client for an
edge server or commit server based on an existing client template (bound
to a different edge server) using a command like the following:
$ p4 client -t clientBoundToOtherEdge clientBoundToMyEdge
The newly created client will have its View map copied
from the View map of the template client, with the
client name on the right-hand side entries changed from the template
client name (clientBoundToOtherEdge) to the new client
name (clientBoundToMyEdge).
Migrating from existing installations
The following sections explain how you migrate to an edge-commit architecture from an existing replicated architecture.
-
Replacing existing proxies and replicas explains what sort of existing replicates can be profitably replaced with edge servers.
-
Deploying commit and edge servers incrementally describes an incremental approach to migration.
-
Hardware, sizing, and capacity discusses how provisioning needs shift as you migrate to the edge-commit architecture.
-
Migration scenarios provides instructions for different migration scenarios.
Replacing existing proxies and replicas
If you currently use Perforce proxies, evaluate whether these should be replaced with edge servers. If a proxy is delivering acceptable performance then it can be left in place indefinitely. You can use proxies in front of edge servers if necessary. Deploying commit and edge servers is notably more complex than deploying a master server and proxy servers. Consider your environment carefully.
Of the three types of replicas available, forwarding replicas are the best candidates to be replaced with edge servers. An edge server provides a better solution than a forwarding replica for many use cases.
Build replicas can be replaced if necessary. If your build processes need to issue write commands other than p4 sync, an edge server is a good option. But if your build replicas are serving adequately, then you can continue to use them indefinitely.
Read-only replicas, typically used for disaster recovery, can remain in place. You can use read-only replicas as part of a backup plan for edge servers.
Deploying commit and edge servers incrementally
You can deploy commit and edge servers incrementally. For example, an existing master server can be reconfigured to act as a commit server, and serve in hybrid mode. The commit server continues to service all existing users, workspaces, proxies, and replicas with no change in behavior. The only immediate difference is that the commit server can now support edge servers.
Once a commit server is available, you can proceed to configure one or more edge servers. Deploying a single edge server for a pilot team is a good way to become familiar with edge server behavior and configuration.
Additional edge servers can be deployed periodically, giving you time to adjust any affected processes and educate users about any changes to their workflow.
Initially, running a commit server and edge server on the same machine can help achieve a full split of operations, which can make subsequent edge server deployments easier.
Hardware, sizing, and capacity
For an initial deployment of a distributed Perforce service, where the commit server acts in a hybrid mode, the commit server uses your current master server hardware. Over time, you might see the performance load on the commit server drop as you add more edge servers. You can reevaluate commit server hardware sizing after the first year of operation.
An edge server handles a significant amount of work for users connected to that edge server. A sensible strategy is to repurpose an existing forwarding replica and monitor the performance load on that hardware. Repurposing a forwarding replica involves the following:
-
Reconfiguring the forwarding replica as an edge server.
-
Creating new workspaces on the edge server or transferring existing workspaces to the edge server. Existing workspaces can be transferred using p4 unload and p4 reload commands. See Migrating a workspace from a commit server or remote edge server to the local edge server for details.
As you deploy more edge servers, you have the option to deploy fewer edge servers on more powerful hardware, or a to deploy more edge servers, each using less powerful hardware, to service a smaller number of users.
You can also take advantage of replication filtering to reduce the volume of metadata and archive content on an edge server.
Note
An edge server maintains a unique copy of local workspace metadata, which is not shared with other edge servers or with the commit server.
Filtering edge server content can reduce the demands for storage and performance capacity.
As you transition to commit-edge architecture and the commit server is only handling requests from edge servers, you may find that an edge server requires more hardware resources than the commit server.
Migration scenarios
This section provides instructions for several migration scenarios. If
you do not find the material you need in this section, we recommend you
contact Perforce support for assistance
[email protected].
Configuring a master server as a commit server
Scenario: You have a master server. You want to convert your master to a commit server, allowing it to work with edge servers as well as to continue to support clients.
-
Choose a ServerID for your master server, if it doesn't have one already, and use p4 serverid to save it.
-
Define a server spec for your master server or edit the existing one if it already has one, and set
Services:
commit-server
.
Converting a forwarding replica to an edge server
Scenario: You currently have a master server and a forwarding replica. You want to convert your master server to a commit server and convert your forwarding replica to an edge server.
Depending on how your current master server and forwarding replica are set up, you may not have to do all of these steps.
-
Have all the users of the forwarding replica either submit, shelve, or revert all of their current work, and have them delete their current workspaces.
-
Stop your forwarding replica.
-
Choose a ServerID for your master server, if it doesn't have one already, and use p4 serverid to save it.
-
Define a server spec for your master server, or edit the existing one if it already has one, and set
Services:
commit-server
. -
Use p4 server to update the server spec for your forwarding replica, and set
Services:
edge-server
. -
Update the replica server with your central server data by doing one of the following:
-
Use a checkpoint:
-
Take a checkpoint of your central server, filtering out the
db.have,db.working,db.resolve,db.locks,db.revsh,db.workingx,db.resolvextables.$ p4d -K "db.have,db.working,db.resolve,db.locks,db.revsh,db.workingx,db.resolvex"\ -jd my_filtered_checkpoint_fileSee the "Perforce Server Reference" appendix in the Helix Versioning Engine Administrator Guide: Fundamentals, for options that can be used to produce a filtered journal dump file, specifically the
-kand-Koptions. -
Restore that checkpoint onto your replica.
-
Remove the replica's state file.
-
-
Use replication:
-
Start your replica on a separate port (so local users don't try to use it yet).
-
Wait for it to pull the updates from the master.
-
Stop the replica and remove the
db.have,db.working,db.resolve,db.locks,db.revsh,db.workingx,db.resolvextables.
-
-
-
Start the replica; it is now an edge server.
-
Have the users of the old forwarding replica start to use the new edge server:
-
Create their new client workspaces and sync them.
-
You are now up and running with your new edge server.
Converting a build server to an edge server
Scenario: You currently have a master server and a build server. You want to convert your master server to a commit server and convert your build server to an edge server.
Build servers have locally-bound clients already, and it seems very attractive to be able to continue to use those clients after the conversion from a build-server to an edge server. There is one small detail:
-
On a build server, locally-bound clients store their have and view data in
db.have.rpanddb.view.rp. -
On an edge server, locally-bound clients store their have and view data in
db.haveanddb.view.
Therefore the process for converting a build server to an edge server is pretty simple:
-
Define a ServerID and server spec for the master, setting
Services: commit-server. -
Edit the server spec for the build-server and change
Services: build-servertoServices: edge-server. -
Shut down the build-server and do the following:
$ rm db.have db.view db.locks db.working db.resolve db.revsh db.workingx db.resolvex
$ mv db.have.rp db.have
$ mv db.view.rp db.view
-
Start the server; it is now an edge server and all of its locally-bound clients can continue to be used!
Migrating a workspace from a commit server or remote edge server to the local edge server
Scenario: You have a workspace on a commit or remote edge server that you want to move to the local edge server.
-
Have all the workspace owners either submit or revert all of their current work and ensure that all shelved files are deleted.
-
p4 unload -c
workspaceExecute this command against the Perforce service where the workspace is being migrated from. In this case, this would be the commit or remote edge server.
-
p4 reload -c
workspace-pprotocol:host:portExecute this command against the local edge server, where the workspace is being migrated to.
protocol:host:portrefers to the commit or remote edge server the workspace is being migrated from.
Managing distributed installations
Commit-edge architecture raises certain issues that you must be aware of and learn to manage. This section describes these issues.
-
Each edge server maintains a unique set of workspace and work-in-progress data that must be backed up separately from the commit server. See Backup and high availability / disaster recovery (HA/DR) planning for more information.
-
Exclusive locks are global: establishing an exclusive lock requires communication with the commit server, which might incur network latency.
-
Parallel submits from an edge server to a commit server use standard pull threads to transfer the files. The administrator must ensure that pull threads can be run on the commit server by doing the following:
-
Make sure that the service user used by the commit server is logged into the edge server.
-
Make sure the
ExternalAddressfield of the edge server's server spec is set to the address that will be used by the commit server's pull threads to connect to the edge server.If the commit and edge servers communicate on a network separate from the network used by clients to communicate with the edge server, the
ExternalAddressfield must specify the network that is used for connections from the commit server. Furthermore, the edge server must listen on the two (or more) networks.See the p4 help submit command for more information.
-
-
Shelving changes in a distributed environment typically occurs on an edge server. Shelving can occur on a commit server only while using a client workspace bound to the commit server. Normally, changelists shelved on an edge server are not shared between edge servers.
You can promote changelists shelved on an edge server to the commit server, making them available to other edge servers. See Promoting shelved changelists for details.
-
Auto-creation of users is not possible on edge servers.
-
You must use a command like the following to delete a client that is bound to an edge server: It is not sufficient to simply use the
-dand-foptions.$ p4 client -d -f --serverid=thatserver thatclientThis prevents your inadvertently deleting a client from an edge server. Likewise, you must specify the server id and the changelist number when trying to delete a changelist whose client is bound to an edge server.
$ p4 change -d -f --serverid=thatserver 6321
Moving users to an edge server
As you create new edge servers, you assign some users and groups to use that edge server.
-
Users need the
P4PORTsetting for the edge server. -
Users need to create a new workspace on the edge server or to transfer an existing workspace to the new edge server. Transferring existing workspaces can be automated.
If you use authentication triggers or single sign-on, install the relevant triggers on all edge servers and verify the authentication process.
Promoting shelved changelists
Changelists shelved on an edge server, which would normally be inaccessible from other edge servers, can be automatically or explicitly promoted to the commit server. Promoted shelved changelists are available to any edge server.
-
In a shared archive configuration, where the commit server and edge servers have access to the same storage device for the archive content, shelves are automatically promoted to the commit server. For more information, see Automatically promoting shelves.
-
You must explicitly promote a shelf when the commit and edge servers do not share the archive. For more information, see Explicitly promoting shelves.
You can view a shelf's promotion status using the
-ztag output of the p4 describe,
p4 changes, or p4 change -o
commands.
See Working with promoted shelves for more information on the limitations of working on promoted shelves.
Automatically promoting shelves
When the edge server and commit server are configured to access the same archive contents, shelf promotion occurs automatically, and promoting shelved fields with p4 shelve -p is not required.
To configure the edge server and commit server to access the same
archive contents, you should set server.depot.root
to the same path for both the commit and edge server, and you should
set the lbr.replication configurable to
shared for the edge server. For example:
$ p4 configure set commit#server.depot.root=/p4/depot/root
$ p4 configure set edge#server.depot.root=/p4/depot/root
$ p4 configure set edge#lbr.replication=shared
Explicitly promoting shelves
You have two ways of explicitly promoting shelves:
-
Set the
dm.shelve.promoteconfigurable:dm.shelve.promote=1.This makes edge servers always promote shelved files to the commit server, which means that file content is transferred and stored both on the commit server and the edge server. (Generally, it is a bad idea to enable automatic promotion because it causes a lot of unnecessary file transfers for shelved files that are not meant to be shared.)
-
Use the
-poption with the p4 shelve command.See the example below for more information on this option.
For example, given two edge servers, edge1 and
edge2, the process works as follows:
-
Shelve and promote a changelist from
edge1.edge1$ p4 shelve -p -c 89 -
The shelved changelist is now available to
edge2.edge2$ p4 describe -S 89 -
Promotion is only required once.
Subsequent p4 shelve commands automatically update the shelved changelist on the commit server, using server lock protection. For example, make changes on
edge1and refresh the shelved changelist:edge1$ p4 shelve -r -c 89The updates can now be seen on
edge2:edge2$ p4 describe -S 89
Promoting shelves when unloading clients
Use the new -p option for the p4
unload command to promote any non-promoted shelves belonging
to the specified client that is being unloaded. The shelf is promoted
to the commit server where it can be accessed by other edge servers.
Working with promoted shelves
The following limitations apply when working with promoted shelves:
-
Once a shelf is promoted, it stays promoted.
There is no mechanism to unpromote a shelved changelist; instead, delete the shelved files from the changelist.
-
You may unshelve a promoted shelf into open files and branches on a server from where the shelf did not originate.
-
You cannot unshelve a remote promoted shelf into already-open local files.
-
You cannot unload an edge server workspace if you have promoted shelves.
-
You can run p4 submit -e on a promoted shelf only on the server that owns the change.
-
You can move a promoted shelf from one edge server to another using the p4 unshelve command.
Locking and unlocking files
You can use the -g flag of the p4
lock command to lock the files locally and globally. The
-g option must be used with the -c
option. This lock is
removed by the p4 unlock -g command or by any submit
command for the specified changelist.
changelist
Use the -x option to the p4 unlock
command to unlock files that have the +l filetype
(exclusive open) but have become orphaned. This is typically only
necessary in the event of an extended network outage between an edge
server and the commit server.
Triggers
This section explains how you manage existing triggers in a commit-edge configuration and how you use edge type triggers.
Determining the location of triggers
In a distributed Perforce service, triggers might run either on the commit server, or on the edge server, or perhaps on both. For more information on triggers, see the Helix Versioning Engine Administrator Guide: Fundamentals.
Make sure that all relevant trigger scripts and programs are deployed appropriately. Edge servers can affect non-edge type triggers in the following ways:
-
If you enforce policy with triggers, you should evaluate whether a change list or shelve trigger should execute on the commit server or on the edge server.
-
Edge servers are responsible for running form triggers on workspaces and some types of labels.
Trigger scripts can determine whether they are running on a commit or
edge server using the trigger variables described in the following
table. When a trigger is executed on the commit server,
%peerip% matches %clientip%.
|
Trigger Variable |
Description |
|---|---|
|
|
The IP address of the proxy, broker, replica, or edge server. |
|
|
The IP address of the machine whose user invoked the command, regardless of whether connected through a proxy, broker, replica, or edge server. |
|
|
For a |
Using edge triggers
In addition, edge servers support two trigger types that are specific
to edge-commit architecture: edge-submit and
edge-content. They are described in the following
table.
|
Trigger Type |
Description |
|---|---|
|
|
Executes a pre-submit trigger on the edge server after changelist has been created, but prior to file transfer from the client to the edge server. The files are not necessarily locked at this point. |
|
|
Executes a mid-submit trigger on the edge server after file transfer from the client to the edge server, but prior to file transfer from the edge server to the commit server. At this point, the changelist is shelved. |
Triggers on the edge server are executed one after another when
invoked via p4 submit -e. For p4
submit, edge-submit triggers run
immediately before the changelist is shelved, and
edge-content triggers run immediately after the
changelist is shelved. As edge-submit triggers run
prior to file transfer to the edge server, these triggers cannot
access file content.
The following edge-submit trigger is an MS-DOS
batch file that rejects a changelist if the submitter has not had his
change reviewed and approved. This trigger fires only on changelist
submission attempts that affect at least one file in the
//depot/qa branch.
@echo off
rem REMINDERS
rem - If necessary, set Perforce environment vars or use config file
rem - Set PATH or use full paths (C:\PROGRA~1\Perforce\p4.exe)
rem - Use short pathnames for paths with spaces, or quotes
rem - For troubleshooting, log output to file, for instance:
rem - C:\PROGRA~1\Perforce\p4 info >> trigger.log
if not x%1==x goto doit
echo Usage is %0[change#]
:doit
p4 describe -s %1|findstr "Review Approved...\n\n\t" > nul
if errorlevel 1 echo Your code has not been reviewed for changelist %1
p4 describe -s %1|findstr "Review Approved...\n\n\t" > nul
To use the trigger, add the following line to your triggers table:
sampleEdge edge-submit //depot/qa/... "reviewcheck.bat %changelist%"
Backup and high availability / disaster recovery (HA/DR) planning
A commit server can use the same backup and HA/DR strategy as a master server. Edge servers contain unique information and should have a backup and an HA/DR plan. Whether an edge server outage is as urgent as a master server outage depends on your requirements. Therefore, an edge server may have an HA/DR plan with a less ambitious Recovery Point Objective (RPO) and Recovery Time Objective (RTO) than the commit server.
If a commit server must be rebuilt from backups, each edge server must be rolled back to a backup prior to the commit server's backup. Alternatively, if your commit server has no local users, the commit server can be rebuilt from a fully-replicated edge server (in this scenario, the edge server is a superset of the commit server).
Backing up and recovering an edge server is similar to backing up and restoring an offline replica server. Specifically, you need to do the following:
-
On the edge server, schedule a checkpoint to be taken the next time journal rotation is detected on the commit server. For example:
$ p4 -p myedgehost:myedgeport admin checkpointThe p4 pull command performs the checkpoint at the next rotation of the journal on the commit server. A
stateCKPfile is written to theP4ROOTdirectory of the edge server, recording the scheduling of the checkpoint. -
Rotate the journal on the commit server:
$ p4 -p mycommithost:mycommitport admin journal
As long as the edge server's replication state file is included in the backup, the edge server can be restored and resume service. If the edge server was offline for a long period of time, it may need some time to catch up on the activity on the commit server.
As part of a failover plan for a commit server, make sure that the edge servers are redirected to use the new commit server.
Note
For commit servers with no local users, edge servers could take significantly longer to checkpoint than the commit server. You might want to use a different checkpoint schedule for edge servers than commit servers. Journal rotations for edge servers could be scheduled at the same time as journal rotations for commit servers.
Other considerations
As you deploy edge servers, give consideration to the following areas.
-
Labels
In a distributed Perforce service, labels can be local to an edge server, or global.
-
Exclusive Opens
Exclusive opens (
+lfiletype modifier) are global: establishing an exclusive open requires communication with the commit server, which may incur network latency. -
Integrations with third party tools
If you integrate third party tools, such as defect trackers, with Perforce, evaluate whether those tools should continue to connect to the master/commit server or could use an edge server instead. If the tools only access global data, then they can connect at any point. If they reference information local to an edge server, like workspace data, then they must connect to specific edge servers.
Build processes can usefully be connected to a dedicated edge server, providing full Perforce functionality while isolating build workspace metadata. Using an edge server in this way is similar to using a build farm replica, but with the additional flexibility of being able to run write commands as part of the build process.
-
Files with propagating attributes
In distributed environments, the following commands are not supported for files with propagating attributes: p4 copy, p4 delete, p4 edit, p4 integrate, p4 reconcile, p4 resolve, p4 shelve, p4 submit, and p4 unshelve. Integration of files with propagating attributes from an edge server is not supported; depending on the integration action, target, and source, either the p4 integrate or the p4 resolve command will fail.
If your site makes use of this feature, direct these commands to the commit server, not the edge server. Perforce-supplied software does not presently set propagating attributes on files and is not known to be affected by this limitation.
-
Logging and auditing
Edge servers maintain their own set of server and audit logs. Consider using structured logs for edge servers, as they auto-rotate and clean up with journal rotations. Incorporate each edge server's logs into your overall monitoring and auditing system.
In particular, consider the use of the
rpl.checksum.*configurables to automatically verify database tables for consistency during journal rotation, changelist submission, and table scans and unloads. Regularly monitor theintegrity.csvstructured log for integrity events. -
Unload depot
The unload depot may have different contents on each edge server. Clients and labels bound to an edge server are unloaded into the unload depot on that edge server, and are not displayed by the p4 clients -U and p4 labels -U commands on other edge servers.
Be sure to include the unload depot as part of your edge server backups. Since the commit server does not verify that the unload depot is empty on every edge server, you must specify p4 depot -d -f in order to delete the unload depot from the commit server.
-
Future upgrades
Commit and edge servers should be upgraded at the same time.
-
Time zones
Commit and edge servers must use the same time zone.
-
Perforce Swarm
The initial release of Swarm can usefully be connected to a commit server acting in hybrid mode or to an edge server for the users of that edge server. Full Swarm compatibility with multiple edge servers will be handled in a follow-on Swarm release. For more detailed information about using Swarm with edge servers, please contact Perforce Support
[email protected].
Validation
As you deploy commit and edge servers, you can focus your testing and validation efforts in the following areas.
Supported deployment configurations
-
Hybrid mode: commit server also acting as a regular master server
-
Read-only replicas attached to commit and edge servers
-
Proxy server attached to an edge server
Backups
Exercise a complete backup plan on the commit and edge servers. Note that journal rotations are not permitted directly on an edge server. Journal rotations can occur on edge servers as a consequence of occurring on a master server.