Working with Depots
All the versioned files that users work with are stored in a shared repository called a depot: files are checked out of the depot for modification and checked back into the depot to archive changes and to share changes with other users.
By default, a depot named Depot of type local is created in the
server when the server starts up. In addition to the default local
depot, you can create additional depots of various types:
- Additional
localdepots allow you to organize users' work in relevant categories. You might, for example, want to separate HR source docs from development source docs. - Stream depots are dedicated to the organization and management of streams.
- A spec depot is used to track changes to user-edited forms such as workspace specifications, jobs, branch mappings, and so on.
- Archive depots are used to offline storage of infrequently needed content.
- Unload depots are used to offline storage of infrequently needed metadata.
- Remote depots are used to facilitate the sharing of code.
- A tangent depot is generated by Perforce and used internally to store
conflicting changes during fetch operations. The only action the
administrator might want to take with respect to the tangent depot
is to rename it if its default name of
tangentis unacceptable.
This chapter includes general information about working with depots of
different types. The p4 depot command, used to create any type
of depot, is described in P4 Command Reference.
Overview
New depots are defined with the command p4 depot .
Depots can be defined as depotnamelocal, stream, remote, unload,
archive, or spec depots.
Perforce servers can host multiple depots, and Perforce client applications can access files from multiple depots. These other depots can exist on the Perforce server normally accessed by the Perforce client, or they can reside within other, remote, Perforce servers.
Naming depots
The name of a depot may not be the same as the name of a branch, client workspace, or label.
Listing depots
To list all depots known to the current Perforce server, use the p4
depots command.
Deleting depots
To delete a depot, use p4 depot -d .
depotname
To delete a depot, it must be empty; you must first obliterate all files
in the depot with p4 obliterate.
For local and spec depots, p4 obliterate deletes the
versioned files as well as all their associated metadata. For remote
depots, p4 obliterate erases only the locally held client and
label records; the files and metadata still residing on the remote
server remain intact.
Before you use p4 obliterate, and especially if you’re about
to use it to obliterate all files in a depot, read and understand the
warnings in Reclaiming disk space by obliterating files.
In a distributed environment, the unload depot may have different
contents on each edge server. Since the commit server does not verify
that the unload depot is empty on every edge server, you must specify
p4 depot -d -f in order to delete the unload depot from the
commit server. For more information, see Helix Versioning Engine Administrator Guide: Multi-site Deployment.
Moving depots in a production environment
Follow these steps to move a depot in a production environment:
- Shut down the server where the depot resides.
- Move the versioned file tree to its new location.
-
Restart the server so that it listens only on localhost (or on some port other than the one you normally use). For example:
$ p4d -p 127.0.0.1:1666flags_you_normally_use - Change the map field using the
p4 depotcommand.depotname -
Shut down the server using a command like the following:
$ p4d -p 127.0.0.1:1666 admin stop - Restart the server normally.
Standard depots
Standard or local-type depots reside on local, remote, or shared
servers. Local-type depots reside on the Perforce server normally
accessed by the user’s Perforce application. When using local depots, a
Perforce application communicates with the Perforce server specified by
the user’s P4PORT environment variable or equivalent setting.
To define a new local depot (that is, to create a new depot in the
current Perforce server namespace), call p4 depot with the new
depot name, and edit only the Map: field in the resulting form.
For example, to create a new depot called book with the files stored
in the local Perforce server namespace in a root subdirectory called
book (that is, $P4ROOT/book), enter the command p4 depot
book, and fill in the resulting form as follows:
Depot:       book
Type:        local
Address:     local
Suffix:      .p4s
Map:         book/...
The Address: and Suffix: fields do not apply to local depots and are
ignored.
By default, the Map: field on a local depot points to a depot
directory matching the depot name, relative to the server root
(P4ROOT) setting for your server. To store a depot’s versioned files
on another volume or drive, specify an absolute path in the Map:
field. This path need not be under P4ROOT. Absolute paths in the
Map: field on Windows must be specified with forward slashes (for
instance, d:/newdepot/) in the p4 depot form.
Stream depots
Stream depots contain streams, a type of branch that includes
hierarchy and policy. Like local depots, stream depots reside on the
Perforce server. When creating a stream depot, you must provide the
following information: name, owner, date, type, and stream depth. For
additional information, see "Working with Stream Depots" in the
description of the p4 depot command.
If you are using the distributed versioning architecture, the personal server uses a stream-type depot.
Spec depot
The spec depot is used to track changes to user-edited forms such as
client workspace specifications, jobs, branch mappings, and so on. There
can be only one spec depot per server. (If you already have a spec
depot, attempting to create another one results in an error message.)
In order to retrieve change histories of user-edited forms, you must enable versioned specifications. After you have enabled versioned specs by creating the spec depot, all user-generated forms (such as client workspace specifications, jobs, branch mappings, and so on) are automatically archived as text files in the spec depot. Filenames within the spec depot are automatically generated by the server, and are represented in Perforce syntax as follows:
//specdepotname/formtype/[objectname[suffix]]
Some formtypes (for example, the protect, triggers, and
typemap forms) are unique to the server, and do not have corresponding
objectnames.
Note
As of Release 2011.1, the first line of every saved form stored in the spec depot is a comment line that identifies the user who most recently changed the form:
# The form data below was edited by usernameCreating the spec depot
To create a spec depot named //spec, enter p4 depot spec, and
fill in the resulting form as follows:
Depot:       spec
Type:        spec
Address:     local
Map:         spec/...
SpecMap:     //spec/...
Suffix:      .p4s
The Address: field does not apply to spec depots and is ignored.
Using a Suffix: is optional, but specifying a file extension for
objects in the spec depot simplifies usability for users of applications
such as P4V, because users can associate the suffix used for Perforce
specifications with their preferred text editor. The default suffix for
these files is .p4s.
For example, if you create a spec depot named spec, and use the
default suffix of .p4s, your users can see the history of changes to
job000123 by using the command:
$ p4 filelog //spec/job/job000123.p4sor by using P4V to review changes to job000123.p4s in whatever editor
is associated with the .p4s file extension on their workstation.
The default SpecMap: of //spec/... indicates
that all specs are to be versioned.
Populating the spec depot with current forms
After you create a spec depot, you can populate it using the p4
admin updatespecdepot command. This command causes the Perforce
Server to archive stored forms (specifically, client, depot,
branch, label, typemap, group, user, and job forms) into the
spec depot.
To archive all current forms, use the -a flag:
$ p4 admin updatespecdepot -aTo populate the spec depot with only one type of form (for instance,
extremely large sites might elect to update only one table at a time),
use the -s flag and specify the form type on the command line. For
example:
$ p4 admin updatespecdepot -s jobIn either case, only those forms that have not yet been archived are
added to the spec depot; after the spec depot is created, you only need
to use p4 admin updatespecdepot once.
Controlling which specs are versioned
By default, all specs (//spec/...) are
versioned. You can use the SpecMap: field to control which specs are
versioned by adding lines in depot syntax that include (or exclude)
paths in the spec depot.
For example, you can exclude the protections table from versioning by
configuring your spec depot’s SpecMap: field as follows:
SpecMap:
    //spec/...
    -//spec/protect/...
In an environment such as a build farm, in which large numbers of temporary client workspaces and/or labels are created, you can configure the spec depot to exclude them, while keeping track of other changes to client workspaces and labels. For example, a spec depot configured with the following spec mapping:
SpecMap:
    //spec/...
    -//spec/client/build_ws_*
    -//spec/label/temp_label_*
will no longer track changes to client workspaces whose names begin with
build_ws_, nor will it track changes to labels whose names begin with
temp_label_.
Note that adding or changing the SpecMap: field only affects future
updates to the spec depot; files already stored in the spec depot are
unaffected.
Large sites and old filesystems
Use the spec.hashbuckets configurable to define the number of buckets
(subdirectories) into which files in the spec depot are hashed. By
default, spec.hashbuckets is 99; for each type of object, directories
associated with objects in the spec depot are allocated between 99
subdirectories.
To disable hashing, set spec.hashbuckets to 0, as follows:
$ p4 configure set spec.hashbuckets=0With hashing disabled, for each subdirectory for each spec type, one
sub-subdirectory is created for each object, and all of these
sub-subdirectories are stored in one single subdirectory. Disabling
hashing may subject your installation to filesystem-imposed limitations
on the maximum number of subdirectories in any one directory (for
example, the 32K limit imposed by older ext2, ext3, and ufs
filesystems).
Archive depots
Archive depots are used for near-line or offline storage of infrequently-accessed content. For details, see Reclaiming disk space by archiving files.
Unload depot
The unload depot is analogous to the archive depot, but provides a place
to store infrequently-accessed metadata (specifically, metadata
concerning client workspaces and labels) rather than old versioned
files. There can be only one unload depot per server. For details, see
Unloading infrequently-used metadata.
Remote depots and distributed development
Perforce is designed to cope with the latencies of large networks and inherently supports users with client workspaces at remote sites. A single Perforce installation is ready, out of the box, to support a shared development project, regardless of the geographic distribution of its contributors.
Partitioning joint development projects into separate Perforce installations does not improve throughput, and usually only complicates administration. If your site is engaged in distributed development (that is, developers in multiple sites working on the same body of code), it is better to set up a distributed Perforce installation. For information on setting up and monitoring a distributed Perforce configuration, see the Helix Versioning Engine Administrator Guide: Multi-site Deployment manual.
If, however, your organization regularly imports or exports material from other organizations, you might want to consider using Perforce’s remote depot functionality to streamline your code drop procedures.
When using remote depots, the user’s client application uses the
Perforce server specified by the user’s P4PORT environment variable or
equivalent setting as a means to access a second, remote, Perforce
server. The local Perforce server communicates with the remote Perforce
server to access a subset of its files.
Remote depots are designed to support shared code, not shared development. They enable independent organizations with separate Perforce installations to integrate changes between Perforce installations. Briefly:
- A "remote depot" is a depot on your Perforce server of type
remote. It acts as a pointer to a depot of type "local" that resides on a second Perforce server. - A user of a remote depot is typically a build engineer or handoff administrator responsible for integrating software between separate organizations.
- Control over what files are available to a user of a remote depot resides with the administrator of the remote server, not the users of the local server.
- See Restricting access to remote depots for security requirements.
For additional information about the options you have to share code, see Distributed development using Fetch and Push.
How remote depots work
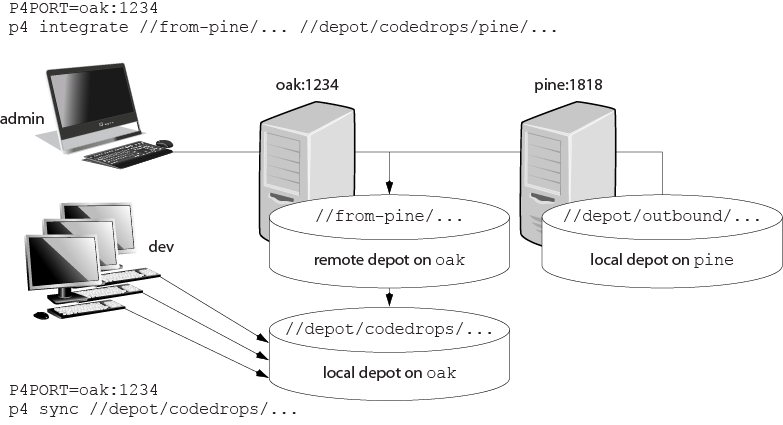
The following diagram illustrates how Perforce applications use a user’s default Perforce server to access files in a depot hosted on another Perforce server.
In this example, an administrator of a Perforce server at oak:1234 is
retrieving a file from a remote server at pine:1818.
 |
Although it is possible to permit individual developers to sync files from remote depots into their client workspaces, this is generally an inefficient use of resources.
The preferred technique for using remote depots is for your organization’s build or handoff administrator to integrate files from a remote depot into an area of your local depot. After the integration, your developers can access copies of the files from the local depot into which the files were integrated.
To accept a code drop from a remote depot, create a branch in a local depot from files in a remote depot, and then integrate changes from the remote depot into the local branch. This integration is a one-way operation; you cannot make changes in the local branch and integrate them back into the remote depot. The copies of the files integrated into your Perforce installation become the responsibility of your site’s development team; the files on the depot remain under the control of the development team at the other Perforce installation.
Restrictions on remote depots
Remote depots facilitate the sharing of code between organizations (as opposed to the sharing of development within a single organization). Consequently, access to remote depots is restricted to read-only operations, and server metadata (information about client workspaces, changelists, labels, and so on) cannot be accessed using remote depots.
Using remote depots for code drops
Performing a code drop requires coordination between two organizations, namely the site receiving the code drop and the site providing the code drop. In most cases, the following three things must be configured:
-
The Perforce administrator at the site receiving the code drop must create a remote depot on his or her Perforce server that points to the site providing the code drop.
This is described in Defining remote depots.
-
The Perforce administrator at the site providing the code drop should configure his or her Perforce server to allow the recipient site’s remote depot to access the providing site’s Perforce server.
This is described in Restricting access to remote depots.
-
The configuration manager or integration manager at the receiving site must integrate the desired files from the remote depot into a local depot under his or her control.
This is described in Receiving a code drop.
Defining remote depots
To define a new remote depot:
- Create the depot with
p4 depot.depotname - Set the
Type:toremote. -
Direct your Perforce server to contact the remote Perforce server by providing the remote server’s name and listening port in the
Address:field.A remote server’s host and port are specified in the
Address:field just as though it were aP4PORTsetting. -
Set the
Map:field to map into the desired portion of the remote server’s namespace.For remote depots, the mapping contains a subdirectory relative to the remote depot namespace. For example,
//depot/outbound/...maps to theoutboundsubdirectory of the depot nameddepothosted on the remote server.The
Map:field must contain a single line pointing to this subdirectory, specified in depot syntax, and containing the "..." wildcard on its right side.If you are unfamiliar with client views and mappings, see the Helix Versioning Engine User Guide for general information about how Perforce mappings work.
- The
Suffix:field does not apply to remote depots; ignore this field.
In order for anyone on your site to access files in the remote depot,
the administrator of the remote server must grant read access to user
remote to the depots and subdirectories within the depots specified in
the Map: field.
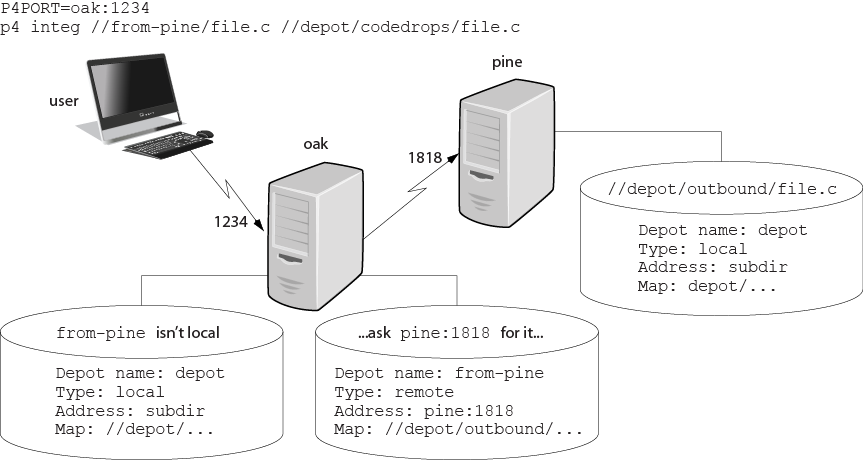
Example 3. Defining a remote depot
Lisa is coordinating a project and wants to provide a set of libraries
to her developers from a third-party development shop. The third-party
development shop uses a Perforce server on host pine that listens on
port 1818. Their policy is to place releases of their libraries on
their server’s single depot depot under the subdirectory outbound.
Lisa creates a new depot from which she can access the code drop; she’ll
call this depot from-pine; she’d type p4 depot from-pine and
fill in the form as follows:
Depot:       from-pine
Type:        remote
Address:     pine:1818
Map:         //depot/outbound/...
This creates a remote depot called from-pine on Lisa’s Perforce
server; this depot (//from-pine) maps to the third party’s
depot’s namespace under its outbound
subdirectory.
Restricting access to remote depots
Remote depots are accessed either by a virtual user named remote, or
(if configured) by the service user of the accessing server’s
p4d. Service users (including the virtual remote user) do not
consume Perforce licenses.
Note
Perforce Servers at release 2010.2 authenticate as remote to older
Perforce servers, and either as remote (if no service user is
configured), or as the service user (if configured) to Perforce Servers
at release 2010.2 and above.
By default, all files on a Perforce server can be accessed remotely. To
limit or eliminate remote access to a particular server, use p4
protect to set permissions for user remote (or the remote site’s
service user) on that server. Perforce recommends that administrators
deny access to user remote across all files and all depots by adding
the following permission line in the p4 protect table:
list user remote * -//...Because remote depots can only be used for read access, it is not
necessary to remove write or super access to user remote (or the
service user). Keep in mind that the virtual user remote does not have
access to anything unless that access is granted explicitly in the
protection table.
Note
As of Release 2010.2, it remains good practice to deny access to user
remote. If the Perforce Servers at partner sites are configured to use
service users, you can use their service users to further restrict which
portions of your server are available for code drops.
As of Release 2010.2, it remains good practice to deny access to user
remote. If the Perforce Servers at partner sites are configured to use
service users, you can use their service users to further restrict which
portions of your server are available for code drops.
Example security configuration
Using the two organizations described in Receiving a code drop, a basic set of security considerations for each site would include:
On the local (oak) site:
- Deny access to
//from-pineto all users. Developers at theoaksite have no need to access files on thepineserver by means of the remote depot mechanism. -
Grant
readaccess to//from-pineto your integration or build managers. The only user at theoaksite who requires access the//from-pineremote depot is the user (in this example,adm) who performs the integration from the remote depot to the local depot.The
oakadministrator adds the following lines to thep4 protecttable:list user * * -//from-pine/... read user adm * //from-pine/...
On the remote (pine) site, access to code residing on pine is
entirely the responsibility of the pine server’s administrator. At a
minimum, this administrator should:
-
Preemptively deny access to user
remoteacross all depots from all IP addresses:list user remote * -//...
Adding these lines to the
p4 protecttable is sound practice for any Perforce installation whether its administrator intends to use remote depots or not. -
If both servers are at Release 2010.2 or higher: contact the
oaksite’s administrator and obtain the name of theoaksite’s service user.In this example, the
oaksite’s service user isservice-oak. When a user of theoakserver accesses a remote depot hosted onpine, theoakserver will authenticate with thepineserver as a user namedservice-oak.As administrator of the
pinesite, you must:- Create a service user on your site named
service-oak. (see Service users). This user’s name must match the name of the receiving site’s service user. - Assign this user a strong password.
-
Inform the
oakadministrator of this password.The administrator of the
oaksite must: - Use the password set by the pine administrator to obtain a ticket
valid for
pinefor the userservice-oak(that is, runp4 login service-oakagainst thepineserver). - Place the ticket somewhere where the
oakserver’sp4dprocess can access it. (For example, the.p4ticketsfile in the server’s root directory, withP4TICKETSset to point to the location of the ticket file.) - Configure
oakto work with thepineservice user, either by startingoak’sp4dprocess with the-u service-oakflag, or configure the server withp4 configure set serviceUser=service-oak.) - Grant
readaccess to userremote(or theoaksite’s service user) to only those areas of thepineserver into which code drops are to be placed. Further restrict access to requests originating from the IP address of the Perforce server that is authorized to receive the code drop.
In this example, outgoing code drops reside in
//depot/outbound/...on thepineserver. Ifoak’s IP address is192.168.41.2, thepinesite’s protections table looks like:list user remote * -//... read user remote 192.168.41.2 //depot/outbound/...
- Create a service user on your site named
-
If both sites are at Release 2010.2 or higher, and the
oakserver is configured to useservice-oakas its service user, thepinesite’s protections table looks like:list user remote * -//... list user service-oak * -//... read user service-oak 192.168.41.2 //depot/outbound/...
Only Perforce Servers at IP address 192.168.41.2 that have valid tickets for the
pinesite’sservice-oakuser, are permitted to access thepineserver through remote depots, and only//depot/outbound/...is accessible.
Receiving a code drop
To perform a handoff or code drop between two Perforce installations:
- Developers on
pine:1818complete work on a body of code for delivery. - The build or release manager on
pine:1818branches the deliverable code into an area ofpine:1818intended for outbound code drops. In this example, the released code is branched to//depot/outbound/... - A Perforce administrator at
oak:1234configures a remote depot called//from-pineon theoakserver. This remote depot contains aMap:field that directs theoakserver to the//depot/outboundarea ofpine:1818. - Upon notification of the release’s availability, a build or release
manager at
oak:1234performs the code drop by integrating files in the//from-pine/...remote depot into a suitable area of the local depot, such as//depot/codedrops/pine. -
Developers at
oak:1234can now use thepineorganization’s code, now hosted locally under//depot/codedrops/pine. Should patches be required topine’s code,oakdevelopers can make such patches under//depot/codedrops/pine. Thepinegroup retains control over its code.