Codeline Management
Codelines are sets of related files that evolve together. To structure groups of related files by purpose, such as a new product or release, you create branches. To propagate changes between branches, you integrate changelists. To create a snapshot of files in a specific state, you can create a label, or refer to the files collectively by specifying a date or a changelist number.
Note
Don't confuse Perforce branches with branch mappings, which are specifications that define the relationship between two branches.
Branching Basics
Branching is a method of managing changes between two or more sets of related files. Perforce's Inter-File Branching mechanism enables you to copy any set of files to a new location in the depot by allowing changes made to one set of files to be copied, or integrated, to the other. The new file set (or codeline) evolves separately from the original files, but changes in either codeline can be propagated to the other by means of integration.
Most version control systems support some form of branching; Perforce's mechanism is unique because it mimics the style in which users create their own file copies when no branching mechanism is available.
Suppose for a moment that you're writing a program in an environment without version control. You're ready to release your program: what do you do with your code? Chances are that you'd copy all your files to a new location. One of your file sets becomes your release codeline, and bug fixes to the release are made to that file set; your other files are your development file set, and new functionality to the code is added to these files.
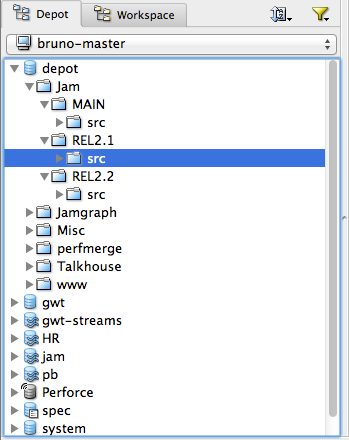
Perforce organizes files in the depot using directory hierarchies, like a
large hard drive. When you make a new codeline, it appears in the depot as
a subdirectory, such as //depot/Jam/MAIN for
ongoing development work, //depot/Jam/REL2.1 for
release 2.1, and //depot/jam/REL2.2 for release
2.2.
Creating a codeline
To create a codeline or development branch, decide which files belong in
the branch (the source files), and
integrate those files into the new codeline to
create the target files. The Perforce server "opens
the target files for branch/sync" in a changelist.
Opening files for branch/sync is just like opening them
for add, edit, or
delete; the files are opened in a changelist, and your
client workspace view must include the target files. Similarly, no changes
are made to the depot until you submit the changelist. The atomic nature
of changelists ensures that when you create a codeline, it contains all of
the files you branched.
Without a version management system, you might create a branch by copying the files from one directory into another directory. The advantage of integration over copying the files and adding the copies to the depot in a new directory is that when you integrate files from one codeline to another, Perforce can track the connections between related files in an integration record, facilitating easy tracking and propagation of changes between the two sets of files.
Integration also enables Perforce to perform a "lazy copy" of the files. When you branch files, the versioning service does not actually hold two copies of the files - it holds the source file and a pointer that tracks the relationship between the source and the target file. Lazy copies make branching a low-overhead operation; the versioning service doesn't have to keep track of duplicate copies of files.
To integrate files from a source codeline to a target codeline:
-
the target must be in your workspace view
-
the source doesn't have to be in your workspace view (although you must have permission to read the source files)
-
you open files for branch in a new changelist by integrating them
-
you create files in the new codeline by submitting the changelist
-
when you submit the changelist with the target files, the target files in the new codeline are at revision #1
-
integration records enable you to examine the history of files in the new codeline, including the fact that they were created by means of integration from the source files.
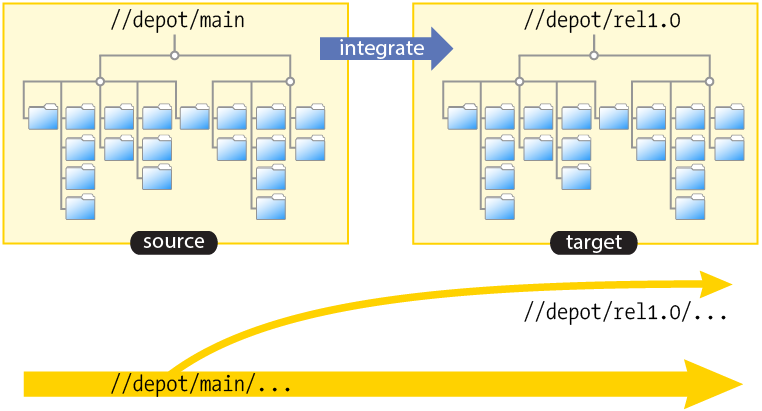
Propagating changes between codelines
You can use integration to propagate changes between related codelines in much the same way you create codelines. (Creating a codeline is equivalent to propagating a set of changes that make up the entirety of the source files into an empty set of target files.)
When you create a codeline, the target files are by definition empty; there is no possibility your changes can conflict. When you propagate changes between existing codelines, conflicts can arise because conflicting changes may have been made in both the source and the target codelines.
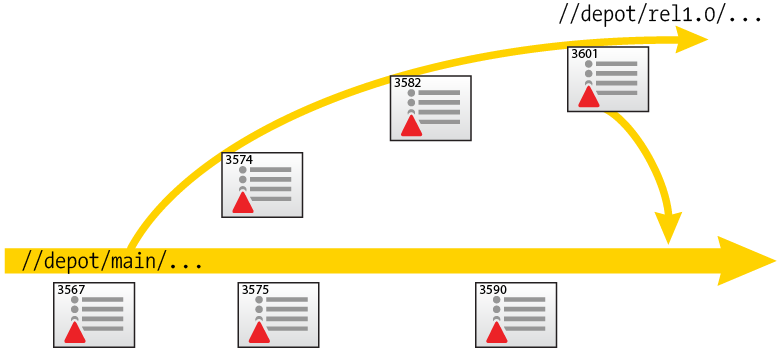
In the example shown, the rel1.0 codeline was created
by branching source files from //depot/main into a
target of //depot/rel1.0 in changelist 3567.
Changelists 3574, 3582 and 3601 represent work performed in the release
branch, and changelists 3575 and 3590 represent work performed in the main
line.
In order to propagate work done in the release branch back into the main
line, you integrate from source files in //depot/rel1.0
into //depot/main, resolving any conflicting changes
between work done in the release branch and work done in the main line.
Resolving differences between codelines
When you integrate changelists from a source codeline to an existing target codeline, Perforce schedules a resolve, or a three-way merge, between the files.
The revisions in the target files in your client workspace are referred to as yours. The revisions of the source files in the depot are referred to as theirs. Where changes between these files do not conflict, the changes can be merged automatically. Where changes conflict, you must choose which changes are to be accepted into the file.
Because changelists are atomic, you must resolve every file in a changelist before the submit can succeed. You can resolve these situations in one of three ways:
-
Automatically: In many cases, you will know whether you want to accept the changes that are yours (that is, the target revisions in your client workspace) or theirs (that is, the source revisions in the depot). Whether you accept yours or theirs, this type of resolve is referred to as an automatic resolve without merging.
-
Accept merged: Sometimes, there are changes made to the files that are theirs and yours do not conflict. In these cases, Perforce merges the two files and provides you with an option to accept the merged result. Such a resolve is referred to as a "safe" automatic resolve with merging.
-
Manual merge: Finally, there may be cases where the same lines in theirs and yours have been changed. Such lines are said to conflict. When changes conflict, Perforce resolves as many differences as possible and produces a merged file containing conflict markers for manual resolution. You must either edit the merged file manually before submitting it, or accept the merged file with the conflict markers included, and fix the conflict in a subsequent changelist.
Duplicating complex branch structures
Perforce provides two mechanisms for branching: integrating using a file specification, and integrating using a branch mapping.
For simple branch structures, you can manually specify the paths of the source and target files, and integrate your source files to the target branch using file specifications. You must manually specify the source and target codelines every time you branch with a file specification.
For more complex branch structures, you can set up branch mappings that enable you to reliably duplicate even the most complex branch structures. A branch mapping holds a set of mapping rules (a branch view) that controls how files in the source branch are integrated in the target branch. After you have set up a branch mapping, you can perform the integration by using the branch mapping to perform all of the integrations specified in the branch view.
For example, the branch mapping in the screenshot shows three mappings:
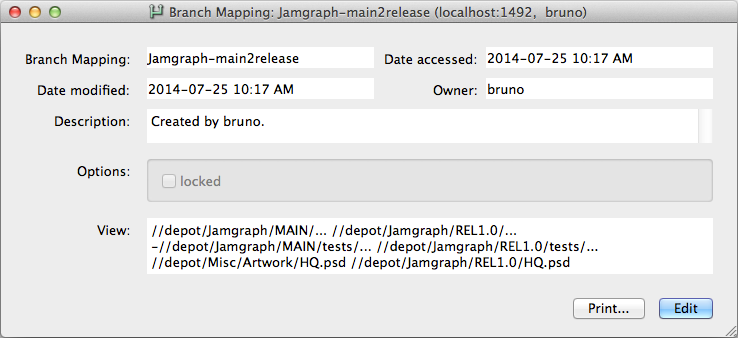
-
a mapping of all files in
//depot/Jamgraph/MAINinto//depot/Jamgraph/REL1.0directory. -
an exclusionary mapping to ensure that test work in
/Jamgraph/MAIN/testsis not copied from the main line. -
a mapping to include a PSD image (
HQ.psd) deliverable located in an unrelated/Misc/Artworkdirectory to thejamgraphproject, for inclusion in the installer to be built for the release.
Tracking change history between codelines
The Revision Graph feature of P4V is a convenient way of visualizing a file's history across (and between) branches.

The example screenshot shows a simple revision graph. The changes to the
file represented by revision #1 through revision #3 were integrated from
the main codeline (//depot/Jamgraph/MAIN/...) into a release
branch (//depot/Jamgraph/REL1.0/...) and into a
development branch (//depot/Jamgraph/DEV/...).
Using Streams
Perforce streams are structured containers for the files that compose projects, codelines, and components. Applications like the Perforce Command-Line Client and P4V, the Perforce Visual Client, provide extensive support for streams. For detailed information about working with streams, refer to the P4 Command Reference, p4 command line help, and P4V online help.
Streams confer the following benefits:
-
Ensure a hierarchical approach to branching
-
Provide an "out of the box" best-practice branching strategy
-
Provide metadata about the branch hierarchy to the Perforce service
-
Provide a standard approach to structuring code (stability and hierarchy)
-
Automate the generation of client workspace views and branch views
-
Offer a compelling and informative visualization of stream structure and status
-
Enable you to organize and visualize (bodies of) code.
-
Provide rules to make development easier.
Perforce streams improve on Perforce's default branching model by providing solutions to the following four issues:
-
You can't name a branch: Branches are collections of paths. You can name a branch specification, true, but a branch specification lacks parentage and stability. It's hard to create branch views, easy to define streams.
-
You can't define a good branching structure without external tools: Perforce, out of the box, permits you to do anything you want. Small installations can get away with a lot, but enterprise- level customers want and need disciplines and best practices that match their business and technical processes. Streams ensure hierarchical branching and minimize pathological relationships between branches.
-
Change is propagated inefficiently: Using well-defined streams, customers can branch only the files that are going to change and can ensure that a meaningful integration history is created.
-
Change is propagated incorrectly: By default, you can integrate files without restriction. Streams ensure that change flows along a predefined hierarchy and that merging and resolving happen appropriately.
Streams don't guarantee efficiency and certitude, but a well-formed hierarchy controls what gets branched and can ensure that change flows correctly.
To work with streams, you perform the following steps:
-
Create a stream depot
-
Create and populate a mainline stream
-
Branch development and release streams
-
Merge and copy changes
To manage streams, you (mainly) use the following commands:
-
p4 stream
-
p4 streams
-
p4 merge
-
p4 copy
-
p4 resolve
-
p4 cstat
-
p4 istat
Additional commands that accept stream arguments are as follows:
-
p4 branch
-
p4 client
-
p4 clients
-
p4 diff2
-
p4 dirs
-
p4 integrate
-
p4 interchanges
For details about command syntax and flags, refer to the
P4
Command Reference, or use the p4 help
commandname command. For a brief
overview, use the p4 help streamintro command. The
following sections describe streams-related tasks in detail.
Setting up the structure
First you create a stream depot. Stream depots are identical to local depots except for the following:
-
Flow is controlled by the stream specification (although manual integrations can use branch views that were generated when streams are defined or edited).
-
Streams accept submissions only from stream-associated workspaces.
-
Imported files can be synced and edited but not submitted You can integrate files between stream and local depots.
Next, for each stream in the branching hierarchy that you want to create, you define a stream specification that specifies the stream name, the parent stream and the stream type. By default, a stream inherits its file structure and contents from its parent. To meet more advanced requirements, you can specify mappings that redefine the file paths that a stream contains by defining path mappings. The following sections explain stream types and views.
Stream types
The stream's type indicates its relative stability. Supported stream types are as follows:
-
mainline: A stream with no parent. Expects merging down from more stable streams. Expects copying up from less stable streams. Used as the stable trunk of a stream system. -
release: A stream that is more stable than its parent. Expects merging down from more stable child streams. Does not expect copying up from its parent stream. Useful for ongoing stabilization, bug fixing and release maintenance. -
development: A stream that is less stable than its parent. Expects merging down from its parent stream. Expects copying up from its less stable child streams. Does not expect to have more stable child streams. Useful for long-term projects, major new features. -
task: works like adevelopmentstream; used for lightweight short-term branches. Appears as a sparse branch. When in use, only the workspace associated with the task stream can see all the files in the stream; other workspaces see only those files and revisions that you changed within the task stream and copied to its parent. -
virtual: useful for filtering a view of a parent stream.
To update a stream from a more stable parent or child stream, you merge. After the less stable stream is up to date, you copy its changes to the more stable stream. In a nutshell: merge down, copy up.
Stream views
To configure the files that a stream contains, you define the stream view. The view is composed of a set of paths to which you assign types that control their characteristics, as follows:
-
share: (default) Files in shared paths are syncable, submittable, and integratable. Shared paths are used for files whose changes will flow to and from other streams. -
isolate: Files can be edited but the resulting changes cannot be integrated to other streams. Isolated paths are useful for storing nightly builds and other generated files. -
import: Files are sourced from a specified location, but cannot be edited or integrated. Use imported paths for components such as third-party libraries that must be present in the stream but are not worked on. An imported path inherits its view from the parent stream unless its depot location is defined explicitly. -
exclude: Prevents files in the parent stream from becoming part of the child stream. Files in excluded paths can't be synced, submitted, or integrated.
When you specify the paths, omit the leading depot and stream name from the target path on the right side of the view (unless you are remapping an imported path). For example:
//AlphaTest/main/doc/... doc/...
When in doubt, use "Development".
Example: A build stream might have mappings like this:
share ...
import relbin/...   //Ace/REL2.1/bin/...
import qt4/...      //import/Qt4.0/...
import jam/...      //depot/main/jam/src/...
...because it needs access to source code and libraries, but will never check changes into those paths. Note that the import paths remap the location of the imported files.
Populating the streams
After defining the mainline stream, you can populate it by adding files or integrating files, then copying them to less stable child streams and merging them to more stable parents.
Propagating change
Typically you define and populate the mainline first, then create development streams below the mainline. You keep development streams up to date by merging from the mainline. When the development work is stable, you copy it to main. When it's time to prepare for a release, you can create a release stream in which you stabilize the release, then create a development stream as a child of the release stream where bugs can be fixed.
To learn more about branching
Although Perforce's branching mechanism is relatively simple, the theory of branching can be very complex. When should a branch be created? At what point should code changes be propagated from one codeline to another? Who is responsible for performing merges? These questions are common to every versioning system, and the answers are not simple.