GitSwarm-EE 2017.2-1 Documentation
Help / Workflow / Helix Mirroring / Enable
Enable
Requirements
You must have at least one Git Fusion entry configured in order to use Helix Mirroring, or to import a repo from Git Fusion. See the configuration section for details.
Your GitLab user account must either be an admin account, or you must have at least master-level permissions for the project on which you are attempting to enable Helix Mirroring.
The project cannot already be mirrored in Git Fusion.
When you use convention-based mirroring, there must not be any content in the Helix Versioning Engine where the to-be mirrored project's files are to be stored. GitLab checks for this before attempting to mirror the project.
When you use convention-based mirroring, there must not be a Git Fusion configuration file (
p4gf_config) for the current namespace/project path combination. GitLab checks for this before attempting to mirror the project.
When the requirements have not been met, GitLab displays an error message.
Once the requirements have been met, choose a scenario for Helix Mirroring:
When you want to create a GitLab project with convention-based mirroring.
When you want to import a Git Fusion repository.
When you have an existing GitLab project.
When you want to create a GitLab project from directories in the Helix Versioning Engine.
Create a GitLab Project with Convention-based Mirroring
Note: If your configuration is incorrect, this option is disabled:

Sign in to your GitLab instance and go to your dashboard.
Click "New Project".
Click the "Helix Git Fusion Server" drop-down menu to select an available Git Fusion Server.
Click "Create a Helix GitLab project to mirror".
Fill in the rest of the details for your project.
Click "Create Project".
Importing a Git Fusion Repository
Sign in to your GitLab instance and go to your dashboard.
Click "New Project".
Click the "Helix Git Fusion Server" drop-down menu to select an available Git Fusion Server.
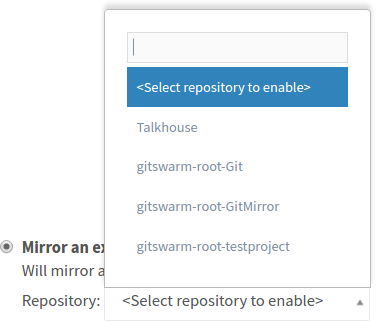
Click "Mirror an existing repository".
Select an available Git Fusion repository to import:
Fill in the rest of the details for your project.
Click "Create Project".
Enabling Mirroring on an Existing GitLab Project
Sign in to your GitLab instance
You must be an admin, or have at least master rights to the project for which you want to enable mirroring.
From the Dashboard, click "Your Projects" or "Explore Projects"
Click on the project you wish to mirror
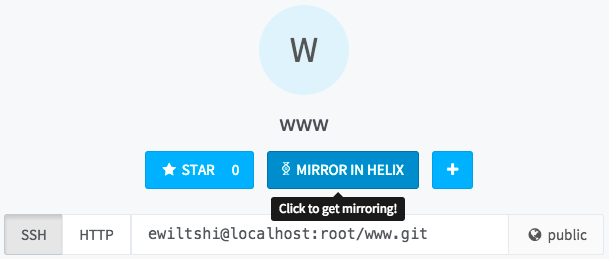
Click the "Mirror in Helix" button on the project details page
If the button is greyed out, mousing over it gives a hint as to what is wrong and how to fix it.
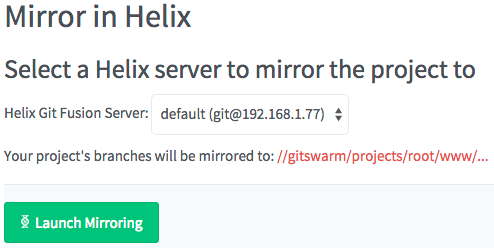
Select the Git Fusion server to which you wish to mirror your project
All configured Git Fusion servers are selectable, but only servers that support convention-based mirroring enable the "Launch Mirroring" button.
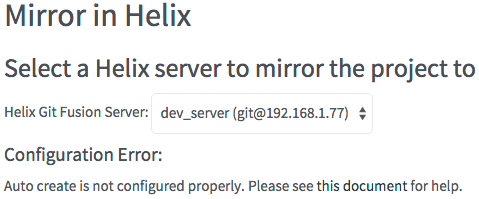
If you have selected a server for which there is a problem (e.g. that particular server does not have auto-create enabled, or has an incorrect username/password), GitLab reports that this is the case, describes what the problem is, and suggests how to fix it. For example:
Clicking the "Launch Mirroring" button
This starts the mirroring process. Assuming there are no configuration errors, GitLab attempts to:
- Create an associated repository in Git Fusion
- Mark the GitLab project as mirrored in Git Fusion
- Perform an initial push (backgrounded) of the GitLab project to Git Fusion
If any errors occur during the above process, GitLab takes you back to the Mirror in Helix page, and reports the error. See below for potential error messages, what they mean and how to fix them.
Create a GitLab project from directories in the Helix Versioning Engine
Note: If your configuration is incorrect, this option is disabled:

Sign in to your GitLab instance, and go to your dashboard.
Click "New Project".
Click the "Helix Git Fusion Server" drop-down menu to select an available Git Fusion Server.
Click "Select directories to mirror".
The depot browser is displayed, showing the available depot paths within the Helix Versioning Engine.
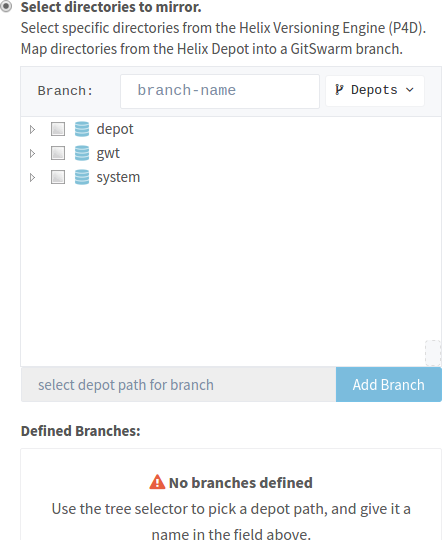
Use the "Depots" dropdown to choose whether you want to browse classic Helix depots or stream depots.
Browse the depot to locate a directory.
Click the triangle to the left of each directory to see sub-directories.
Click the checkbox to the left of a directory to select that directory (and all of its contents) to represent a Git branch within your project.
Specify the branch name in the "branch-name" field.
Click "Add Branch
". The "Defined Branches" area maintains a list of the named branches and the corresponding depot paths (directories) within the Helix Versioning Engine.
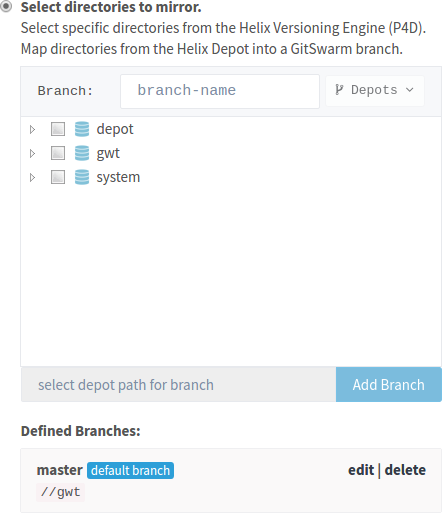
Repeat steps 3-6 as many times as necessary to define all of the branches that should appear in your new project.
If you wish to edit a branch name or associated depot path, click "edit".
The branch definition within the "Defined Branches" area becomes highlighted, and the depot browser updates to reflect the current name and depot path.
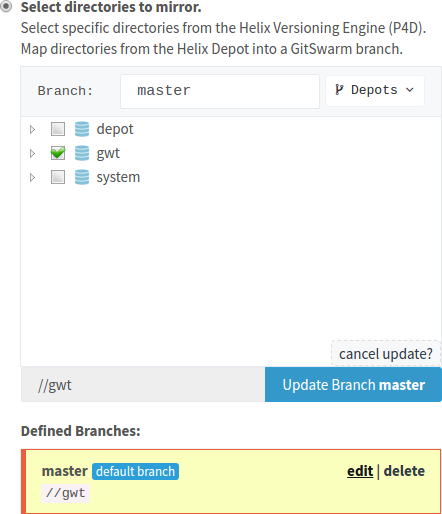
If you change the branch name, click the "Change Branch
to " button to save your changes. If you change only the depot path, click the "Update Branch
" button to save your changes. At any time, click the "cancel update?" link to terminate editing the branch definition.
If you specify more than one branch definition, you can click "make default" to specify which of the branch definitions should become the new project's default branch.
Fill in the rest of the details for your project.
Click "Create Project".
Warning: If any of the branch definitions that you specify overlap, those branches become read-only. For example, if you specify one branch for
//depotand another branch for//depot/jam, those two branch definitions overlap becausejamis inside//depot.
Important: Once you have created your project, the branch definitions cannot be altered by GitLab. Modifications are possible by having an administrator edit the Git Fusion
p4gf_configfiles.
Important: You are free to create new branches within the Git repository for your GitLab project, but any new (and therefore, unmapped) branches are considered to be "lightweight" branches in Git Fusion. A lightweight branch has no project-specific mapping within the Helix Versioning Engine, and so participation by developers using Helix versioning is greatly reduced. See the Git Fusion guide for details.
Error Messages
GitLab's Helix Git Fusion integration is disabled.
Getting this error message means that Git Fusion integration is currently disabled for your GitLab instance. You need to get an admin to enable it for the Git Fusion servers against which you wish to enable mirroring.
GitLab's Helix Git Fusion integration is enabled, however no Git Fusion instances have been configured.
In order to mirror an existing GitLab project, you must not only have Git Fusion enabled, but you must have at least one Git Fusion server instance configured. Please see this section for instructions on configuring a Git Fusion instance.
None of the Helix Git Fusion instances GitLab knows about are configured for 'auto create'.
When mirroring an existing GitLab project in Git Fusion, GitLab must be configured to be able to create a Git Fusion repository definition. Please see this section for instructions on configuring auto create.
GitLab is configured for Helix Mirroring, but you lack permissions to enable it for this project.
Enabling mirroring on an existing GitLab project requires permissions to edit that project. This means your GitLab user account either needs to be an administrator account, or at least master-level permissions for the project on which you wish to enable mirroring.
Problems?
If you encounter problems with importing projects from Git Fusion, or with Helix Mirroring between GitLab and Git Fusion, please contact Perforce support for assistance.