Administering Perforce: Superuser Tasks
This chapter describes basic tasks associated with day-to-day Perforce administration and advanced Perforce configuration issues related to cross-platform development issues, migration of Perforce servers from one machine to another, and working with remote and local depots.
Most of the tasks described in this chapter requires that you have
Perforce superuser (access level super) or
administrator (access level admin) privileges as
defined in the Perforce protections table. For more about controlling
Perforce superuser access, and protections in general, see
Administering Perforce: Protections.
Basic Perforce Administration
Tasks commonly performed by Perforce administrators and superusers include:
-
User maintenance tasks, including resetting passwords, creating users, disabling the automatic creation of users, and cleaning up files left open by former users
-
Administrative operations, including setting the server security level, obliterating files to reclaim disk space, editing submitted changelists, verifying server integrity, defining file types to control Perforce's file type detection mechanism, and the use of the
-fflag to force operations
User authentication: passwords and tickets
Perforce supports two methods of authentication: password-based and ticket-based.
Warning
Although ticket-based authentication provides a more secure authentication mechanism than password-based authentication, it does not encrypt network traffic between client workstations and the Perforce server.
To encrypt network traffic between client workstations and the Perforce server, configure your installation to use SSL. See “Encrypting connections to a Perforce server”.
How password-based authentication works
Password-based authentication is stateless; after a password is correctly set, access is granted for indefinite time periods. Passwords may be up to 1024 characters in length. To enforce password strength and existence requirements, set the server security level. See “Server security levels” for details. Password based authentication is supported at security levels 0, 1, and 2.
Minimum password length is configurable by setting the
dm.password.minlength configurable. For
example, to require passwords to be at least 16 characters in
length, a superuser can run:
p4 configure set dm.password.minlength=16
The default minimum password length is eight characters.
In order to require users to change their passwords after a
specified interval, assign your users to at least one group and
set the PasswordTimeout: value for that
group. For users in multiple groups, the largest defined
PasswordTimeout (including
unlimited, but ignoring
unset) value applies.
How ticket-based authentication works
Ticket-based authentication is based on time-limited tickets
that enable users to connect to Perforce servers. Perforce
applications store tickets in the file specified by the
P4TICKETS environment variable. If this variable
is not set, tickets are stored in
%USERPROFILE%\p4tickets.txt on Windows,
and in $HOME/.p4tickets on UNIX and other
operating systems.
Tickets have a finite lifespan, after which they cease to be
valid. By default, tickets are valid for 12 hours (43200
seconds). To set different ticket lifespans for groups of
users, edit the Timeout: field in the
p4 group form for each group. The timeout
value for a user in multiple groups is the largest timeout
value (including unlimited, but ignoring
unset) for all groups of which a user is a
member. To create a ticket that does not expire, set the
Timeout: field to
unlimited.
Although tickets are not passwords, Perforce servers accept valid tickets wherever users can specify Perforce passwords. This behavior provides the security advantages of ticket-based authentication with the ease of scripting afforded by password authentication. Ticket-based authentication is supported at all server security levels, and is required at security level 3 and 4.
If password aging is in effect, tickets expire when their passwords expire.
Logging in to Perforce
To log in to Perforce, get a ticket from the server by using the p4 login command:
p4 login
You are prompted for your password, and a ticket is created for you in your ticket file. You can extend your ticket's lifespan by calling p4 login while already logged in. If you run p4 login while logged in, your ticket's lifespan is extended by 1/3 of its initial timeout setting, subject to a maximum of your initial timeout setting.
The Perforce service rate-limits the user's ability to run
p4 login after multiple failed login
attempts. To alter this behavior, set
dm.user.loginattempts to the maximum number
of failed login attempts to permit before the service imposes a
10-second delay on subsequent login attempts by that user.
By default, Perforce tickets are valid for your IP address only. If you have a shared home directory that is used on more than one machine, you can log in to Perforce from both machines by using p4 login -a to create a ticket in your home directory that is valid from all IP addresses.
Logging out of Perforce
To log out of Perforce from one machine by removing your ticket, use the command:
p4 logout
The entry in your ticket file is removed. If you have valid tickets for the same Perforce server, but those tickets exist on other machines, those tickets remain present (and you remain logged in) on those other machines.
If you are logged in to Perforce from more than one machine, you can log out of Perforce from all machines from which you were logged in by using the command:
p4 logout -a
All of your Perforce tickets are invalidated and you are logged out.
Determining ticket status
To see if your current ticket (that is, for your IP address,
user name, and P4PORT setting) is still valid,
use the command:
p4 login -s
If your ticket is valid, the length of time for which it will remain valid is displayed.
To display all tickets you currently have, use the command:
p4 tickets
The contents of your ticket file are displayed.
Invalidating a user's ticket
As a super user, you can use the -a flag of the p4
logout command to invalidate a user's ticket. The following command
invalidates Joe's ticket.
p4 logout -a joe
Server security levels
Perforce superusers can configure server-wide password usage
requirements, password strength enforcement, and supported methods
of user/server authentication by setting the
security configurable. To change the
security configurable, issue the command:
p4 configure set
security=seclevel
where seclevel is 0, 1, 2, 3, or 4.
Note
If you are using an external authentication manager such as
LDAP or Active Directory (see
“Triggering to use external authentication”), the security configurable
is moot; the server either behaves as though security=3 was
set, or is placed completely under the control of the external
authentication system implemented by the associated
auth-check and auth-set
triggers.
Choosing a server security level
The default security level is 0: passwords are not required, and password strength is not enforced.
To ensure that all users have passwords, use security level 1. Users of old Perforce applications can still enter weak passwords.
To ensure that all users have strong passwords, use security level 2. Very old Perforce applications continue to work, but users must change their password to a strong password and upgrade to 2003.2 or later.
To require that all users have strong passwords, and to require the use of session-based authentication, use security level 3 and current Perforce applications.
In multiserver and replicated environments, use security level 4 to ensure that only authenticated service users (subject to all of the restrictions of level 3) can connect to this server.
Level 0 corresponds to pre-2003.2 server operation. Levels 1 and 2 were designed for support of legacy applications. Levels 3 and 4 afford the highest degree of security.
The Perforce server security levels and their effects on the behavior of Perforce applications are defined below.
|
Security level |
Server behavior |
|---|---|
|
|
Legacy support: passwords are not required. If passwords are used, password strength is not enforced.
Users with passwords can use either their
Users of old Perforce applications are unaffected. |
|
|
Legacy support: Strong passwords are required for users of post-2003.2 Perforce applications, but existing passwords are not reset. Pre-2003.2 Perforce applications can set passwords with p4 passwd or in the p4 user form, but password strength is not enforced.
Users with passwords can use either their
The |
|
|
Legacy support: All unverified strength passwords must be changed.
Users of pre-2003.2 Perforce applications cannot set
passwords. Users at release 2003.2 or higher must use
p4 passwd and enter their passwords
at the prompt. Setting passwords with the p4
user form or the p4 passwd -O
On Windows, passwords are no longer stored in (or read
from) the registry. (Storing
Users who have set strong passwords with a 2003.2 or
higher Perforce application can use either their
The |
|
|
All password-based authentication is rejected. Users must use ticket-based authentication (p4 login).
If you have scripts that rely on passwords, use
p4 login to create a ticket valid
for the user running the script, or use p4
login -p to display the value of a ticket
that can be passed to Perforce commands as though it
were a password (that is, either from the command line,
or by setting
The |
|
|
Authenticated service users must be used for all replica server and remote depot connections to this server. |
Requiring minimum revisions of Perforce application software
The Perforce versioning service offers a mechanism to control which revisions of client applications are able to connect to Perforce.
To require a minimum revision, set the configurables
minClient to the appropriate revision, and
(optionally) set minClientMessage to the error
message displayed when users of older applications connect to the
server.
For example:
p4 configure set minClient=2010.2
p4 configure set minClientMessage="Please upgrade to 2010.2 or higher"
Password strength requirements
Certain combinations of server security level and Perforce
applications require users to set "strong" passwords. A password is
considered strong if it is at least
dm.password.minlength characters long (by
default, eight characters), and at least two of the following are
true:
-
The password contains uppercase letters.
-
The password contains lowercase letters.
-
The password contains nonalphabetic characters.
For example, the passwords a1b2c3d4,
A1B2C3D4, aBcDeFgH are
considered strong in an environment in which
dm.password.minlength is 8, and the
security is configurable to at least 1.
You can configure a minimum password length requirement on a
sitewide basis by setting the
dm.password.minlength configurable. For example,
to require passwords to be at least 16 characters in length, a
superuser can run:
p4 configure set dm.password.minlength=16
Passwords may be up to 1024 characters in length. The default minimum password length is eight characters.
Managing and resetting user passwords
Perforce superusers can manually set a Perforce user's password with:
p4 passwd username
When prompted, enter a new password the user.
To force a user with an existing password to reset his or her own password the next time they use Perforce, use the following command:
p4 admin resetpassword -u
username
You can force all users with passwords (including the superuser that invokes this command) to reset their passwords by using the command:
p4 admin resetpassword -a
Running p4 admin resetpassword -a resets only
the passwords of users who already exist (and who have passwords).
If you create new user accounts with default passwords, you can
further configure your installation to require that all
newly-created reset their passwords before issuing their first
command. To do this, set the
dm.user.resetpassword configurable as follows:
p4 configure set dm.user.resetpassword=1
Creating users
By default, Perforce creates a new user record in its database
whenever a command is issued by a user that does not exist.
Perforce superusers can also use the -f
(force) flag to create a new user as follows:
p4 user -f username
Fill in the form fields with the information for the user you want to create.
The p4 user command also has an option
(-i) to take its input from the standard
input instead of the forms editor. To quickly create a large number
of users, write a script that reads user data, generates output in
the format used by the p4 user form, and then
pipes each generated form to p4 user -i -f.
Preventing automatic creation of users
By default, Perforce creates a new user record in its database
whenever a user invokes any command that can update the depot or
its metadata. You can control this behavior by setting the
dm.user.noautocreate configurable with the
p4 configure command:
|
Value |
Meaning |
|---|---|
|
|
A user record is created whenever any new user invokes a command that updates the depot or its metadata (default). |
|
|
New users must create their own user records by explicitly running p4 user. |
|
|
Only the Perforce superuser can create a new user with p4 user. |
For example:
p4 configure set dm.user.noautocreate=1
changes the server's behavior to require that new users first create their own accounts before attempting to modify data on the server.
Renaming users
You can use the p4 renameuser command to rename users. The command renames the user and modifies associated artifacts to reflect the change: the user record, groups that include the user, properties that apply to the user, and so on. For detailed information see the description of the p4 renameuser command in the Perforce Command Reference. In general, the user name is not changed in descriptive text fields such as change descriptions. It is only changed where the name appears as the owner or user field of the database record.
For best results, follow these guidelines:
-
Before you use this command, check to see that the new user name does not already exist. Using an existing name might result in the merging of data for the existing and the renamed user despite the best efforts of the system to prevent such merges.
-
The user issuing this command should not be the user being renamed.
-
The user being renamed should not be using the server when this command executes. After the command completes, the user should log out and then log back in.
-
The p4 renameuser command does not process unloaded workspaces: all the user's workspaces should be reloaded (or deleted) first.
A distributed installation might contain local workspaces or local labels owned by the user; these workspaces and labels, which are bound to Edge Servers, should be deleted or moved to the Commit Server first.
-
Files of type +k which contain the
$Author$tag that were submitted by the user will have incorrect digests following this command. Use p4 verify -v to recompute the digest value after the rename.
Deleting obsolete users
Each standard user on the system consumes one Perforce license. A Perforce administrator can free up licenses by deleting users with the following command:
p4 user -d -f
username
Before you delete a user, you must first revert (or submit) any files a user has open in a changelist. If you attempt to delete a user with open files, Perforce displays an error message to that effect.
Deleting a user frees a Perforce license but does not automatically update the group and protections tables. Use p4 group and p4 protect to delete the user from these tables.
Adding new licensed users
Perforce licenses are controlled by a text file called
license. This file resides in the server root
directory.
To add or update a license file, stop the Perforce Server, copy the
license file into the server root directory, and
restart the Perforce Server.
You can update an existing license without
shutting down the Perforce Server, use p4 license
-i to read the new license file from the standard input.
Most new license files obtained from Perforce can be installed with
p4 license , except for when the server IP
address has changed. If the server IP address has changed, or if no
license file currently exists, restart the
Server with p4 admin restart.
Operator users consume no licenses
Organizations whose system administrators do not use Perforce's
versioning capabilities may be able to economize on licensing costs
by using the operator user type.
The operator user type is intended for system
administrators who, even though they have super
or admin privileges, are responsible for the
maintenance of the Perforce Server, rather than the development of
software or other assets on the server.
There are three types of Perforce users:
standard users, operator
users, and service users. Standard users are the
default, and each standard user consumes one Perforce license.
Service users do not require licenses, but are restricted to
automated inter-server communication processes in replicated and
multiserver environments (see “Service users”).
An operator user does not require a Perforce
license, and can run only the following commands:
-
p4 admin stop
-
p4 admin restart
-
p4 admin checkpoint
-
p4 admin journal
-
p4 dbstat
-
p4 dbverify
-
p4 diskspace
-
p4 configure
-
p4 counter (including
-f) -
p4 counters
-
p4 journaldbchecksums
-
p4 jobs (including
-R) -
p4 login
-
p4 logout
-
p4 logappend
-
p4 logparse
-
p4 logrotate
-
p4 logschema
-
p4 logstat
-
p4 logtail
-
p4 lockstat
-
p4 monitor
-
p4 passwd
-
p4 ping
-
p4 serverid
-
p4 verify
-
p4 user
Service users
There are three types of Perforce users:
standard users, operator
users, and service users. A
standard user is a traditional user of Perforce,
an operator user is intended for human or
automated system administrators, and a service
user is used for server-to-server authentication, whether in
the context of remote depots
(see “Remote depots and distributed development”)
or in distributed environments
(see Distributing Perforce.)
Creating a service user for each Perforce
service you install. Doing so can simplify the task of
interpreting your server logs, but can also improve security by
requiring that any remote Perforce services with which yours
is configured to communicate have valid login tickets for your
installation. Service users do not consume Perforce licenses.
A service user can run only the following commands:
-
p4 dbschema
-
p4 export
-
p4 login
-
p4 logout
-
p4 passwd
-
p4 info
-
p4 user
To create a service user, run the command:
p4 user -f service1
The standard user form is displayed. Enter a new line to set the
new user's Type: to be
service; for example::
User:      service1
Email:     [email protected]
FullName:  Service User for remote depots
Type:      service
By default, the output of p4 users omits service users. To include service users, run p4 users -a.
Tickets and timeouts for service users
A newly-created service user that is not a member of any groups
is subject to the default ticket timeout of 12 hours. To avoid
issues that arise when a service user's ticket ceases to be
valid, create a group for your service users that features an
extremely long timeout, or to unlimited. On
the master server, issue the following command:
p4 group service_users
Add service1 to the list of
Users: in the group, and set the
Timeout: and
PasswordTimeout: values to a large value or to
unlimited.
Group:            service_users
Timeout:          unlimited
PasswordTimeout:  unlimited
Subgroups:
Owners:
Users:
        service1
Permissions for service users
On your server, use p4 protect to grant
the service user super permission. Service
users are tightly restricted in the commands they can run, so
granting them super permission is safe.
If you are only using the service user for remote depots and
code drops, you may further reduce this user's permissions
as described in “Restricting access to remote depots”.
Reverting files left open by obsolete users
If files have been left open by a nonexistent or obsolete user (for instance, a departing employee), a Perforce administrator can revert the files by deleting the client workspace specification in which the files were opened.
As an example, if the output of p4 opened includes:
//depot/main/code/file.c#8 - edit default change
                                         (txt) by jim@stlouis
you can delete the stlouis client workspace
specification with:
p4 client -d -f stlouis
Deleting a client workspace specification automatically reverts all files opened in that workspace, deletes pending changelists associated with the workspace, and any pending fix records associated with the workspace. Deleting a client workspace specification does not affect any files in the workspace actually used by the workspace's owner; the files can still be accessed by other employees.
Reclaiming disk space by archiving files
Over time, a Perforce server accumulates many revisions of files from old projects that are no longer in active use. Because p4 delete merely marks files as deleted in their head revisions, it cannot be used to free up disk space on the server.
Archive depots are a solution to this problem. You use archive depots to move infrequently-accessed files to bulk storage. To create one, mount a suitable filesystem, and use the p4 archive (and related p4 restore) commands to populate an archive depot located on this storage.
Note
Archive depots are not a backup mechanism.
Archive depots are merely a means by which you can free up diskspace by reallocating infrequently-accessed files to bulk storage, as opposed to p4 obliterate, which removes file data and history.
Archiving is restricted to files that meet all of the following criteria:
-
By default, files must be stored in full (
+F) or compressed (+C) format. To archive text files (or other files stored as deltas), use p4 archive -t, but be aware that the archiving of RCS deltas is computationally expensive. -
Files must not be copied or branched from other revisions
-
Files must not be copied or branched to other revisions
-
Files must already exist in a local depot.
To create an archive depot and archive files to it:
-
Create a new depot with p4 depot and set the depot's
Type:toarchive. Set the archive depot'sMap:to point to a filesystem for near-line or detachable storage. -
Mount the volume to which the archive depot is to store its files.
-
Use p4 archive to transfer the files from a local depot to the archive depot.
-
(Optionally), unmount the volume to which the archive files were written.
Disk space is freed up on the (presumably high-performance) storage used for your local depot, and users can no longer access the contents of the archived files, but all file history is preserved.
To restore files from an archive depot:
-
Mount the volume on which the archive depot's files are stored.
-
Use p4 restore to transfer the files from the archive depot to a local depot.
-
(Optionally), unmount the volume to which the archive files were restored.
To purge data from an archive depot
-
Mount the volume on which the archive depot's files are stored.
-
Use p4 archive -p to purge the archives of the specified files in the archive depot.
On completion, the action for affected revisions is set to
purge, and the purged revisions can no longer be restored. The data is permanently lost. -
(Optionally), unmount the volume from which the archive files were purged.
Reclaiming disk space by obliterating files
Warning!
Use p4 obliterate with caution. This is the one of only two commands in Perforce that actually remove file data. (The other command that removes file data is the archive-purging option for p4 archive)
Occasionally, users accidentally add files (or entire directory trees) to the wrong areas of the depot by means of an inadvertent branch or submit. There may also be situations that require that projects not only be removed from a depot, but the history of development work be removed with it. These are the situations in which p4 obliterate can be useful.
Perforce administrators can use p4
obliterate filename to remove
all traces of a file from a depot, making the file
indistinguishable from one that never existed.
Note
The purpose of a version management system is to enable your organization to maintain a history of what operations were performed on which files. The p4 obliterate command defeats this purpose; as such, it is intended only to be used to remove files that never belonged in the depot in the first place, and not as part of a normal software development process. Consider using p4 archive and p4 restore instead.
Note also that p4 obliterate is computationally expensive; obliterating files requires that the entire body of metadata be scanned per file argument. Avoid using p4 obliterate during peak usage periods.
Warning!
Do not use operating system commands (erase,
rm, and their equivalents) to remove files
from the Perforce server root by hand.
By default, p4
obliterate filename does
nothing; it merely reports on what it would do. To actually destroy
the files, use p4 obliterate -y
filename.
To destroy only one revision of a file, specify only the desired revision number on the command line. For instance, to destroy revision 5 of a file, use:
p4 obliterate -y
file#5
Revision ranges are also acceptable. To destroy revisions 5 through 7 of a file, use:
p4 obliterate -y
file#5,7
Warning!
If you intend to obliterate a revision range, be certain you've specified it properly. If you fail to specify a revision range, all revisions of the file are obliterated.
The safest way to use p4 obliterate is to
use it without the
-y flag until you are certain the
files and revisions are correctly specified.
Backing up a workspace
You can use the -o flag to the p4 unload command
to unload a client, label, or task stream to a flat file on the client rather than to a file
in the unload depot. This can be useful for seeding a client into another database or for
creating a private backup of the client. The flat file uses standard journal format. The
client, label, or task stream remains fully loaded after the command is run.
Deleting changelists and editing changelist descriptions
Perforce administrators can use the -f
(force) flag with p4 change to change the
description, date, or user name of a submitted changelist. The
syntax is p4 change -f
changenumber. This command
presents the standard changelist form, but also enables superusers
to edit the changelist's time, description, date, and associated
user name.
You can also use the -f flag to delete any
submitted changelists that have been emptied of files with
p4 obliterate. The full syntax is p4
change -d -f changenumber.
Example 3. Updating changelist 123 and deleting changelist 124
Use p4 change with the
-f (force) flag:
p4 change -f 123
p4 change -d -f 124
The User: and
Description: fields for change
123 are edited, and change
124 is deleted.
Verifying files by signature
Perforce administrators can use the p4 verify
filenames command to
validate stored MD5 digests of each revision of the named files.
The signatures created when users store files in the depot can
later be used to confirm proper recovery in case of a crash: if the
signatures of the recovered files match the previously saved
signatures, the files were recovered accurately. If a new signature
does not match the signature in the Perforce database for that file
revision, Perforce displays the characters BAD!
after the signature.
It is good practice to run p4 verify before performing your nightly system backups, and to proceed with the backup only if p4 verify reports no corruption.
For large installations, p4 verify can take some time to run. The server is also under heavy load while files are being verified, which can impact the performance of other Perforce commands. Administrators of large sites might want to perform p4 verify on a weekly basis, rather than a nightly basis.
If you ever see a BAD! signature during a
p4 verify command, your database or versioned
files might be corrupt, and you should contact Perforce Technical
Support.
Verifying files during server upgrades
It is good practice to use p4 verify as follows before and after server upgrades:
-
Before the upgrade, run:
p4 verify -q //...
to verify the integrity of your server before the upgrade.
-
Take a checkpoint and copy the checkpoint and your versioned files to a safe place.
-
Perform the server upgrade.
-
After the upgrade, run:
p4 verify -q //...
to verify the integrity of your new system.
Defining filetypes with p4 typemap
Perforce uses the filesys.binaryscan
configurable to determine how many bytes to examine when
determining if a file is of type text or
binary. By default,
filesys.binaryscan is 65536; if the high bit is
clear in the first 65536 bytes, Perforce assumes it to be
text; otherwise, it is assumed to be
binary. Files compressed in the
.zip format (including .jar
files) are also automatically detected and assigned the type
ubinary.
Although this default behavior can be overridden by the use of the
-t flag,
it's easy for users to overlook this consideration, particularly in
cases where files' types are usually (but not always) detected
correctly. Certain file formats, such as RTF (Rich Text Format) and
Adobe PDF (Portable Document Format), can start with a series of
comment fields or other textual data. If these comments are
sufficiently long, such files can be erroneously detected by
Perforce as being of type filetypetext.
The p4 typemap command solves this problem by
enabling system administrators to set up a table that links
Perforce file types with filename specifications. If an entry in
the typemap table matches a file being added, it overrides the file
type that would otherwise be assigned by the Perforce application.
For example, to treat all PDF and RTF files as
binary, use p4 typemap to
modify the typemap table as follows:
Typemap:
        binary //....pdf
        binary //....rtf
The first three periods ("...") in the
specification are a Perforce wildcard specifying that all files
beneath the root directory are to be included in the mapping. The
fourth period and the file extension specify that the specification
applies to files ending in .pdf (or
.rtf).
The following table lists recommended Perforce file types and modifiers for common file extensions.
|
File type |
Perforce file type |
Description |
|---|---|---|
|
|
|
Active server page file |
|
|
|
Video for Windows file |
|
|
|
Windows bitmap file |
|
|
|
Btrieve database file |
|
|
|
Conference link file |
|
|
|
Cascading style sheet file |
|
|
|
Microsoft Word document |
|
|
|
Microsoft Word template |
|
|
|
Export file (Microsoft Visual C++) |
|
|
|
GIF graphic file |
|
|
|
Gzip compressed file |
|
|
|
HTML file |
|
|
|
HTML file |
|
|
|
Icon file |
|
|
|
Active Server include file |
|
|
|
Initial application settings file |
|
|
|
JPEG graphic file |
|
|
|
JavaScript language source code file |
|
|
|
Library file (several programming languages) |
|
|
|
Log file |
|
|
|
MPEG video file |
|
|
|
Adobe PDF file |
|
|
|
Sybase Power Designer file |
|
|
|
Microsoft PowerPoint file |
|
|
|
Microsoft Excel file |
Use the following p4 typemap table to map all of the file extensions to the Perforce file types recommended in the preceding table.
# Perforce File Type Mapping Specifications.
#
#  TypeMap:     a list of filetype mappings; one per line.
#               Each line has two elements:
#               Filetype: The filetype to use on 'p4 add'.
#               Path:     File pattern which will use this filetype.
# See 'p4 help typemap' for more information.
TypeMap:

        text //....asp
        binary+F //....avi
        binary //....bmp
        binary //....btr
        text //....cnf
        text //....css
        binary //....doc
        binary //....dot
        binary+w //....exp
        binary+F //....gif
        binary+F //....gz
        text //....htm
        text //....html
        binary //....ico
        text //....inc
        text+w //....ini
        binary //....jpg
        text //....js
        binary+w //....lib
        text+w //....log
        binary+F //....mpg
        binary //....pdf
        text+w //....pdm
        binary //....ppt
        binary //....xls
If a file type requires the use of more than one file type
modifier, specify the modifiers consecutively. For example,
binary+lFS10 refers to a
binary file with exclusive-open
(l), stored in full (F) rather
than compressed, and for which only the most recent ten revisions
are stored (S10).
For more information, see the p4 typemap page in the Perforce Command Reference.
Implementing sitewide pessimistic locking with p4 typemap
By default, Perforce supports concurrent development, but
environments in which only one person is expected to have a file
open for edit at a time can implement pessimistic locking by using
the +l (exclusive open) modifier as a partial
filetype. If you use the following typemap, the
+l modifier is automatically applied to all
newly added files in the depot:
Typemap:
        +l //depot/...
If you use this typemap, any files your users add to the depot
after you update your typemap automatically have the
+l modifier applied, and may only be opened for
edit by one user at a time. The typemap table applies only to new
additions to the depot; after you update the typemap table for
sitewide exclusive open, files previously submitted without
+l must be opened for edit with p4 edit
-t+l filename and resubmitted.
Similarly, users with files already open for edit must update their
filetypes with p4 reopen
-t+l filename.
Forcing operations with the -f flag
Certain commands support the -f flag, which
enables Perforce administrators and superusers to force certain
operations unavailable to ordinary users. Perforce administrators
can use this flag with p4 branch, p4
change, p4 client, p4
job, p4 label, and p4
unlock. Perforce superusers can also use it to override
the p4 user command. The usages and meanings of
this flag are as follows.
|
Command |
Syntax |
Function |
|---|---|---|
|
p4 branch |
p4 branch -f
|
Allows the modification date to be changed while editing the branch mapping |
|
p4 branch -f -d
|
Deletes the branch, ignoring ownership |
|
|
p4 change |
p4 change -f
[ |
Allows the modification date to be changed while editing the changelist specification |
|
p4 change -f
|
Allows the description field and username in a committed changelist to be edited |
|
|
p4 change -f -d
|
Deletes empty, committed changelists |
|
|
p4 client |
p4 client -f
|
Allows the modification date to be changed while editing the client specification |
|
p4 client -f -d
|
Deletes the client, ignoring ownership, even if the client has opened files |
|
|
p4 job |
p4 job -f
[ |
Allows the manual update of read-only fields |
|
p4 label |
p4 label -f
|
Allows the modification date to be changed while editing the label specification |
|
p4 label -f -d
|
Deletes the label, ignoring ownership |
|
|
p4 unlock |
p4 unlock -c changelist -f
|
Releases a lock (set with p4 lock) on an open file in a pending numbered changelist, ignoring ownership |
|
p4 user |
p4 user -f
|
Allows the update of all fields, ignoring ownership
This command requires |
|
p4 user -f -d
|
Deletes the user, ignoring ownership
This command requires |
Advanced Perforce administration
Encrypting connections to a Perforce server
With the addition of SSL support in 2012.1, there is no longer a need to manually configure an ssh or other VPN tunnel in order to run Perforce securely over an untrusted communication channel.
Server and client setup
For any given Perforce server, proxy, or broker, SSL encryption is an all-or-nothing option: If a Perforce server is configured to use SSL (presumably for security reasons), all Perforce applications must be configured to use SSL. Conversely, if a Perforce server is configured to accept plaintext connections (either for performance reasons or for backwards compatibility), all applications must connect in plaintext.
By default, a P4PORT setting that does not
specify a protocol is assumed to be in plaintext. It is good
practice to configure Perforce applications to explicitly
specify the protocol, either
tcp:host:port
for plaintext, or
ssl:host:port
for encrypted connections.
The first time a user connects to an SSL-enabled server, their Perforce applications will inform them of the fingerprint of the server's key.
If the user can independently verify that the fingerprint is
accurate, they should add the server to their
P4TRUST file (either by using the p4
trust command, by following the prompts in P4V or
other Perforce applications, or by manually adding the
fingerprint to the file).
Key and certificate management
When configured to accept SSL connections, all server processes
(p4d, p4p,
p4broker), require a valid certificate and
key pair on startup. These files are stored in the directory
specified by the P4SSLDIR environment variable.
In order for an SSL-enabled server process to start, the
following additional conditions must be met:
-
P4SSLDIRmust be set to a valid directory. -
The
P4SSLDIRdirectory must be owned by the same userid as the one running the Perforce server, proxy, or broker process. TheP4SSLDIRdirectory must not be readable by any other user. On UNIX, for example, the directory's permissions must be set to 0700 (drwx------) or 0500 (dr-x------). -
Two files, named
privatekey.txtandcertificate.txt, must exist inP4SSLDIR.These files correspond to the PEM-encoded private key and certificate used for the SSL connection. They must be owned by the userid that runs the Perforce server, proxy, and broker process, and must also have their permissions set such as to make them unreadable by other users. On UNIX, for example, the files' permissions must be set to 0600 (
-rw-------) or 0400 (-r--------).You can supply your own private key and certificate, or you can use p4d -Gc to generate a self-signed key and certificate pair.
-
To generate a fingerprint from your server's private key and certificate, run p4d -Gf . (
P4SSLDIRmust be configured with the correct file names and permissions, and the current date must be valid for the certificate.)After you have communicated this fingerprint to your end users, your end users can then compare the fingerprint the server offers with the fingerprint you have provided. If the two fingerprints match, users can use p4 trust to add the fingerprint to their
P4TRUSTfiles.
Key and certificate generation
To generate a certificate and private key for your server:
-
Set
P4SSLDIRto a valid directory in a secure location. The directory specified byP4SSLDIRmust be secure: owned by the same userid as the one generating the keypair, and it must not be readable by any other user. -
Optionally, create a file named
config.txtin yourP4SSLDIRdirectory before running p4d -Gc, and format the file as follows:# C: Country Name - 2 letter code (default: US) C = # ST: State or Province Name - full name (default: CA) ST = # L: Locality or City Name (default: Alameda) L = # O: Organization or Company Name (default: Perforce Autogen Cert) O = # OU = Organization Unit - division or unit OU = # CN: Common Name (usually the DNS name of the server) # (default: the current server's DNS name) CN = # EX: number of days from today for certificate expiration # (default: 730, e.g. 2 years) EX = # UNITS: unit multiplier for expiration (defaults to "days") # Valid values: "secs", "mins", "hours"UNITS =
-
Generate the certificate and key pair with the following command:
p4d -Gc
If
P4SSLDIR(and optionally,config.txt) has been correctly configured, and if no existing private key or certificate is found, two files, namedprivatekey.txtandcertificate.txt, are created inP4SSLDIR.If a
config.txtfile is not present, the following default values are assumed, and a certificate is created that expires in 730 days (two years, excluding leap years).C=US ST=CA L=Alameda O=Perforce Autogen Cert OU= CN=
the-DNS-name-of-your-serverEX=730 UNITS=days -
Generate a fingerprint for your server's key and certificate pair.
p4d -Gf
This command displays the fingerprint of the server's public key, and then exits.
                                             Fingerprint:
                                             CA:BE:5B:77:14:1B:2E:97:F0:5F:31:6E:33:6F:0E:1A:E9:DA:EF:E2
Record your server's fingerprint for your own records and communicate it to your users via an out-of-band communications channel.
If a Perforce application reports a a different fingerprint (and you have not recently installed a new certificate and key pair), your users should consider such changes as evidence of a potential man-in-the-middle threat.
Note
Because Perforce Servers can use self-signed certificates, you may also use third-party tools such as OpenSSL or PuTTY to generate the key pairs, or supply your own key pair. The p4d -Gf command accepts user-supplied credentials. The private key should be a PEM-encoded 2048-bit RSA key, stripped of any passphrase protection.
If you are supplying your own key, your
privatekey.txt and
certificate.txt files in
P4SSLDIR must be PEM-encoded, with the private
key file stripped of passphrase protection.
Whether you supply your own key and certificate pair or generate one with p4d -Gc, it is imperative that these files are stored in a secure location that is readable only by the p4d binary.
Migrating to an SSL environment
In a mixed environment, each link between Perforce servers, proxies, or brokers may be configured to be in either plaintext or SSL, independent of the encryption choice for any other link.
For example, during a migration from cleartext to SSL, a Perforce Broker may be configured to accept plaintext connections from older Perforce applications, and to forward those requests (encrypted by SSL) to a Perforce Server that requires SSL connections.
For example, a Perforce Broker could be configured to
listen on
tcp:old-server:1666, and redirect all
requests to a target of
ssl:new-server:1667. Users of new Perforce
applications could use SSL to connect directly to the upgraded
Perforce Server (by setting P4PORT to
ssl:new-server:1667), while users of older
Perforce applications could continue to use plaintext when
connecting to a Perforce Broker (by setting
P4PORT to old-server:1666).
After migration is complete, the broker at
old-server:1666 could be deactivated (or
reconfigured to require SSL connections), and any remaining
legacy processes or scripts still still attempting to connect
via plaintext could be upgraded manually.
The Perforce Proxy and the Perforce Broker support the
-Gc and -Gf
flags, and use the P4SSLDIR environment
variable. You generate certificate and key pairs for these
processes (and confirm fingerprints) as you would with a single
Perforce Server. In order for two servers to communicate over
SSL, the administrator of the downstream server (typically a
replica server, Proxy, or Broker process) must also use the
p4 trust command to generate a
P4TRUST file for the service user associated
with the downstream server.
When migrating from a non-SSL environment to an SSL-based environment, it is your responsibility to securely communicate the new server's fingerprint to your users.
Secondary cipher suite
By default, Perforce's SSL support is based on the AES256-SHA
cipher suite. To use CAMELLIA256-SHA, set the
ssl.secondary.suite tunable to 1.
Specifying IP addresses in P4PORT
Under most circumstances, your Perforce server's
P4PORT setting consists of a protocol and a port
number. Users must know the IP address (or be able to resolve it
from a hostname) of the Perforce server in order to connect to it.
If you specify a protocol, an IP address and a
port number in P4PORT to the p4d
process, the Perforce server ignores requests from any IP addresses
other than the one specified in P4PORT. This
configuration is useful if you need to configure
p4d to listen only to a specific network
interface or IP address; you can force your Perforce server to
ignore all non-local connection requests by setting
P4PORT==protocol:localhost:port.
Running from inetd on UNIX
Under a normal installation, the Perforce service runs on UNIX as a
background process that waits for connections from users. To have
p4d start up only when connections are made to
it, using inetd and p4d -i,
add the following line to /etc/inetd.conf:
p4dservice
stream tcp nowait
username
/usr/local/bin/p4d p4d -i -r
p4droot
and then add the following line to /etc/services:
p4dservice
nnnn
/tcp
where:
-
p4dserviceis the service name you choose for this Perforce server -
/usr/local/binis the directory holding your p4d binary -
p4drootis the root directory (P4DROOT) to use for this Perforce server (for example,/usr/local/p4d) -
usernameis the UNIX user name to use for running this Perforce server -
nnnnis the port number for this Perforce server to use
The "extra" p4d on the
/etc/inetd.conf line must be present;
inetd passes this to the OS as
argv[0]. The first argument, then, is the
-i flag, which causes p4d
not to run in the background as a daemon, but rather to serve the
single client connected to it on stdin/stdout. (This is the
convention used for services started by inetd.)
This method is an alternative to running p4d
from a startup script. It can also be useful for providing special
services; for example, at Perforce, we have a number of test
servers running on UNIX, each defined as an
inetd service with its own port number.
There are caveats with this method:
-
inetdmay disallow excessive connections, so a script that invokes several thousand p4 commands, each of which spawns an instance of p4d viainetdcan causeinetdto temporarily disable the service. Depending on your system, you might need to configureinetdto ignore or raise this limit. -
There is no easy way to disable the server, since the p4d executable is run each time; disabling the server requires modifying
/etc/inetd.confand restartinginetd.
Case sensitivity and multiplatform development
Very early (pre-97.2) releases of the Perforce server treated all filenames, pathnames, and database entity names with case significance, whether the server was running on UNIX or Windows.
For example, //depot/main/file.c and
//depot/MAIN/FILE.C were treated as two
completely different files. This caused problems where users on
UNIX were connecting to a Perforce server running on Windows
because the filesystem underlying the server could not store files
with the case-variant names submitted by UNIX users.
In release 97.3, the behavior was changed, and only the UNIX server supports case-sensitive names. However, there are still some case-sensitivity problems that users can encounter when sharing development projects across UNIX and Windows.
If you are running a pre-97.2 server on Windows, please contact
<[email protected]> to discuss upgrading your
server and database.
For current releases of the server:
-
The Perforce server on UNIX supports case-sensitive names.
-
The Perforce server on Windows ignores case differences.
-
Case is always ignored in keyword-based job searches, regardless of platform.
The following table summarizes these rules.
|
Case-sensitive |
UNIX server |
Windows server |
|---|---|---|
|
Pathnames and filenames |
Yes |
No |
|
Database entities (workspaces, labels, and so on.) |
Yes |
No |
|
Job search keywords |
No |
No |
To find out what platform your Perforce server runs on, use p4 info.
Perforce server on UNIX
If your Perforce server is on UNIX, and you have users on both UNIX and Windows, your UNIX users must be very careful not to submit files whose names differ only by case. Although the UNIX server can support these files, when Windows users sync their workspaces, they'll find files overwriting each other.
Conversely, Windows users will have to be careful to use case
consistently in filenames and pathnames when adding new files.
They might not realize that files added as
//depot/main/one.c and
//depot/MAIN/two.c will appear in two
different directories when synced to a UNIX user's workspace.
The UNIX Perforce server always respects case in client names,
label names, branch view names, and so on. Windows users
connecting to a UNIX server should be aware that the lowercased
workstation names are used as the default names for new client
workspaces. For example, if a new user creates a client
workspace on a Windows machine named ROCKET,
his client workspace is named rocket by
default. If he later sets P4CLIENT to
ROCKET (or Rocket,
Perforce will tell him his workspace is undefined. He must set
P4CLIENT to rocket (or unset
it) to use the client workspace he defined.
Perforce server on Windows
If your Perforce server is running on Windows, your UNIX users must be aware that their Perforce server will store case-variant files in the same namespace.
For example, users who try something like this:
p4 add dir/file1
p4 add dir/file2
p4 add DIR/file3
should be aware that all three files will be stored in the same
depot directory. The depot pathnames and filenames assigned to
the Windows server will be those first referenced. (In this
case, the depot pathname would be dir, and
not DIR.)
Monitoring server activity
Use the p4 monitor command to observe and control Perforce-related processes running on your Perforce server machine.
Enabling process monitoring
Server process monitoring requires minimal system resources,
but you must enable process monitoring for p4
monitor to work. To enable process monitoring, set
the monitor configurable as follows:
p4 configure set monitor=1
Enabling idle processes monitoring
By default, IDLE processes (often associated
with custom applications based on the Perforce API) are not
included in the output of p4 monitor. To
include idle processes in the default output of p4
monitor, use monitoring level 2.
p4 configure set monitor=2
To display idle processes, use the command:
p4 monitor show -s I
Listing running processes
To list the processes monitored by the Perforce server, use the command:
p4 monitor show
To restrict the display to processes currently in the running state, use the command:
p4 monitor show -s R
By default, each line of p4 monitor output looks like this:
pid
status
owner
hh:mm:ss
command
[args]
where pid is the UNIX process ID (or
Windows thread ID), status is
R or T depending on whether the
process is running or marked for termination,
owner is the Perforce user name of the
user who invoked the command, hh:mm:ss
is the time elapsed since the command was called, and
command and
args are the command and arguments as
received by the Perforce server. For example:
$ p4 monitor show
74612 R qatool     00:00:47 job
78143 R edk        00:00:01 filelog
78207 R p4admin    00:00:00 monitor
To show the arguments with which the command was called, use the
-a (arguments) flag:
$ p4 monitor show -a
74612 R qatool     00:00:48 job job004836
78143 R edk        00:00:02 filelog //depot/main/src/proj/file1.c //dep
78208 R p4admin    00:00:00 monitor show -a
To obtain more information about user environment, use the
-e flag. The -e flag
produces output of the form:
pid client IP-address status owner workspace hh:mm:ss command
[args]
where client is the Perforce application
(and version string or API protocol level),
IP-address is the IP address of the
user's Perforce application, and
workspace is the name of the calling
user's current client workspace setting. For example:
$ p4 monitor show -e
74612 p4/2011.1 192.168.10.2   R qatool    buildenvir 00:00:47 job
78143           192.168.10.4   R edk       eds_elm    00:00:01 filelog
78207 p4/2011.1 192.168.10.10  R p4admin   p4server   00:00:00 monitor
By default, all user names and (if applicable) client workspace
names are truncated at 10 characters, and lines are truncated at 80
characters. To disable truncation, use the
-l (long-form) option:
$ p4 monitor show -a -l
74612 R qatool     00:00:50 job job004836
78143 R edk        00:00:04 filelog //depot/main/src/proj/file1.c //dep
ot/main/src/proj/file1.mpg
78209 R p4admin    00:00:00 monitor show -a -l
Only Perforce administrators and superusers can use the
-a, -l, and
-e options.
Pausing, resuming, and terminating processes
To pause and resume long-running processes (such as p4 verify or p4 pull), a Perforce superuser can use the commands p4 monitor pause and p4 monitor resume. If a process on a Perforce Server consumes excessive resources, it can also be marked for termination with p4 monitor terminate.
Once marked for termination, the process is terminated by the Perforce server within 50000 scan rows or lines of output. Only processes that have been running for at least ten seconds can be marked for termination.
Users of terminated processes are notified with the following message:
Command has been canceled, terminating
                                              request
Processes that involve the use of interactive forms (such as p4 job or p4 user) can also be marked for termination, but data entered by the user into the form is preserved. Some commands, such as p4 obliterate, cannot be terminated.
Clearing entries in the process table
Under some circumstances (for example, a Windows machine is rebooted while certain Perforce commands are running), entries may remain in the process table even after the process has terminated.
Perforce superusers can remove these erroneous entries from the
process table altogether with p4 monitor
clear pid, where
pid is the erroneous process ID. To
clear all processes from the table (running or not), use
p4 monitor clear all.
Running processes removed from the process table with p4 monitor clear continue to run to completion.
Perforce server trace and tracking flags
To modify the behavior of command tracing or performance tracking,
specify the appropriate -v
flag to the p4d startup command. Use
subsystem=valueP4LOG or the -L
flag to specify the
log file. For example:
logfile
p4d -r /usr/perforce -v server=2 -p 1666 -L /usr/perforce/logfile
Before you activate logging, make sure that you have adequate disk space.
Windows
When running Perforce as a Windows service, use the p4
set command to set P4DEBUG as a
registry variable. You can also set these trace flags when
running p4d.exe as a server process from the
command line.
Setting server debug levels on a Perforce server
(p4d) has no effect on the debug level of a
Perforce Proxy (p4p) process, and vice versa.
Higher levels of the Perforce server command tracing and tracking flags are typically recommended only for system administrators working with Perforce Technical Support to diagnose or investigate problems.
Command tracing
The server command trace flags and their meanings are as follows.
|
Trace flag |
Meaning |
|---|---|
|
|
Disable server command logging. |
|
|
Logs server commands to the server log file. (As of release 2011.1, this is the default setting) |
|
|
In addition to data logged at level 1, logs server
command completion and basic information on CPU time
used. Time elapsed is reported in seconds. On UNIX, CPU
usage (system and user time) is reported in
milliseconds, as per |
|
|
In addition to data logged at level 2, adds usage information for compute phases of p4 sync and p4 flush (p4 sync -k) commands. |
For command tracing, output appears in the specified log file, showing the date, time, username, IP address, and command for each request processed by the server.
Performance tracking
The Perforce Server produces diagnostic output in the server
log whenever user commands exceed certain predetermined
thresholds of resource usage. Performance tracking is enabled
by default, and if P4DEBUG is unset (or the
tracking flag is not specified on the command line), the
tracking level is computed based on the number of users in the
license file.
|
Tracking flag |
Meaning |
|---|---|
|
|
Turn off tracking. |
|
|
Track all commands. |
|
|
Track excess usage for a server with less than 10 users. |
|
|
Track excess usage for a server with less than 100 users. |
|
|
Track excess usage for a server with less than 1000 users. |
|
|
Track excess usage for a server with more than 1000 users. |
The precise format of the tracking output is undocumented and subject to change.
Auditing user file access
The Perforce Server is capable of logging individual file accesses
to an audit logfile. Auditing is disabled by default, and is only
enabled if P4AUDIT is set to point to the location
of the audit log file, or if the server is started with the
-A flag.
auditlog
When auditing is enabled, the server adds a line to the audit log file every time file content is transferred from the server to the client. On an active server, the audit log file will grow very quickly.
Lines in the audit log appear in the form:
date time
user@client
clientIP
command
file#rev
For example:
$ tail -2 auditlog
2011/05/09 09:52:45 karl@nail 192.168.0.12 diff //depot/src/x.c#1
2011/05/09 09:54:13 jim@stone 127.0.0.1 sync //depot/inc/file.h#1
If a command is run on the machine that runs the Perforce Server,
the clientIP is shown as
127.0.0.1.
If you are auditing server activity in a replicated environment,
each of your build farm or forwarding replica servers must have its
own P4AUDIT log set.
Advanced logging with structured log files
As of Release 2012.1, the Perforce Server can now be configured to
write log files in a structured(.csv) format.
Structured log files contain more detail than the conventional log
files, are easier to parse, and the Perforce Server offers
additional commands to help customize your site's logging
configuration:
Logging commands
|
Command |
Meaning |
|---|---|
|
p4 logappend |
If the user log is enabled, write an entry to
|
|
p4 logparse |
Parse a structured log file and return the logged data in tagged format |
|
p4 logrotate |
Rotate a named logfile, or, if no name is specified,
all server logs. This command applies only to
structured logs; it does not rotate the unstructured
|
|
p4 logstat |
Report the file size of the journal
( |
|
p4 logtail |
Output the last block of the error log
( |
|
p4 logschema |
Return a description of the specified log record type. |
Enabling structured logging
To enable structured logging, set the
serverlog.file.
configurable(s) to the name of the file. Valid names for
structured log files are:
N
|
Filename |
Description |
|---|---|
|
|
All loggable events (commands, errors, audit, etc...) |
|
|
Command events (command start, compute, and end) |
|
|
Error events (errors-failed, errors-fatal) |
|
|
Audit events (audit, purge) |
|
|
Command tracking (track-usage, track-rpc, track-db) |
|
|
User events; one record every time a user runs p4 logappend. |
|
|
Server events (startup, shutdown, checkpoint, journal rotation, etc.) |
|
|
Major events that occur during replica integrity checking. |
To enable recording of all eight log types, set the following configurables:
p4 configure set serverlog.file.1=all.csv
p4 configure set serverlog.file.2=commands.csv
p4 configure set serverlog.file.3=errors.csv
p4 configure set serverlog.file.4=audit.csv
p4 configure set serverlog.file.5=track.csv
p4 configure set serverlog.file.6=user.csv
p4 configure set serverlog.file.7=events.csv
p4 configure set serverlog.file.8=integrity.csv
Note that enabling all structured logging files can consume considerable diskspace.
Structured logfile rotation and diskspace limits
Each of the N configured
serverlog.file.N files has its own
corresponding
serverlog.maxmb.N
and
serverlog.retain.N
configurables. For each configured server log type, these
configurables control the maximum size (in megabytes) of the
logfile before rotation, and the number of rotated server logs
retained by the server.
Structured log files are automatically rotated on checkpoint,
journal creation, overflow of associated
serverlog.maxmb.N
limit (if configured), and the p4 logrotate
command.
Moving a Perforce server to a new machine
The procedure for moving an existing Perforce server from one machine to another depends on whether or not you're moving between machines
-
that use the same byte order,
-
that use different byte ordering, but the same text file (CR/LF) format, or
-
that use different byte order and a different text file format.
Additional considerations apply if the new machine has a different IP address/hostname.
The Perforce server stores two types of data under the Perforce root directory: versioned files and a database containing metadata describing those files. Your versioned files are the ones created and maintained by your users, and your database is a set of Perforce-maintained binary files holding the history and present state of the versioned files. In order to move a Perforce server to a new machine, both the versioned files and the database must be successfully migrated from the old machine to the new machine.
For more about the distinction between versioned files and database, as well as for an overview of backup and restore procedures in general, see “Backup and recovery concepts”.
For more information, see "Moving a Perforce Server" in the Perforce knowledge base:
http://answers.perforce.com/articles/KB_Article/Moving-a-Perforce-Server
Moving between machines of the same byte order
If the architecture of the two machines uses the same byte order
(for example, SPARC/SPARC, x86/x86, or even 32-bit Windows to
64-bit Windows), the versioned files and database can be copied
directly between the machines, and you only need to move the server
root directory tree to the new machine. You can use
tar, cp,
xcopy.exe, or any other method. Copy everything
in and under the P4ROOT directory - the
db.* files (your database) as well as the depot
subdirectories (your versioned files).
-
Back up your server (including a p4 verify before the backup) and take a checkpoint.
-
On the old machine, stop p4d.
-
Copy the contents of your old server root (
P4ROOT) and all its subdirectories on the old machine into the new server root directory on the new machine. -
Start p4d on the new machine with the desired flags.
-
Run p4 verify on the new machine to ensure that the database and your versioned files were transferred correctly to the new machine.
(Although the backup, checkpoint, and subsequent p4 verify are not strictly necessary, it's always good practice to verify, checkpoint, and back up your system before any migration and to perform a subsequent verification after the migration.)
Moving between different byte orders that use the same text format
If the internal data representation (big-endian vs. little-endian) convention differs between the two machines (for example, Linux-on-x86/SPARC), but their operating systems use the same CR/LF text file conventions, you can still simply move the server root directory tree to the new machine.
Although the versioned files are portable across architectures, the
database, as stored in the db.* files, is not.
To transfer the database, you will need to create a checkpoint of
your Perforce server on the old machine and use that checkpoint to
re-create the database on the new machine. The checkpoint is a text
file that can be read by a Perforce server on any architecture. For
more details, see “Creating a checkpoint”.
After you create the checkpoint, you can use
tar, cp,
xcopy.exe, or any other method to copy the
checkpoint file and the depot directories to the new machine. (You
don't need to copy the db.* files, because they
will be re-created from the checkpoint you took.)
-
On the old machine, use p4 verify to ensure that the database is in a consistent state.
-
On the old machine, stop p4d.
-
On the old machine, create a checkpoint:
p4d -jc
checkpointfile -
Copy the contents of your old server root (
P4ROOT) and all its subdirectories on the old machine into the new server root directory on the new machine.(To be precise, you don't need to copy the
db.*files, just the checkpoint and the depot subdirectories. Thedb.*files will be re-created from the checkpoint. If it's more convenient to copy everything, then copy everything.) -
On the new machine, if you copied the
db.*files, be sure to remove them from the newP4ROOTbefore continuing. -
Re-create a new set of
db.*files suitable for your new machine's architecture from the checkpoint you created:p4d -jr
checkpointfile -
Start p4d on the new machine with the desired flags.
-
Run p4 verify on the new machine to ensure that the database and your versioned files were transferred correctly to the new machine.
Moving between Windows and UNIX
In this case, both the architecture of the system and the CR/LF text file convention may be different. You still have to create a checkpoint, copy it, and re-create the database on the new platform, but when you move the depot subdirectories containing your versioned files, you also have to address the issue of the differing linefeed convention between the two platforms.
Depot subdirectories can contain both text and binary files. The
text files (in RCS format, ending with ",v ")
and binary files (directories of individual binary files, each
directory ending with ",d ") need to be
transferred in different ways in order to translate the line
endings on the text files while leaving the binary files unchanged.
As with all other migrations, be sure to run p4 verify after your migration.
Warning
Windows is a case-insensitive operating system. Files that
differ by case only on a UNIX server will occupy the same
namespace when transferred to a Windows machine. For instance,
files Makefile and file
makefile on a UNIX server will appear to
be the same file on a Windows machine.
Due to the risk of data loss due to case collision, migrations from UNIX servers to Windows are not supported.
Contact Perforce Technical Support for assistance when migrating a Perforce server from Windows to UNIX.
Changing the IP address of your server
If the IP address of the new machine is not the same as that of the old machine, you will need to update any IP-address-based protections in your protections table. See Administering Perforce: Protections for information on setting protections for your Perforce server.
If you are a licensed Perforce customer, you will also need a new license file to reflect the server's new IP address. Contact Perforce Technical Support to obtain an updated license.
Changing the hostname of your server
If the hostname of the new machine serving Perforce is different
from that of its predecessor, your users must change their
P4PORT settings. If the old machine is being retired
or renamed, consider setting an alias for the new machine to match
that of the old machine, so that your users won't have to change
their P4PORT settings.
Using multiple depots
New depots are defined with the command p4
depot depotname. Depots can be
defined as local, stream,
remote, unload,
archive, or spec depots.
Just as Perforce servers can host multiple depots, Perforce applications can access files from multiple depots. These other depots can exist on the Perforce server normally accessed by the Perforce client, or they can reside within other, remote, Perforce servers.
Local depots reside on the Perforce server normally accessed by the
user's Perforce application. When using local depots, a Perforce
application communicates with the Perforce server specified by the
user's P4PORT environment variable or equivalent
setting.
Stream depots contain streams, a type of branch that includes hierarchy and policy. Like local depots, stream depots reside on the Perforce server.
When using remote depots, the user's Perforce application uses the
Perforce server specified by the user's P4PORT
environment variable or equivalent setting as a means to access a
second, remote, Perforce server. The local
Perforce server communicates with the remote Perforce server in
order to access a subset of its files. Remote depots are primarily
used to facilitate the sharing of code (that is, "code drops")
between separate organizations, and are discussed in
“Remote depots and distributed development”.
Remote depots are not a generalized solution for load-balancing or network access problems. To support shared development or to deal with load-balancing or network access problems, see the material in Distributing Perforce.
Archive depots are used for near-line or offline storage of infrequently-accessed content. For details, see “Reclaiming disk space by archiving files”.
The unload depot is analogous to the archive depot, but provides a
place to store infrequently-accessed metadata (specifically,
metadata concerning client workspaces and labels) rather than old
versioned files. There can be only one unload
depot per server. For details, see
“Unloading infrequently-used metadata”.
The spec depot is a special case. If present, the
spec depot tracks changes to user-edited forms
such as client workspace specifications, jobs, branch mappings, and
so on. There can be only one spec depot per
server.
Naming depots
Depot names share the same namespace as branches, client
workspaces, and labels. For example, //rel2
refers uniquely to one of the depot rel2, the
workspace rel2, the branch
rel2, or the label rel2; you
can't simultaneously have both a depot and a label named
rel2.
Defining new local depots
To define a new local depot (that is, to create a new depot in the
current Perforce server namespace), call p4
depot with the new depot name, and edit only the
Map: field in the resulting form.
For example, to create a new depot called book
with the files stored in the local Perforce server namespace in a
root subdirectory called book (that is,
$P4ROOT/book), enter the command p4
depot book, and fill in the resulting form as follows:
Depot:       book
Type:        local
Address:     local
Suffix:      .p4s
Map:         book/...
The Address: and Suffix:
fields do not apply to local depots and are ignored.
By default, the Map: field on a local depot
points to a depot directory matching the depot name, relative to
the server root (P4ROOT) setting for your server. To
store a depot's versioned files on another volume or drive, specify
an absolute path in the Map: field. This path
need not be under P4ROOT. Absolute paths in the
Map: field on Windows must be specified with
forward slashes (for instance, d:/newdepot/)
in the p4 depot form.
Enabling versioned specifications with the spec depot
In order for your users to retrieve change histories of user-edited
forms, you must enable versioned specifications. The spec depot can
have any name, but it must be of type spec, and
there can only be one spec depot per server. (If you already have a
spec depot, attempting to create another one results in an error
message.)
Note
As of Release 2011.1, the first line of every saved form stored in the spec depot is a comment line that identifies the user who most recently changed the form:
# The form data belowwas edited by
username
After you have enabled versioned specs by creating the spec depot, all user-generated forms (such as client workspace specifications, jobs, branch mappings, and so on) are automatically archived as text files in the spec depot. Filenames within the spec depot are automatically generated by the server, and are represented in Perforce syntax as follows:
//specdepotname/formtype/[objectname[suffix]]
Some formtypes (for example, the
protect, triggers, and
typemap forms) are unique to the server, and do
not have corresponding objectnames.
Creating the spec depot
To create a spec depot named //spec, enter
p4 depot spec, and fill in the resulting
form as follows:
Depot:       spec
Type:        spec
Address:     local
Map:         spec/...
SpecMap:     //spec/...
Suffix:      .p4s
The Address: field does not apply to spec
depots and is ignored.
Using a Suffix: is optional, but specifying
a file extension for objects in the spec depot simplifies
usability for users of applications such as P4V, because users
can associate the suffix used for Perforce specifications with
their preferred text editor. The default suffix for these files
is .p4s.
For example, if you create a spec depot named
spec, and use the default suffix of
.p4s, your users can see the history of
changes to job000123 by using the command
p4 filelog //spec/job/job000123.p4s
or by using P4V to review changes to
job000123.p4s in whatever editor is
associated with the .p4s file extension on
their workstation.
The default SpecMap: of
//spec/... indicates that all specs are to
be versioned.
Populating the spec depot with current forms
After you create a spec depot, you can populate it with the
p4 admin updatespecdepot command. This
command causes the Perforce Server to archive stored forms
(specifically, client,
depot, branch,
label, typemap,
group, user, and
job forms) into the spec depot.
To archive all current forms, use the
-a flag:
p4 admin updatespecdepot -a
To populate the spec depot with only one type of form (for
instance, extremely large sites might elect to update only one
table at a time), use the -s flag
and specify the form type on the
command line. For example:
p4 admin updatespecdepot -s job
In either case, only those forms that have not yet been archived are added to the spec depot; after the spec depot is created, you only need to use p4 admin updatespecdepot once.
Controlling which specs are versioned
By default, all specs (//spec/...) are
versioned. You can use the SpecMap: field to
control which specs are versioned by adding lines in depot
syntax that include (or exclude) paths in the spec depot.
For example, you can exclude the protections table from
versioning by configuring your spec depot's
SpecMap: field as follows:
SpecMap:
    //spec/...
    -//spec/protect
In an environment such as a build farm, in which large numbers of temporary client workspaces and/or labels are created, you can configure the spec depot to exclude them, while keeping track of other changes to client workspaces and labels. For example, a spec depot configured with the following spec mapping:
SpecMap:
    //spec/...
    -//spec/client/build_ws_*
    -//spec/label/temp_label_*
will no longer track changes to client workspaces whose names
begin with build_ws_, nor will it track
changes to labels whose names begin with
temp_label_.
Note that adding or changing the SpecMap:
field only affects future updates to the spec depot; files
already stored in the spec depot are unaffected.
Large sites and old filesystems: spec.hashbuckets
This configurable defines the number of buckets (subdirectories)
into which files in the spec depot are hashed. By default,
spec.hashbuckets is 99; for each type of
object, directories associated with objects in the spec depot
are allocated between 99 subdirectories.
To disable hashing, set spec.hashbuckets to 0.
as follows:
p4 configure set spec.hashbuckets=0
With hashing disabled, for each subdirectory for each spec type,
one sub-subdirectory is created for each object, and all of these
sub-subdirectories are stored in one single subdirectory.
Disabling hashing may subject your installation to
filesystem-imposed limitations on the maximum number of
subdirectories in any one directory (for example, the 32K
limit imposed by older ext2,
ext3, and ufs filesystems).
Listing depots
To list all depots known to the current Perforce server, use the p4 depots command.
Deleting depots
To delete a depot, use p4 depot -d
depotname.
To delete a depot, it must be empty; you must first obliterate all files in the depot with p4 obliterate.
For local and spec depots,
p4 obliterate deletes the versioned files as
well as all their associated metadata. For
remote depots, p4 obliterate
erases only the locally held client and label
records; the files and metadata still residing on the remote server
remain intact.
Before you use p4 obliterate, and especially if you're about to use it to obliterate all files in a depot, read and understand the warnings in “Reclaiming disk space by obliterating files”.
In a distributed environment, the unload depot may have different contents on each edge server. Since the commit server does not verify that the unload depot is empty on every edge server, you must specify p4 depot -d -f in order to delete the unload depot from the commit server. For more information, see Distributing Perforce.
Remote depots and distributed development
Remote depots are designed to support shared code, not shared development. They enable independent organizations with separate Perforce installations to integrate changes between Perforce installations. Briefly:
-
A "remote depot" is a depot on your Perforce server of type
remote. It acts as a pointer to a depot of type "local" that resides on a second Perforce server. -
A user of a remote depot is typically a build engineer or handoff administrator responsible for integrating software between separate organizations.
-
Control over what files are available to a user of a remote depot resides with the administrator of the remote server, not the users of the local server.
-
See “Restricting access to remote depots” for security requirements.
When to use remote depots
Perforce is designed to cope with the latencies of large networks and inherently supports users with client workspaces at remote sites. A single Perforce installation is ready, out of the box, to support a shared development project, regardless of the geographic distribution of its contributors.
Partitioning joint development projects into separate Perforce installations does not improve throughput, and usually only complicates administration. If your site is engaged in distributed development (that is, developers in multiple sites working on the same body of code), it is better to set up a distributed Perforce installation. For information on setting up and monitoring a distributed Perforce configuration, see the Distributed Perforce manual.
If, however, your organization regularly imports or exports material from other organizations, you might want to consider using Perforce's remote depot functionality to streamline your code drop procedures.
How remote depots work
The following diagram illustrates how Perforce applications use a user's default Perforce server to access files in a depot hosted on another Perforce server.
In this example, an administrator of a Perforce server at
oak:1234 is retrieving a file from a remote
server at pine:1818.
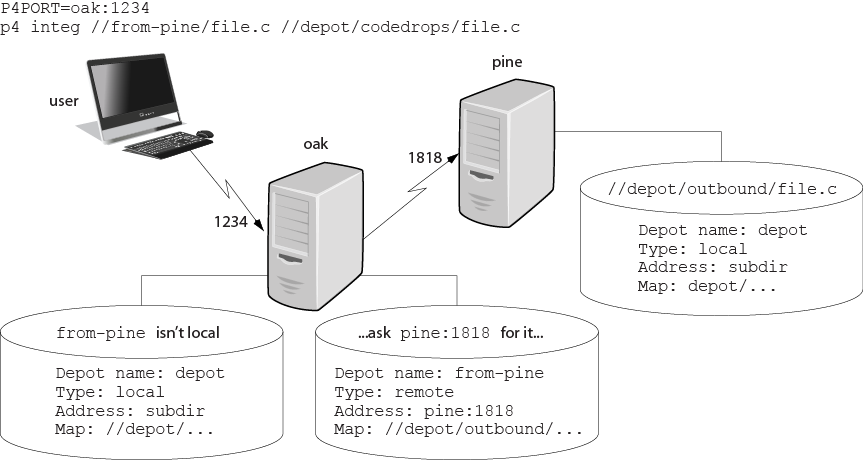
Although it is possible to permit individual developers to sync files from remote depots into their client workspaces, this is generally an inefficient use of resources.
The preferred technique for using remote depots is for your organization's build or handoff administrator to integrate files from a remote depot into an area of your local depot. After the integration, your developers can access copies of the files from the local depot into which the files were integrated.
To accept a code drop from a remote depot, create a branch in a local depot from files in a remote depot, and then integrate changes from the remote depot into the local branch. This integration is a one-way operation; you cannot make changes in the local branch and integrate them back into the remote depot. The copies of the files integrated into your Perforce installation become the responsibility of your site's development team; the files on the depot remain under the control of the development team at the other Perforce installation.
Restrictions on remote depots
Remote depots facilitate the sharing of code between organizations (as opposed to the sharing of development within a single organization). Consequently, access to remote depots is restricted to read-only operations, and server metadata (information about client workspaces, changelists, labels, and so on) cannot be accessed using remote depots.
Using remote depots for code drops
Performing a code drop requires coordination between two organizations, namely the site receiving the code drop and the site providing the code drop. In most cases, the following three things must be configured:
-
The Perforce administrator at the site receiving the code drop must create a remote depot on his or her Perforce server that points to the site providing the code drop.
This is described in “Defining remote depots”.
-
The Perforce administrator at the site providing the code drop should configure his or her Perforce server to allow the recipient site's remote depot to access the providing site's Perforce server.
This is described in “Restricting access to remote depots”.
-
The configuration manager or integration manager at the receiving site must integrate the desired files from the remote depot into a local depot under his or her control.
This is described in “Receiving a code drop”.
Defining remote depots
To define a new remote depot:
-
Create the depot with p4 depot
depotname. -
Set the
Type:toremote. -
Direct your Perforce server to contact the remote Perforce server by providing the remote server's name and listening port in the
Address:field.A remote server's host and port are specified in the
Address:field just as though it were aP4PORTsetting. -
Set the
Map:field to map into the desired portion of the remote server's namespace.For remote depots, the mapping contains a subdirectory relative to the remote depot namespace. For example,
//depot/outbound/...maps to theoutboundsubdirectory of the depot nameddepothosted on the remote server.The
Map:field must contain a single line pointing to this subdirectory, specified in depot syntax, and containing the "..." wildcard on its right side.If you are unfamiliar with client views and mappings, see the P4 User's Guide for general information about how Perforce mappings work.
-
The
Suffix:field does not apply to remote depots; ignore this field.
In order for anyone on your site to access files in the remote
depot, the administrator of the remote server must grant
read access to user
remote to the depots and subdirectories
within the depots specified in the Map:
field.
Example 4. Defining a remote depot
Lisa is coordinating a project and wants to provide a set of
libraries to her developers from a third-party development
shop. The third-party development shop uses a Perforce server
on host pine that listens on port
1818. Their policy is to place releases of
their libraries on their server's single depot
depot under the subdirectory
outbound.
Lisa creates a new depot from which she can access the code
drop; she'll call this depot from-pine;
she'd type p4 depot from-pine and fill in
the form as follows:
Depot:       from-pine
Type:        remote
Address:     pine:1818
Map:         //depot/outbound/...
This creates a remote depot called from-pine
on Lisa's Perforce server; this depot
(//from-pine) maps to the third party's
depot's namespace under its
outbound subdirectory.
Restricting access to remote depots
Remote depots are accessed either by a virtual user named
remote, or (if configured) by the service
user of the accessing server's p4d. Service
users (including the virtual remote user) do
not consume Perforce licenses.
Note
Perforce Servers at release 2010.2 authenticate as
remote to older Perforce servers, and either
as remote (if no service user is
configured), or as the service user (if configured) to Perforce
Servers at release 2010.2 and above.
By default, all files on a Perforce server can be accessed
remotely. To limit or eliminate remote access to a particular
server, use p4 protect to set permissions
for user remote (or the remote site's
service user) on that server. Perforce recommends that
administrators deny access to user remote
across all files and all depots by adding the following
permission line in the p4 protect table:
list user remote * -//...
Because remote depots can only be used for
read access, it is not necessary to remove
write or super access to
user remote (or the service user).
As of Release 2010.2, it remains good practice to deny access
to user remote. If the Perforce Servers at
partner sites are configured to use service users, you can use
their service users to further restrict which portions of your
server are available for code drops.
Example security configuration
Using the two organizations described in “Receiving a code drop”, a basic set of security considerations for each site would include:
On the local (oak) site:
-
Deny access to
//from-pineto all users. Developers at theoaksite have no need to access files on thepineserver by means of the remote depot mechanism. -
Grant
readaccess to//from-pineto your integration or build managers. The only user at theoaksite who requires access the//from-pineremote depot is the user (in this example,adm) who performs the integration from the remote depot to the local depot.The
oakadministrator adds the following lines to the p4 protect table:
list user * * -//from-pine/...
read user adm * //from-pine/...
On the remote (pine) site, access to code
residing on pine is entirely the
responsibility of the pine server's
administrator. At a minimum, this administrator should:
-
Preemptively deny access to user
remoteacross all depots from all IP addresses:list user remote * -//...
Adding these lines to the p4 protect table is sound practice for any Perforce installation whether its administrator intends to use remote depots or not.
-
If both servers are at Release 2010.2 or higher: contact the
oaksite's administrator and obtain the name of theoaksite's service user.In this example, the
oaksite's service user isservice-oak. When a user of theoakserver accesses a remote depot hosted onpine, theoakserver will authenticate with thepineserver as a user namedservice-oak.As administrator of the
pinesite, you must: -
Create a service user on your site named
service-oak. (see “Service users”). This user's name must match the name of the receiving site's service user. -
Assign this user a strong password.
-
Inform the
oakadministrator of this password.The administrator of the
oaksite must: -
Use the password set by the pine administrator to obtain a ticket valid for
pinefor the userservice-oak(that is, run p4 login service-oak against thepineserver). -
Place the ticket somewhere where the
oakserver's p4d process can access it. (For example, the.p4ticketsfile in the server's root directory, withP4TICKETSset to point to the location of the ticket file.) -
Configure
oakto work with thepineservice user, either by startingoak's p4d process with the-u service-oakflag, or configure the server with p4 configure set serviceUser=service-oak.) -
Grant
readaccess to userremote(or theoaksite's service user) to only those areas of thepineserver into which code drops are to be placed. Further restrict access to requests originating from the IP address of the Perforce server that is authorized to receive the code drop.In this example, outgoing code drops reside in
//depot/outbound/...on thepineserver. Ifoak's IP address is192.168.41.2, thepinesite's protections table looks like:
list user remote * -//...
read user remote 192.168.41.2 //depot/outbound/...
-
If both sites are at Release 2010.2 or higher, and the
oakserver is configured to useservice-oakas its service user, thepinesite's protections table looks like:list user remote * -//... list user service-oak * -//... read user service-oak 192.168.41.2 //depot/outbound/...
Only Perforce Servers at IP address 192.168.41.2 that have valid tickets for the
pinesite'sservice-oakuser, are permitted to access thepineserver through remote depots, and only//depot/outbound/...is accessible.
Receiving a code drop
To perform a handoff or code drop between two Perforce installations:
-
Developers on
pine:1818complete work on a body of code for delivery. -
The build or release manager on
pine:1818branches the deliverable code into an area ofpine:1818intended for outbound code drops. In this example, the released code is branched to//depot/outbound/... -
A Perforce administrator at
oak:1234configures a remote depot called//from-pineon theoakserver. This remote depot contains aMap:field that directs theoakserver to the//depot/outboundarea ofpine:1818. -
Upon notification of the release's availability, a build or release manager at
oak:1234performs the code drop by integrating files in the//from-pine/...remote depot into a suitable area of the local depot, such as//depot/codedrops/pine. -
Developers at
oak:1234can now use thepineorganization's code, now hosted locally under//depot/codedrops/pine. Should patches be required topine's code,oakdevelopers can make such patches under//depot/codedrops/pine. Thepinegroup retains control over its code.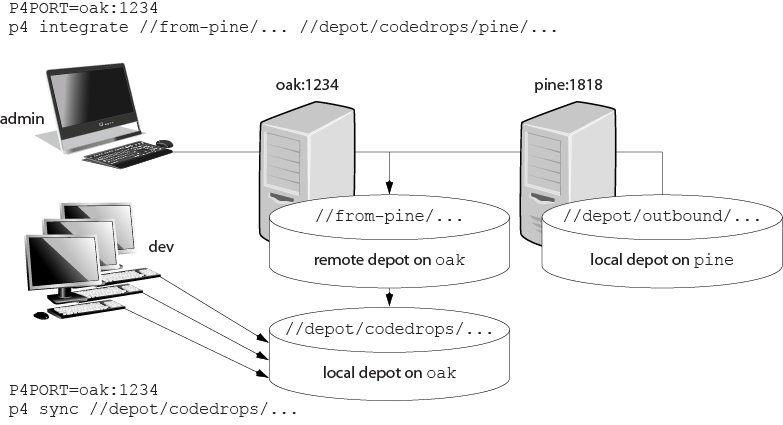
Managing Unicode Installations
Overview
The Perforce server can be run in Unicode mode to activate support for:
-
File names or directory names that contain Unicode characters, and
-
Perforce identifiers (for example, user names) and specifications (for example, changelist descriptions or jobs) that contain Unicode characters
Note
If you need to manage textual files that contain Unicode characters, but do not need the features listed above, you do not need to run your server in Unicode mode. For such installations, assign the Perforce
utf16file type to textual files that contain Unicode characters.
In Unicode mode, the Perforce server also translates
unicode files and metadata to the character set
configured on the user's machine, and verifies that the unicode
files and metadata contain valid UTF-8 characters.
To configure a Unicode-mode server and the workstations that access it, you must:
-
Put the server into Unicode mode, and
-
Configure workstations to receive files and metadata correctly
The following sections tell you how to configure Perforce to manage such files.
Note
The Perforce service limits the lengths of strings used to index job descriptions, specify filenames and view mappings, and identify client workspaces, labels, and other objects. The most common limit is 2048 bytes. Because no basic Unicode character expands to more than three bytes, you can ensure that no name exceeds the Perforce limit by limiting the length of object names and view specifications to 682 characters for Unicode-mode servers.
Configuring the Server for Unicode
To enable the Perforce server to manage files and directories with names that include Unicode characters, you must configure your server to run in Unicode mode. In Unicode mode, the server:
-
Supports Unicode in file and path names and Perforce metadata
-
Translates metadata and
unicodefiles according to the user'sP4CHARSETenvironment variable, and -
Validates
unicodefiles and metadata to ensure they are valid UTF-8
Note
Converting a server to Unicode mode is a one-way operation! You cannot restore a Unicode server to its previous state.
Enabling Unicode mode
To convert a server to Unicode mode, perform the following steps:
-
Stop the server by issuing the p4 admin stop command.
-
Create a server checkpoint, as described in the Perforce System Administrator's Guide.
-
Convert the server to Unicode mode by invoking the server (p4d) and specifying the
-xiflag, for example:p4d -xi -r
server_rootThe server verifies that its existing metadata contains only valid UTF-8 characters, then creates and sets a protected configurable called "unicode," which is used as a flag to ensure that the next time you start the server, it runs in Unicode mode. After validating metadata and setting the configurable, p4d exits and displays the following message:
Server switched to Unicode mode.Note
If the server detects invalid characters in its metadata, it displays error messages such as the following:
Table db.job has 7 rows with invalid UTF8.In case of such errors, contact Perforce Technical Support for instructions on locating and correcting the invalid characters.
-
Restart p4d, specifying server root and port as you normally do. The server now runs in Unicode mode.
Localizing server error messages
By default, the Perforce server informational and error messages are in English. You can localize server messages. To ensure best results, contact Perforce Technical Support. The following overview explains the localization process.
To localize the Perforce server messages:
-
Obtain the message file from Perforce Technical Support.
-
Edit the message file, translating messages to the target language. Each message includes a two-character language code. Change the language code from
ento your own code for the target language. Do not change any of the key parameters or named parameters (which are specified between percent signs, for example,%depot%). You can change the order in which the parameters appear in the message.Example of correct translation:
Original English
@pv@ 0 @db.message@ @en@ 822220833 @Depot
                                                           '%depot%' unknown - use 'depot' to create it.@
Correct translation to Portuguese (note reordered parameters)
@pv@ 0 @db.message@ @pt@ 822220833 @Depot '%depot' inexistente - use o comando 'depot' para criar-lo.@ -
Load the translated messages into the server by issuing the following command:
p4d -jr /
fullpath/message.txtThis command creates a
db.messagefile in the server root. The Perforce service uses this database file when it displays error messages. The Perforce proxy can also make use of thisdb.messagefile; see the section on localizing P4P in Distributing Perforce
To view localized messages, set the P4LANGUAGE
environment variable on user workstations to the language code
you assigned to the messages in the translated message file.
For example, to have your messages returned in Portuguese, set
P4LANGUAGE to pt.
Note
To view localized messages using P4V, you must set the
LANG environment variable to the language code
that you use in the messages file.
Configuring Client Workstations for Unicode
To correctly interoperate with Unicode-mode servers, you must
configure user workstations by setting the P4CHARSET
environment variable. Recommendation: use separate workspaces for
connections that require different character sets.
Warning!
If you access Perforce from an incorrectly configured
workstation, you risk data corruption! For example, if you
submit a file using a P4CHARSET that is
different than the one you used to sync it, the file is
translated in a way that is likely to be incorrect.
Setting P4CHARSET on Windows
To set P4CHARSET for all users on a workstation,
you need Perforce administrator privileges. Issue the following
command:
p4 set -s
P4CHARSET=character_set
To set P4CHARSET for the user currently logged
in:
p4 set
P4CHARSET=character_set
Your workstation must have a compatible True Type or Open Type font installed.
For a full list of supported character sets, issue the command p4 help charset.
Setting P4CHARSET on Unix
You can set P4CHARSET from a command shell or in
a startup script such as .kshrc,
.cshrc, or .profile.
To determine the proper value for P4CHARSET,
examine the setting of the LANG or
LOCALE environment variable. Common settings are
as follows:
|
If $LANG is... |
Set P4CHARSET to |
|---|---|
|
|
|
|
|
|
|
|
|
In general, for a Japanese installation, set
P4CHARSET to eucjp, and for a
European installation, set P4CHARSET to
iso8859-1.
The following table lists common settings for
P4CHARSET. For a full list of supported
character sets, issue the command p4 help
charset.
|
Client language |
Client platform |
P4CHARSET |
|---|---|---|
|
Japanese |
Windows (code page 932) |
|
|
UNIX ( |
|
|
|
High-ASCII (recommended by ISO for use in modern European languages) |
Windows (code page 1252) |
|
|
UNIX ( |
|
|
|
Classic MacOS ( |
|
|
|
Macintosh OS X |
|
For details about the UTF-8 and UTF-16 variants, see “UTF character sets and Byte Order Markers (BOMs)”.
Windows: Determining your Code Page
A code page maps characters to values.
On Windows machines, the value that you assign to
P4CHARSET depends on the code page that your
workstation uses.
To determine the code page in use on a Windows machine, either:
-
From the control panel, launch the control panel. On the Languages tab, click the button.
-
From the command prompt, use Windows' built-in
chcpcommand to set the active code page number. Your current code page is displayed; for example:Active code page: 1252
Note that the DOS environment can be assigned a code page that is different from the one that is inherited by programs that are launched from the menu.
UTF character sets and Byte Order Markers (BOMs)
Byte order markers (BOMs) are used in UTF files to specify the order in which multibyte characters are stored and to identify the file content as Unicode. Not all extended-character file formats use BOMs.
To ensure that such files are translated correctly by the
Perforce server when the files are synced or submitted, you
must set P4CHARSET to the character set that
corresponds to the format used on your workstation by the
applications that access them, such as text editors or IDEs.
Typically the formats are listed when you save the file using
the menu option.
The following table lists valid settings for
P4CHARSET for specifying byte order properties
of UTF files.
|
Client Unicode format |
BOM? |
Big or Little-Endian |
Set P4CHARSET to |
Remarks |
|---|---|---|---|---|
|
UTF-8 |
No |
(N/A) |
|
Suppresses Perforce server UTF-8 validation |
|
Yes |
|
|||
|
No |
|
|||
|
Yes |
|
|||
|
UTF-16 |
Yes |
Per client |
|
Synced with a BOM according to the client platform byte order |
|
Yes |
Little |
|
Best choice for Windows Unicode files |
|
|
Yes |
Big |
|
||
|
No |
Per client |
|
||
|
No |
Little |
|
||
|
No |
Big |
|
||
|
UTF-32 |
Yes |
Per client |
|
Synced with a BOM according to the client platform byte order |
|
Yes |
Little |
|
||
|
Yes |
Big |
|
||
|
No |
Per client |
|
||
|
No |
Little |
|
||
|
No |
Big |
|
If you set P4CHARSET to a UTF-8 setting, the
Perforce server does not translate text files when you sync or
submit them. Starting with release 2006.1, Perforce verifies
that such files contain valid UTF-8 data.
Controlling translation of server output
If you set P4CHARSET to any
utf16 or utf32 setting,
you must set the P4COMMANDCHARSET to a non
utf16 or utf32 character
set in which you want server output displayed. "Server output"
includes informational and error messages, diff output, and
information returned by reporting commands.
To specify P4COMMANDCHARSET on a per-command
basis, use the -Q flag. For example, to
display all filenames in the depot, as translated using the
winansi code page, issue the following
command:
p4 -Q winansi files //...
Diffing files
The p4 diff2 command, which compares two depot file revisions, can only compare files that have the same Perforce file type.
Using other Perforce client applications
If you are using other Perforce client applications, note how they handle Unicode environments:
-
P4V (Perforce Visual Client): the first time you connect to a Unicode-mode server, you are prompted to choose the character encoding. Thereafter, P4V retains your selection in association with the connection.
-
P4Web: when you invoke P4Web, you can specify the character encoding on the command line using the
-Cflag. P4Web uses this flag when it sends commands to a Unicode-mode server. This approach means that each instance of P4Web can handle a single character encoding and that browser machines must have compatible fonts installed. -
P4Merge: To configure the character encoding used by P4Merge, choose P4Merge's menu option.
-
IDE plug-ins (SCC-based): the first time you connect to a Unicode-mode server, you are prompted to choose the character encoding. Thereafter, the plug-in retains your selection in association with the connection.
Troubleshooting user workstations in Unicode installations
To prevent file corruption, it is essential that you configure your workstation correctly. The following section describes common problems and provides solutions.
-
"Cannot Translate" error message
This message is displayed if your workstation is configured with a character set that does not include characters that are being sent to it by the Perforce server. Your workstation cannot display unmapped characters. For example, if
P4CHARSETis set toshiftjisand your depot contains files named using characters from the Japanese EUC character set that do not have mappings in shift-JIS, you see the "Cannot translate" error message when you list the files by issuing the p4 files command.To ensure correct translation, do not use unmappable characters in Perforce user specifications, client specifications, jobs, or file names.
-
Strange display of file content
If you attempt to display an extended-character text file and see odd-looking text, your workstation might lack the font required to display the characters in the file. Typical symptoms of this problem include the display of question marks or boxes in place of characters. To solve this problem, install the required font.
Configuring P4V settings
Not every site (nor every user at every site) requires the full suite of functionality in P4V, the Perforce Visual Client. By using the p4 property command, it is possible for an administrator to control, on a site-wide, per-group, or per-user basis, which features are available from within P4V. Properties relate to performance, features, or enabling the rich comparison of Microsoft .docx files. Performance and feature-related properties set at the server level override local P4V settings.
Configuring performance-related properties
If a user connects to a new Perforce service, performance-related properties are reloaded for the Perforce service to which the user has most recently connected.
|
Property |
Meaning |
|---|---|
|
|
Number of changelists, jobs, branch mappings, or labels to fetch at any one time. |
|
|
Limits the number of files to check in the 'opened' call during a rollback operation. Default value is 1000. If the number of files to roll back exceeds the configured value, a popup informs the user that no opened check will be performed, and asks if the user wants to complete the operation. |
|
|
Maximum number of files displayed per changelist. |
|
|
Maximum number of files displayed per changelist. |
|
|
Maximum size of files to preview, in kilobytes. |
|
|
Number of time between display refreshes, in minutes. |
Configuring feature-related properties
You can use the following properties to enable or disable P4V features. These
properties are read once, upon P4V startup, from the first service to which the user
connects. Features that are deactivated by setting these properties to
Off are unavailable in P4V and do not display in P4V's Preferences
page:
|
Property |
Meaning |
|---|---|
|
|
If |
|
|
If |
|
|
If |
|
|
If |
|
|
If |
|
|
If |
|
|
If |
|
|
If |
|
|
If |
|
|
If |
|
|
If |
|
|
If |
|
|
If |
For example, the administrator of a site that does not use Perforce's built-in defect tracking can disable access to jobs from within P4V by running:
p4 property -a -n P4V.Features.Jobs -v Off
A new property is added/updated (-a), it is named
(-n) P4V.Features.Jobs, and it is assigned the
value (-v) of Off.
If one group of users within the organization has a need to use the jobs functionality of P4V, the feature can be selectively (and centrally) re-enabled for those users with:
p4 property -a -n P4V.Features.Jobs -v On -g jobusers
The jobs feature of P4V is re-enabled by setting its value to On,
but only for users in the jobusers group.
Enabling .docx diffs
You can use the P4.Combine.URL property to enable the rich comparison
of Microsoft Word .doxc files through P4Merge. You must deploy P4Combine as part of a
Commons deployment to use this feature.
To enable the feature, set the P4.Combine.URL server property to the P4Combine Web Service URL. P4V will then display a rich compare of .docx files in the P4Merge window, using HTML5 to show differences for text, images, formats, styles, tables, headers, footers, and other objects.