| Perforce 2003.2 System Administrator's Guide | ||
|
<< Previous Chapter Supporting Perforce: Backup and Recovery |
Table of Contents Index Perforce on the Web |
Next Chapter >> Administering Perforce: Protections |
Each of the tasks described in this chapter requires that you be a Perforce superuser (access level super) or administrator (access level admin) as defined in the Perforce protections table. For more about controlling Perforce superuser access, and protections in general, see "Administering Perforce: Protections" on page 67.
Superusers can use the -f (force) flag to create a new user as follows:
p4 user -f username
Fill in the form fields with the information for the user you wish to create.
The p4 user command also has an option (-i) to take its input from the standard input instead of the forms editor. If you wish to create a large number of new users at once, you can write a script which creates output in the same format as that used by the forms editor and then pipes each pre-generated "form" to p4 users -i -f username, where the username is also specified by a variable within your calling script.
To prevent Perforce from automatically creating new users, all users must be explicitly listed in the protections table. The easiest way to do this is to put all users into a Perforce group, and to configure Perforce to grant access only to members of that group.
A Perforce superuser wants to prevent the server from creating new users. He starts by
setting up a group called p4users for the three users currently at his site. He types:
and fills in the form as follows:
He then uses p4 protect to edit the protections table. The relevant line of the default
protections table looks like this:
This grants write permission to any user matching * (that is, to all users) from any host
(the second *) in all areas of the depot (that is, to files in //...).
After using p4 group p4users to create the Perforce group p4users, he uses p4 protect
to change this line in the protections table to read:
The replacement protection grants only write access to users whose group matches
p4users. Members of p4users may use Perforce from any host (*) and have write access to
all areas of the depot (//...).
As long as no other lines in the protections table grant permission to all users, all users are
now defined within p4 protect, and the server will no longer automatically create new user
entries when new users attempt to access Perforce.
For a more in-depth description of Perforce protections, see "Administering Perforce: Protections" on page 67.
p4 user -d username
You must first revert (or submit) any open files opened by a user before deleting that user. If you attempt to delete a user who has opened files, Perforce will display an error message to that effect.
To free the Perforce license, you must also delete the user from entries in the grouping and protections tables maintained with p4 group or p4 protect.
For example, if the output of p4 opened shows:
//depot/main/code/file.c#8 - edit default change (txt) by jim@stlouis
the "stlouis" client spec can be deleted with:
p4 client -d -f stlouis
Deleting a user's client spec automatically reverts all files opened by that client, and also removes that client's "have list". Note that it does not affect any files in the workspace actually used by that client; the files can still be accessed by other employees.
Perforce administrators can use p4 obliterate filename to remove all traces of a file from a depot, making the file indistinguishable from one that never existed in the first place.
By default, p4 obliterate filename does nothing; it merely reports on what it would do. To actually destroy the files, use p4 obliterate -y filename.
If you need to destroy only one revision of a file (perhaps someone inadvertently stored some line art as a 20-megabyte uncompressed TIFF in place of its 500K-long compressed equivalent), specify only the desired revision number on the command line. For instance, to destroy revision #5 of a file, use:
p4 obliterate -y file#5
Revision ranges are also acceptable. To destroy revisions 5 through 7 of a file, use:
p4 obliterate -y file#5,7
The p4 obliterate command has one more flag: -z. When you branch a file from one area of the depot into another, a "lazy copy" is created - the file itself isn't copied, only a record that the branch has occurred. If, for some reason, you wish to undo the "lazy copy" and create a new copy of the branched file's contents in your depot subdirectories, you could "obliterate" the lazy copy and create a new one by using p4 obliterate -y -z filename.
Removing lazy copies by using the -z flag typically increases disk space usage. The only practical use of p4 obliterate -y -z is to undo lazy copies in order to allow you to manually remove archive files without breaking any linked metadata pointing to the deleted files.
If a user sees the following error message while trying to access files:
Operation:user-sync
where path is the path of a previously-obliterated file, the user has probably encountered a problem that resulted from an earlier use of p4 obliterate from an older (pre-98.2/10314) Perforce server. Contact Perforce technical support for a workaround.
Librarian checkout path failed
You can also use the -f flag to delete any submitted changelists that have been emptied of files with p4 obliterate. The full syntax is p4 change -d -f changenumber.
Use p4 change with the -f (force) flag:
p4 change -f 123
p4 change -d -f 124
The User: and Description: fields for change 123 are edited, and change 124 is deleted.
Subsequent verifications of file revisions are performed against the stored signatures; if a new signature does not match the signature in the Perforce database for that file revision, Perforce adds the characters BAD! after the signature.
It is good practice to run p4 verify before performing your nightly system backups, and to proceed with the backup only if p4 verify reports no corruption. Generate and store new checksums with p4 verify -u following a successful p4 verify on a weekly basis.
As of Release 2003.2, p4 verify -u is obsolescent, because Perforce Servers at Release 2003.2 and higher automatically generate and store MD5 checksums of files upon file submission. (You must still run p4 verify -u at least once, following an upgrade to 2003.2, to generate signatures for any pre-2003.2 files for which signatures were not generated.)
If you ever see a BAD! signature during a p4 verify command, your database or versioned files may have been corrupted, and you should contact Perforce Technical Support.
to verify the integrity of your system.
Although this default behavior can be overridden by the use of the -t filetype flag, it's easy for users to overlook this, particularly in cases where files' types are usually (but not always) detected correctly. Certain file formats, such as RTF (Rich Text Format) and Adobe PDF (Portable Document Format), can start with a series of comment fields and/or other textual data. If these comments are sufficiently long, such files may be erroneously detected by Perforce as being of type text.
The p4 typemap command solves this problem by allowing system administrators to set up a table that links Perforce file types with file name specifications. If an entry in the typemap table matches a file being added, it overrides the file type that would otherwise be assigned by the Perforce client program.
To tell the Perforce server to regard all PDF and RTF files as binary, use p4 typemap to modify the typemap table as follows:
The first three periods ("...") in the specification are a Perforce wildcard specifying that all files beneath the root directory are to be included in the mapping. The fourth period and the file extension specify that the specification applies to files ending in ".pdf" (or ".rtf"). The following table lists recommended Perforce file types and modifiers for common file extensions.
Use the following p4 typemap table to map all of the file extensions to the Perforce file types recommended in the preceding table.
For more information, see the p4 typemap page in the Perforce Command Reference.
Perforce administrators can use this flag with p4 branch, p4 change, p4 client, p4 job, p4 label, and p4 unlock. Perforce superusers can also use it to override the p4 user command.
The usages and meanings of this flag are as follows:
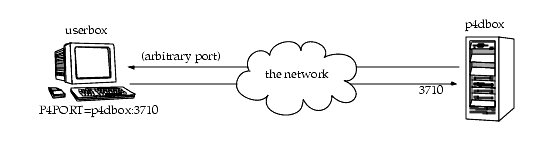
The port on which the server listens is specified when the server is started. The number is arbitrary, so long as it does not conflict with any other networking services and is greater than 1024. The port number on the client machine is dynamically allocated.
A firewall is a network element which prevents any packets from outside a local (trusted) network from reaching that local network. This is done at a low level in the network protocol; any packets not coming from a trusted IP address are simply ignored.
In the following diagram, the Perforce client is on an untrusted part of the network. None of its connection requests reach the machine with the Perforce server. Consequently, the user running the client through the firewall is unable to use Perforce.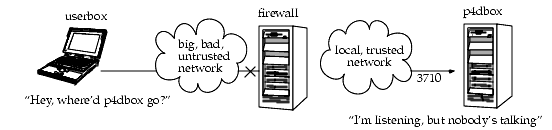
Secure shell (ssh) is meant to be a replacement for the UNIX rsh (remote shell) command, which allows you to log into a remote system and execute commands on it. The "secure" part of "secure shell" comes from the fact that the connection is encrypted, so none of the data is visible while it passes through the untrusted network. With simple utilities like rsh, all traffic - even passwords - is unencrypted and visible to all intermediate hosts, creating an unacceptable security hazard.
Secure shell is available for free in source form for a multitude of UNIX platforms from http://www.openssh.com. This page also links to ports of ssh for OS/2 and Amiga, as well as commercial implementations for Windows and Macintosh from Data Fellows (http://www.datafellows.com) and SSH (http://www.ssh.com).
The OpenSSH FAQ (Frequently Asked Questions) can also be found online at the main site (http://www.openssh.com/faq.html).
A good solution takes advantage of ssh's ability to forward arbitrary TCP/IP connections. By using ssh, you can make your Perforce client appear as though it's connecting from the firewall machine over the local (trusted) network. In reality, your client remains on your local machine, but all packets from your local machine are first sent to the firewall through the secure channel set up by ssh.
Suppose the Perforce server is on p4dbox.bigcorp.com, and the firewall machine is called firewall.bigcorp.com. In our example, we'll arbitrarily choose local port 4242, and assume that the Perforce server is listening on port 3710.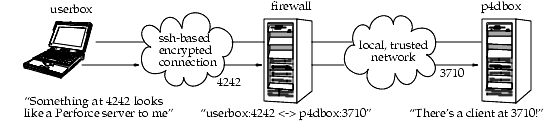
Packets ultimately destined for your client's port 4242 are first sent to the firewall, and ssh forwards them securely to your client. Likewise, connections made to port 4242 of the firewall machine will end up being routed to port 3710 of the Perforce server.
On UNIX, the ssh command on your own machine to set up and forward the TCP/IP connection would be:
ssh -L 4242:p4dbox.bigcorp.com:3710 firewall.bigcorp.com
At this point, it may be necessary to provide a password to log into firewall.bigcorp.com. Once the connection is established, ssh listens at port 4242 on the local machine, and forwards packets over its encrypted connection to firewall.bigcorp.com; the firewall then forwards them by normal channels to port 3710 on p4dbox.bigcorp.com.
All that remains is to tell the Perforce client to use port 4242 by setting the environment variable P4PORT to 4242.
Normally, setting P4PORT=4242 would normally indicate that we are trying to connect to a Perforce server on the local machine listening at port 4242. In this case, ssh takes the role of the Perforce server. Anything a client sends to port 4242 of the local machine is forwarded by ssh to the firewall, which passes it to the real Perforce server at p4dbox.bigcorp.com. Since all of this is transparent to the Perforce client, it doesn't matter whether the client is talking to an instance of ssh that's forwarding traffic from port 4242 of the local machine, or if it's talking to a real Perforce server residing on the local machine.
The only glitch is that there's a login session you don't normally want on the firewall machine.
ssh -L 4242:p4dbox.bigcorp.com:3710 firewall.bigcorp.com -f sleep 9999999 -f
on the remote system.
This tells ssh on firewall.bigcorp.com to fork a long-running sleep command in the background after the password prompt. Effectively, this sets up the ssh link and keeps it up; there is no login session to terminate.
Finally, ssh can be configured to "do the right thing" so that it is unnecessary to type such a long command with each session. The Windows version of ssh, for instance, has a GUI to configure this.
One final concern: with port 4242 on the local machine now forwarded to a supposedly secure server, your local machine is part of the trusted network; it is prudent to make sure the local machine really is secure. The Windows version of ssh has an option to only allow local connections to the forwarded port, which is a wise precaution; your machine will be able to use port 4242, but a third party's machine will be ignored.
If, however, you specify both an IP address and a port number in P4PORT when starting p4d, the Perforce server takes the IP address into account, and ignores requests from any IP addresses other than the one specified in P4PORT.
Although this isn't the default behavior, it can be useful. For instance, if you want to tell p4d to listen only to a specific network interface or IP address, you can make your Perforce server ignore all non-local connection requests by setting P4PORT=localhost:port.
If you wish to do this, add the following line to /etc/inetd.conf:
p4dservice stream tcp nowait username /usr/local/bin/p4d p4d -i -rp4droot
and add the following to /etc/services:
This method is an alternative to running p4d from a startup script. It can also be useful for providing special services; for example, at Perforce, we have a number of test servers running on UNIX, each defined as an inetd service with its own port number.
There are caveats with this method:
For example, //depot/main/file.c and //depot/MAIN/FILE.C were treated as two completely different files. This caused problems where users on UNIX were connecting to a Perforce server running on Windows, because the filesystem underlying the server could not store files with the case-variant names submitted by UNIX users.
In release 97.3, the behavior was changed, and only the UNIX server supports case-sensitive names. However, there are still some case-sensitivity problems which users can run into when sharing development projects across UNIX and Windows.
If you are running a pre-97.2 server on Windows, please contact [email protected] to discuss upgrading your server and database.
For current releases of the server:
|
Case-sensitive |
UNIX server |
Windows server |
|---|---|---|
|
Pathnames and filenames |
Yes |
No |
|
Database entities (clients, labels, etc.) |
Yes |
No |
|
Job search keywords |
No |
No |
To find out what platform your Perforce server runs on, use p4 info.
Conversely, Windows users will have to be careful to use case consistently in file and path names when adding new files. They may not realize that files added as //depot/main/one.c and //depot/MAIN/two.c will appear in two different directories in a UNIX user's workspace.
The UNIX Perforce server always respects case in client names, label names, branch view names, and so on. Windows users connecting to a UNIX server should be aware that the lowercased workstation names are used as the default names for new client workspaces. For examples, if a new user creates a client spec on a Windows machine named ROCKET, his client workspace is named rocket by default. If he later sets P4CLIENT to ROCKET (or Rocket), Perforce will tell him his client is undefined. He must set P4CLIENT to rocket (or unset it) to use the client workspace he defined.
For example, users who try something like this:
p4 add dir/file1
should be aware that all three files will be stored in the same depot directory. The depot path and filenames assigned to the Windows server will be those first referenced. (In this case, the depot path name would be dir, and not DIR.)
p4 add dir/file2
p4 add DIR/file3
p4 counter monitor 1
Then stop and restart the Perforce Server.
Server process monitoring requires minimal system resources.
p4 monitor show
Each line of p4 monitor output looks like this:
pid status owner hh:mm:ss command [args]
where pid is the UNIX process ID (or Windows thread ID), status is R or T depending on whether the process is running or marked for termination, owner is the Perforce user name of the user who invoked the command, hh:mm:ss is the time elapsed since the command was called, and command and args are the command and arguments as received by the Perforce server.
By default, p4 monitor show lists only the name of the running command. To show arguments with which the command was called, use the -a (arguments, truncated at 80 characters per line, user names at 10 characters) or -l (long-form, no truncation) options.
Only Perforce administrators and superusers may use the -a and -l options.
Once marked for termination, the process is terminated by the Perforce server within 50000 scan rows or lines of output. Only processes that have been running for at least ten seconds can be marked for termination. Users of terminated processes are notified with the following message:
Command has been canceled, terminating request
Processes that involve the use of interactive forms (such as p4 job or p4 user) can also be marked for termination, but data entered by the user into the form is preserved. Some commands, such as p4 obliterate, cannot be terminated.
Perforce administrators and superusers can remove these erroneous entries from the process table altogether with p4 monitor clear pid, where pid is the erroneous process ID. To clear all processes from the table (running or not), use p4 monitor clear all.
Running processes removed from the process table with p4 monitor clear continue to run to completion.
p4d -r /usr/perforce -v server=1 -p 1666 -L /usr/perforce/logfile
Trace output appears in the specified log file, and shows the date, time, username, IP address, and command for each request processed by the server. Before turning on logging, you should make sure that you have adequate disk space.
The server trace flags and their meanings are as follows:
In most cases, the Perforce server trace flags are useful only to administrators working with Perforce Technical Support to diagnose or investigate a problem.
The Perforce server stores two types of data under the Perforce root directory: versioned files and a database containing metadata describing those files. Your versioned files are the ones created and maintained by your users, and your database is a set of Perforce-maintained binary files holding the history and present state of the versioned files. In order to move a Perforce server to a new machine, both the versioned files and the database must be successfully migrated from the old machine to the new machine.
For more about the distinction between versioned files and database, as well as for an overview of backup and restore procedures in general, see "Backup and Recovery Concepts" on page 25.
For more about moving a Perforce server from one machine to another, see also the Perforce Tech Note at:
Although the versioned files are portable across architectures, the database, as stored in the db.* files, is not. To transfer the database, you will need to create a checkpoint of your Perforce server on the old machine and use that checkpoint to recreate the database on the new machine. The checkpoint is a text file which can be read by a Perforce server on any architecture. For more details, see "Creating a checkpoint" on page 26.
After creating the checkpoint, you can use tar, cp, xcopy.exe, or any other method to copy the checkpoint file and the depot directories to the new machine. (You don't need to copy the db.* files, because they will be recreated from the checkpoint you took.)
(To be precise, you don't need to copy the db.* files, just the checkpoint and the depot subdirectories. The db.* files will be recreated from the checkpoint. If it's more convenient to copy everything, then copy everything.)
Depot subdirectories can contain both text and binary files. The text files (in RCS format, ending with ",v") and binary files (directories of individual binary files, each directory ending with ",d") will need to be transferred differently in order to translate the line endings on the text files while leaving the binary files unchanged.
As with all other migrations, be sure to run p4 verify after your migration.
Contact Perforce Technical Support for assistance when migrating a Perforce server from Windows to UNIX or vice-versa.
If you are a licensed Perforce customer, you will also need a new license file to reflect the new IP address. Contact Perforce technical support to obtain an updated license.
When using local depots, the user's Perforce client program communicates with the Perforce server specified by the user's P4PORT environment variable or equivalent setting.
When using remote depots, the user's Perforce client program uses the Perforce server specified by the user's P4PORT environment variable or equivalent setting as a means to access a second, remote, Perforce server. The local Perforce server communicates with the remote Perforce server in order to access a subset of its files. Remote depots are primarily used to facilitate the sharing of code (that is, "code drops") between separate organizations, and are discussed in "Remote depots and distributed development" on page 61.
Remote depots are not a generalized solution for load-balancing or network access problems. To support shared development or to deal with load-balancing or network access problems, see "Perforce Proxy" on page 119.
For example, to create a new depot called book with the files stored in the local Perforce server namespace in a root subdirectory called book (that is, $P4ROOT/book), enter the command p4 depot book, and fill in the resulting form as follows:
By default, the Map: field on a local depot points to a depot directory matching the depot name, relative to the server root (P4ROOT) setting for your server. To store a depot's versioned files on another volume or drive, specify an absolute path in the Map: field.
To delete a depot, it must be empty; you must first obliterate all files in the depot with p4 obliterate.
For local depots, p4 obliterate deletes the versioned files as well as all their associated metadata. For remote depots, p4 obliterate erases only the locally held client and label records; the files and metadata still residing on the remote server remain intact.
Before using p4 obliterate, and especially if you're about to use it to obliterate all files in a depot, read and understand the warnings in "Reclaiming disk space by obliterating files" on page 42.
Partitioning joint development projects into separate Perforce installations will not improve throughput, and usually only complicates administration. If your site is engaged in distributed development (that is, developers in multiple sites working on the same body of code), it is usually preferable to set up a Perforce installation with all code in depots resident on one Perforce server, and to cache frequently-accessed files at each development site with Perforce Proxy.
If, however, your organization regularly imports or exports material from other organizations, you may wish to consider using Perforce's remote depot functionality to streamline your code drop procedures.
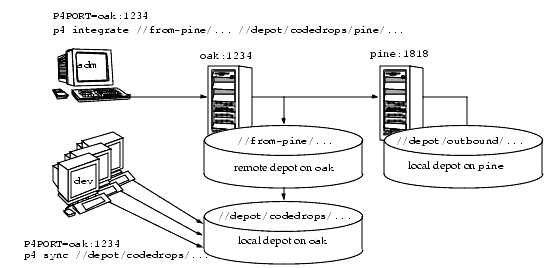
In this example, an administrator of a Perforce server at oak:1234 is retrieving a file from a remote server at pine:1818. 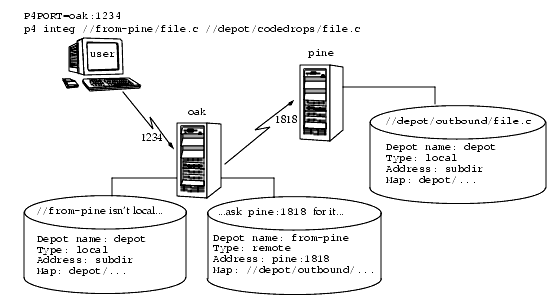
Although it is possible to allow individual developers to sync files from remote depots into their client workspaces, this is generally an inefficient use of resources.
The preferred technique for using remote depots is for your organization's build or handoff administrator to integrate files from a remote depot into an area of your local depot. After the integration, your developers can access copies of the files from the local depot into which the files were integrated.
To accept a code drop from a remote depot, create a branch in a local depot from files in a remote depot, and then integrate changes from the remote depot into the local branch. This integration is a one-way operation; you cannot make changes in the local branch and integrate them back into the remote depot. The copies of the files integrated into your Perforce installation become the responsibility of your site's development team; the files on the depot remain under the control of the development team at the other Perforce installation.
Remote depots facilitate the sharing of code between organizations (as opposed to the sharing of development within a single organization). Consequently, access to remote depots is restricted to read-only operations, and server metadata (information about client workspaces, changelists, labels, and so on) cannot be accessed using remote depots.
A remote server's host and port are specified in the Address: field just as though it were a P4PORT setting.
For remote depots, the mapping contains a subdirectory relative to the remote depot namespace. For example, //depot/outbound/... maps to the outbound subdirectory of the depot named depot hosted on the remote server.
The Map: field must contain a single line pointing to this subdirectory, specified in depot syntax, and containing the "..." wildcard on its right side.
If you are unfamiliar with client views and mappings, see the Perforce User's Guide for general information about how Perforce mappings work.
Lisa is coordinating a project and wants to provide a set of libraries to her developers from a
third party development shop. The third party development shop uses a Perforce server on
host pine that listens on port 1818. Their policy is to place releases of their libraries on their
server's single depot depot under the subdirectory outbound.
Lisa creates a new depot from which she can access the code drop; she'll call this depot from-
pine; she'd type p4 depot from-pine and fill in the form as follows:
This creates a remote depot called from-pine on Lisa's Perforce server; this depot (//from-
pine) maps to the third party's depot's namespace under its outbound subdirectory.
By default, all the files on any Perforce server may be accessed remotely. To limit or eliminate remote access to a particular server, use p4 protect to set permissions for user remote on that server. Perforce recommends that administrators deny access to user remote across all files and all depots by adding the following permission line in the p4 protect table:
list user remote * -//...
Since remote depots can only be used for read access, it is not necessary to remove write or super access to user remote.
| Perforce 2003.2 System Administrator's Guide | ||
|
<< Previous Chapter Supporting Perforce: Backup and Recovery |
Table of Contents Index Perforce on the Web |
Next Chapter >> Administering Perforce: Protections |