Distribution Server
A distribution server makes it possible for your organization to expose a limited set of content and history to third parties without needing to provide direct access to your main server. We expect that distribution servers will be deployed in a publicly accessible network with no means of communication to the internal server, effectively air-gapping the third party users from the internal network.
This topic assumes you have read the Guidelines for setting up multi-server services
Flow of data
-
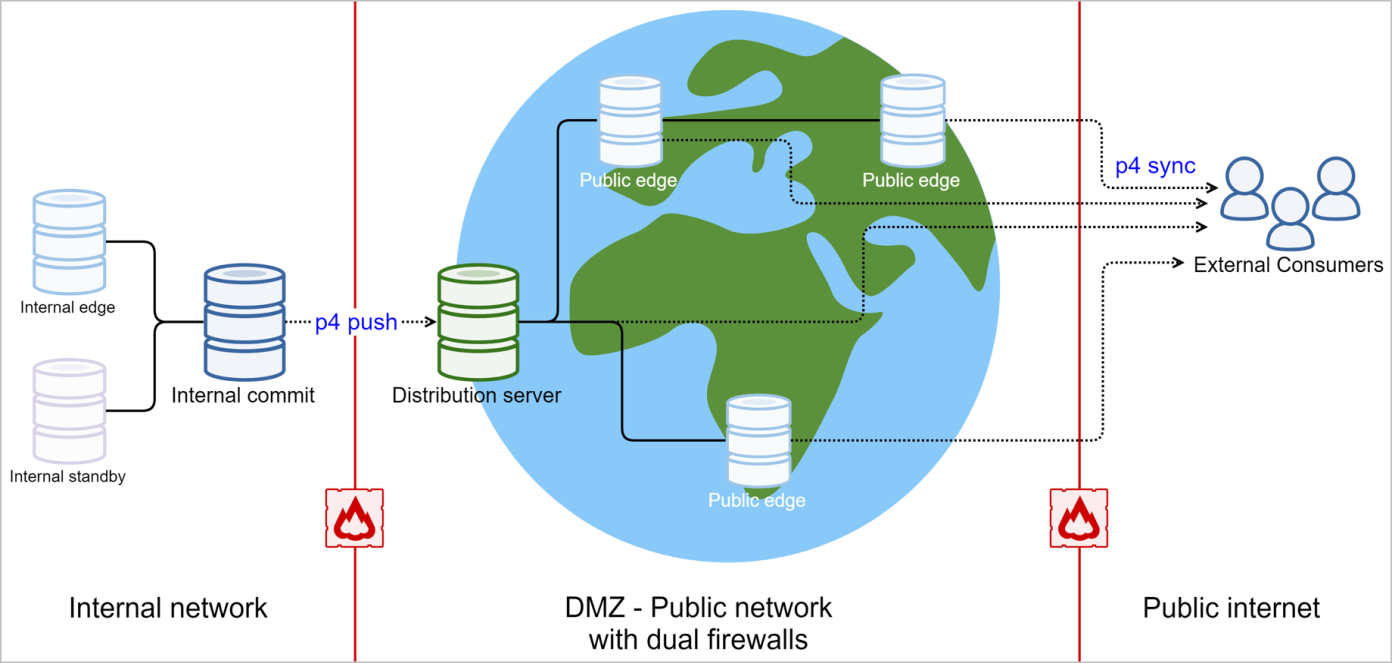
An internal server uses p4 push to push content to the distribution server, which is located in a DMZ. The distribution server does not accept p4 submit.
-
(Optional) The content on the distribution server can be replicated to one or more edge servers in the DMZ.
Replicas of distribution servers can be created. For example, edge servers of the distribution server can be created in geographically distributed locations to provide lower latency sync's to third parties that are far away from the distribution server. -
The external consumers use p4 sync to take the code drops.
Prerequisites
-
Helix Core Server 2023.1 (or later)
-
License to use the Distribution Server. Distribution Server is a new feature released at the same time as the 2023.1 release of Helix Core Server. To purchase a Distribution Server license, contact your Perforce account representative.
Security considerations
-
Standard "protections" functionality within Helix Core secures the content on the target server.
-
The internal server must be able to connect to the distribution server to push additional content.
-
No detailed user information is exposed from the source to the target because the users and groups that are defined on the target server are independent of the source server.
-
Changelist metadata is exposed.
Setting up the Distribution Server
The steps on this page assume you have logged into the server as the Helix Core user with the access level of super. See Permission levels and access rights in the p4 protect topic of Helix Core Command-Line (P4) Reference. That user can have any name, but for convenience the examples use super:
p4 -u super login
-
Decide which content you want to push to the Distribution Server.
-
Decide your business rule for change numbers.
-
Without setting up a Centralized changelist server (P4CHANGE) server, only
p4 pushcan create new changelists and the external consumers only needlistpermission. See Set protections with p4 protect. -
With a centralized changelist server, external consumers can create pending changes but it is your responsibility to manage the protections table so only the appropriate users have access.
-
-
Get a license for the Distribution Server by contacting your Helix Core account representative and indicating the number of Distribution Server users.
-
Start a new server after copying the Distribution Server license file into P4ROOT.
-
Create a server spec with
Services: distribution-server(see p4 server in Helix Core Command-Line (P4) Reference) -
Set the Distribution Server to use that server spec using
p4 -u super serverid DIST-SERVER-SPEC-NAME -
(Optional) If you want to preserve change numbers for content pushed to the distribution server, run
p4 -u super configure set DIST-SERVER-SPEC-NAME#dm.fetch.preservechangenumbers=1 -
Allow the Distribution Server to accept push using
p4 -u super configure set DIST-SERVER-SPEC-NAME#server.allowpush=2 -
On the internal commit server,
-
Run
p4 -u super configure set COMMIT-SERVER-SPEC-NAME#server.allowpush=1if this configurable is not already set to a higher value. -
Create a remote spec for the Distribution Server. (See the
p4 remotecommand.) -
Change the
Addressfield of the remote spec to match the address and port for the Distribution Server. -
Run p4 push to the Distribution Server by using the remote spec. This might be a manual operation, scripted as a cron job, or part of continuous integration.
-


