Create a new Simulink project and connect to the Helix Server
When you create a new Simulink project the .p4config file might not be present. The following steps will create a new project, connect the project to the Helix Server, and write a .p4config file for the project.
Create a new Simulink project and connect to the Helix Server:
- From the Simulink Home tab, select New > Project > From Simulink Template.
- Select the Simple Project template and click Create Project to open the Create Project dialog.
- Click the Folder icon in the Create Project dialog to open the Select a Project Directory dialog.
- From the Select a Project Directory dialog, click Create Folder, enter a name the new folder (this will be your project name), and click Open to return to the Create Project dialog.
- Click OK in the Create Project dialog to create your project.
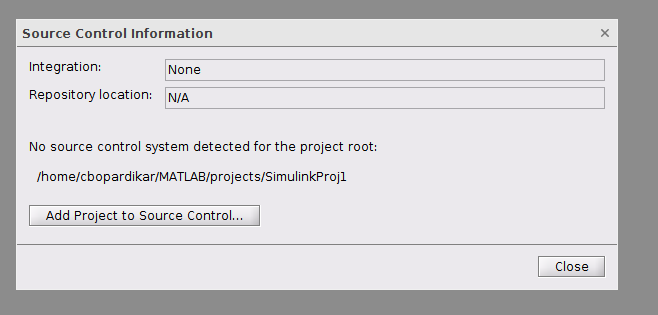
- From the Simulink Project tab, click Use Source Control to open the Source Control Information dialog.
- Click Add Project to Source Control... > Helix Core > Change... to open the Helix Core Connection dialog.
- Enter your Helix Server, Username, and Workspace details and click Connect.
- Click OK to close this dialog and return to the previous dialog.
- Click Convert to open the Helix Core Connection dialog. This is used to create the workspace for your project.
- AllWrite: select to leave all files writable on the client workspace. By default, only files opened by p4 edit are writable. If set, files might be clobbered as a result of ignoring the Clobber option (see below).
- Clobber: select to permit p4 sync to overwrite writable files on the client workspace. noclobber is ignored if allwrite is set.
- Compress: select to compress data sent between the client workspace and Helix Server. This is used to speed up slow connections.
- Locked: select to allow only the client workspace owner to use or change the client spec. Prevents the client spec from being deleted or unloaded.
- Modtime: select to make p4 sync and p4 submit preserve file modification times, as with files with the +m type modifier. For more information about Modtime, see p4 help filetypes. With nomodtime, file timestamps are updated by sync and submit operations.
- RmDir: select to delete a workspace folder if all the files contained in the folder are removed.
- Stream: if using streams, specify the full Helix Server depot path for the stream that you want to populate your workspace from.
Stream at change (optional): enter a changelist number to populate your workspace based on the point in time that is represented by that changelist.
- View Mapping: map files in the depot to your client workspace. This defines the files that you want in your client workspace and specifies where you want them to reside. The left-hand side specifies one or more files in the depot. The right-hand side specifies one or more files in the client workspace. For details about client view syntax, see the Specify mappings chapter in the Helix Core Command-Line (P4) Guide.
- The P4SL plugin displays the Helix Server depot path and prompts you to specify how the workspace should be populated.
- Get Latest revision: populates the workspace with the most recent revision of the files in the Helix Server. Typically this is the option you would select.
- Specify a revision: populates the workspace with the revision of the files you specify from the Helix Server.
- Advanced Sync Options, these options are only used if you are updating an existing client workspace:
- Force Operation (p4 sync -f): forces the sync even if the workspace already contains the file at the specified revision.
- Safe Update (p4 sync -s): performs a safe sync by comparing the content in your client workspace against what was last synced. If the file was modified outside of the control of Helix Server, an error message is displayed and the file is not overwritten.
- Your project is now connected to the Helix Server. For details of the Helix Server file and folder operations available to you, see File management.

The project name is not editable in the Create Project dialog. The project name is set by the project folder name that you create.


If you do not have a valid ticket session for the Helix Server, you will be prompted for your password.

If Helix Authentication Service is configured for your Helix Server a web page will open and you will be directed to the sign in process used by your Identity Provider (IdP) when you connect to the Helix Server.

Set your Helix Server Workspace settings, options are:
If you are connecting to a Stream![]() A branch with built-in rules that determine which changes to propagate to files in a stream depot, and in what order. A stream specification defines a stream. A user creates a stream spec by using the 'p4 stream' command or in P4V with File > New Stream. In P4V, stream specs are visible in the Streams Graph and the Streams tab. depot enter your stream details, if you are connecting to a classic depot enter your View Mapping
A branch with built-in rules that determine which changes to propagate to files in a stream depot, and in what order. A stream specification defines a stream. A user creates a stream spec by using the 'p4 stream' command or in P4V with File > New Stream. In P4V, stream specs are visible in the Streams Graph and the Streams tab. depot enter your stream details, if you are connecting to a classic depot enter your View Mapping![]() A single line in a view definition, consisting of a left side, a blank space, and a right side. The mappings specify the correspondences between files in the depot and files in a client, label, or branch. See also workspace view, branch view, and label view. details.
A single line in a view definition, consisting of a left side, a blank space, and a right side. The mappings specify the correspondences between files in the depot and files in a client, label, or branch. See also workspace view, branch view, and label view. details.
Click OK.

Options are:
Click OK to populate your workspace.


