Using the stream graph
The Streams tab lists streams while the Stream Graph tab displays a graphical representation of the relationships between parent and child streams in a selected depot.
To display streams in the Streams tab:
- Go to View > Streams to open the Streams tab.
-
Select a display option by clicking the Show streams in list or tree icon
 :
:- List displays the streams in a flat list.
- Tree (default) displays the streams in a hierarchy, with development streams and release streams listed under mainline streams.
-
Search for streams or restrict the streams that are displayed by using the Filter pane at the top of the tab. You can filter by owner, stream name, parent stream, stream type, and depot.
For more information about filters, see Searching and filtering.
To display streams in the Stream graph:
- Go to View > Stream Graph to open the Stream Graph tab.
Stream Graph display conventions
The Stream Graph provides a graphical view of stream relationships and provides tools and shortcuts for working with streams.
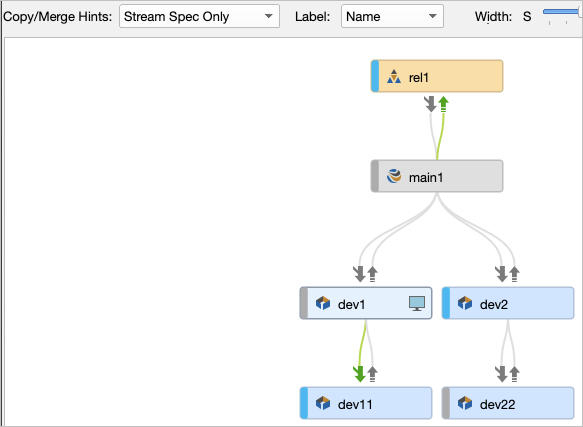
If the dm.stream.parentview configurable is set to 1 or 2, the Copy/Merge Hints filter can be set to show Files Only, Stream Spec Only, or Files and Stream Spec. Otherwise, the Copy/Merge Hints filter does not appear and hints are for Files Only.
The graph uses location and color to depict stream types: mainline streams are gray and placed in the middle of the graph, release streams are orange and appear above the mainline, and development streams are blue and appear below.
In the screenshot above,
- the grey band means that dev1 and dev22 have an
inheritparent view - blue band means rel1, dev2, and dev11 have a
noinheritparent view.
Status indicators between streams tell you which streams have changes to contribute and where the changes can be copied or merged:
Merge indicator:
![]()
Copy indicator:
![]()
The arrows are color-coded to indicate status:
- Gray: no merge or copy required
- Green: a merge or copy operation is available
- Because dev11 and rel1 are
noinherit, the changes to the parent stream are not automatically inherited. Therefore a merge is optional.
- Because dev11 and rel1 are
- Orange: stream must be updated, after which merge or copy is available
The workspace icon  indicates the stream you are
currently working in.
indicates the stream you are
currently working in.
You can drag the workspace icon to another stream to switch your workspace to that stream. The Stream field value in the workspace definition changes to the new stream.
Configure the stream graph display
-
In the Stream Graph tab, click the arrow icon
 at the top left to open the filter pane.
 - From the Depot list, select the depot that contains the streams you want to view.
-
If the depot contains more than one mainline stream, from the Mainline list, select the mainline stream you want displayed in the graph. The field below the list populates with a tree view of the selected stream.
The full depot path appears at the bottom of the filter pane and at the top of the Stream Graph tab, next to the arrow icon.
-
(Optional) To focus on specific child streams, select them in the tree view.
You may need to expand the tree to view the streams you want to select. To access quick filter options, click the filter list
 . Tip
. TipYou can select multiple streams and then press the Spacebar to select or clear the respective check boxes.
-
Click Apply.
The Stream Graph displays the streams that you specified.
-
To save the Stream graph:
- Click the filter list and select Save Graph As.
-
In the Add Stream Graph Filter dialog, enter a name for the filter and click OK.
You can now access the filter from the filter list
.
- Click the filter list
- To close the filter pane, click the arrow icon again.
-
(Optional) To view the actual depot location of the selected streams in the Stream Graph, from the Label list, select Stream Root.
The full depot path appears in the stream node for each stream:

This is useful if you have parent streams with child task streams that are located in other depots.
-
(Optional) To change the size of the stream node to accommodate long depot paths, move the Width slider.
-
(Optional) Click the navigator icon
 to open the Graph Navigator.
The Graph Navigator allows you to navigate the Stream graph when it is too big to fit into the available display area. In the Graph Navigator window, the red rectangle indicates the portion of the graph that is currently displayed in the Stream graph. You can use your mouse or cursor keys to move the rectangle and shift focus in the Stream graph.
NoteThe navigator icon
is only available if the Stream graph is larger than the display area.
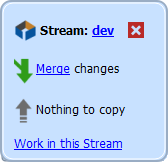
Display stream status
Double-click a stream to view a popup that contains status details:
Work in a stream
To work in a stream or switch from one stream to another, do one of the following:
-
In the Streams tab or the Stream Graph, right-click a stream and select Work in this Stream.
- In the Stream Graph, drag the Workspace icon from your current
stream to the one you want to work in.
If your stream preferences are set to use a different workspace and to show an information dialog when switching workspaces, P4V prompts you to switch workspaces or create a new workspace. In this case, click the Create New Workspace button (if you have only one workspace), Switch Workspaces button (if you have two workspace), or the Select Workspaces button (if you have more than two workspace) to switch your workspace. If more than one workspace is associated with the stream, the Select Workspace dialog opens, where you can search for and select the workspace you want.
If your preferences are set to use the same workspace when you switch between streams, the workspace view changes to include the stream you are switching to. In other words, the Stream field value in the workspace definition changes to the new stream. When you do this and your Helix server version is 2019.1 or later, then if you have files checked out to:
- The default changelist: P4V shelves them automatically in a numbered changelist with the description "Switched branch shelf" and unshelves them again to the default changelist when you switch back to that stream. However, note that the numbered changelist created for the interim shelf does not get deleted and stays behind in the system.
- A numbered changelist:P4V prompts you to shelve those files before switching. When you switch back to that stream, those files remain shelved in the numbered changelist. You have to unshelve them manually.
Branching with Streams
To create a new development or release branch, you create a child stream from a parent. You can also create virtual siblings of your mainline stream by branching.
You can create task streams by creating a child stream from a parent, but you can also create parentless task streams. For more information about how branch a task stream, see Working with Task Streams.
To create a child stream:
- In the Streams tab, right-click the stream and select Create New Stream from 'stream_name'….
-
In the Stream: New dialog, define the new stream.
See Creating streams.
-
Verify that the new stream appears correctly in the stream graph.
If you have specified the stream type correctly, more stable streams are displayed above the parent and less stable streams below the parent.
You can also reparent streams that have already been branched. To reparent a stream, do one of the following:
- In the Stream graph, drag the stream to the new parent stream.
- In the Streams tab (list or tree view) or the Stream Graph Tab, right-click the stream, select Edit Stream 'stream_name' , and enter a new parent in the Stream dialog.
You cannot reparent task streams.


