Remote depots for code drops
Performing a code drop requires coordination between the site receiving the code drop and the site providing the code drop. In most cases:
-
The Helix Core Server administrator at the site receiving the code drop creates a remote depot on that site's Helix Core Server that points to the site providing the code drop. See Define a remote depot.
-
The Helix Core Server administrator at the site providing the code drop configures that site's Helix Core Server to allow the recipient site’s remote depot to access the providing site’s Helix Core Server. See Restrict access to remote depots.
-
The configuration manager or integration manager at the receiving site integrates the desired files from the remote depot into a local depot. See Receive a code drop.
Define a remote depot
To define a new remote depot:
- Create the depot with
p4 depot.depotname - Set the
Type:toremote. -
Direct your Helix Core Server to contact the remote Helix Core Server by providing the remote server’s name and listening port in the
Address:field.A remote server’s host and port are specified in the
Address:field just as though it were aP4PORTsetting. -
Set the
Map:field to map into the desired portion of the remote server’s namespace.For remote depots, the mapping contains a subdirectory relative to the remote depot namespace. For example,
//depot/outbound/...maps to theoutboundsubdirectory of the depot nameddepothosted on the remote server.The
Map:field must contain a single line pointing to this subdirectory, specified in depot syntax, and containing the "..." wildcard on its right side.If you are unfamiliar with client views and mappings, see Configure workspace views in the Helix Core Command-Line (P4) Guide.
- The
Suffix:field does not apply to remote depots.
In order for anyone on your site to access files in the remote depot,
the administrator of the remote server must grant read
access to user remote to the depots and subdirectories
within the depots specified in the Map: field.
Example Define a remote depot
Lisa is coordinating a project and wants to provide a set of libraries
to her developers from a third-party development shop. The third-party
development shop uses a
Helix Core Server
on host pine that listens on port 1818. Their
policy is to place releases of their libraries on their server’s single
depot depot under the subdirectory
outbound.
Lisa creates a new depot from which she can access the code drop;
she’ll call this depot from-pine; she’d type p4
depot from-pine and fill in the form as follows:
Depot:       from-pine
Type:        remote
Address:     pine:1818
Map:         //depot/outbound/...
This creates a remote depot called from-pine on Lisa’s
Helix Core Server. This depot (//from-pine) maps to the third party’s
depot's namespace under its outbound
subdirectory.
Restrict access to remote depots
Remote depots are accessed either by the built-in user named
remote, or by the service user of the
accessing server’s p4d, if a service user is configured. Service users (including the
built-in remote user) do not consume
Helix Core licenses.
By default, all files on a
Helix Core Server
can be accessed remotely. To limit or eliminate remote access to a
particular server, use p4 protect to set permissions
for user remote or the remote site’s service user on that
server.
We recommend that administrators deny access to user remote
across all files and all depots by adding the following permission line
in the p4 protect table:
list user remote * -//...
Because remote depots can only be used for read access, it
is not necessary to remove write or super
access to user remote user or the service user. The built-in user remote does not have access to anything unless that
access is granted explicitly in the protection table. Nevertheless, it remains good practice to deny access to user
remote. If the
servers at partner sites are configured to use service users, you can
use their service users to further restrict which portions of your
server are available for code drops.
Example security configuration with remote or service user
For both for code drops and scenarios with a Centralized changelist server (P4CHANGE), there are use cases for Grant limited read access to remote or service user. In the case of a Centralized changelist server (P4CHANGE), if a service user is configured, that service user is used to contact the centralized change server and obtain the change number. If not, the built-in remote user is used.
In this example, we use the two organizations described in Receive a code drop. The security considerations for each site include:
On the local (oak) site:
- Deny access to
//from-pineto all users. Developers at theoaksite have no need to access files on thepineserver by means of the remote depot mechanism. -
Grant
readaccess to//from-pineto your integration or build managers. The only user at theoaksite who requires access the//from-pineremote depot is the user (in this example,adm) who performs the integration from the remote depot to the local depot.The
oakadministrator adds the following lines to thep4 protecttable:list user * * -//from-pine/... read user adm * //from-pine/...
On the remote (pine) site, access to code residing on
pine is entirely the responsibility of the pine
server’s administrator. At a minimum, this administrator should:
-
Preemptively deny access to user
remoteacross all depots from all IP addresses:list user remote * -//...
Adding these lines to the
p4 protecttable is sound practice for any Helix Core Server installation, whether its administrator intends to use remote depots or not. -
Contact the
oaksite’s administrator and obtain the name of theoaksite’s service user.In this example, the
oaksite’s service user isservice-oak. When a user of theoakserver accesses a remote depot hosted onpine, theoakserver will authenticate with thepineserver as a user namedservice-oak.Grant limited read access to remote or service user
As administrator of the
pinesite, you must:- Create a service user on your site named
service-oak. (see "service users" under "Types of users" in the p4 user topic of Helix Core Command-Line (P4) Reference). This user’s name must match the name of the receiving site’s service user. - Assign this user a strong password.
-
Inform the
oakadministrator of this password.The administrator of the
oaksite must: - Use the password set by the pine administrator to obtain a ticket
valid for
pinefor the userservice-oak(that is, runp4 login service-oakagainst thepineserver). - Place the ticket somewhere where the
oakserver’sp4dprocess can access it. (For example, the.p4ticketsfile in the server’s root directory, withP4TICKETSset to point to the location of the ticket file.) - Configure
oakto work with thepineservice user, either by startingoak'sp4dprocess with the-u service-oakflag, or configure the server withp4 configure set serviceUser=service-oak.) - Grant
readaccess to userremote(or theoaksite’s service user) to only those areas of thepineserver into which code drops are to be placed. Service users are used for replication, so you must consider the access rights that replication requires. - Restrict access to requests originating from the IP address of the Helix Core Server that is authorized to receive the code drop.
In this example, outgoing code drops reside in
//depot/outbound/...on thepineserver. Ifoak's IP address is192.168.41.2, thepinesite’s protections table looks like:list user remote * -//... read user remote 192.168.41.2 //depot/outbound/...
- Create a service user on your site named
-
If the
oakserver is configured to useservice-oakas its service user, thepinesite’s protections table looks like:list user remote * -//... list user service-oak * -//... read user service-oak 192.168.41.2 //depot/outbound/...
Only servers at IP address 192.168.41.2 that have valid tickets for the
pinesite’sservice-oakuser can access thepineserver through remote depots, and only//depot/outbound/...is accessible.
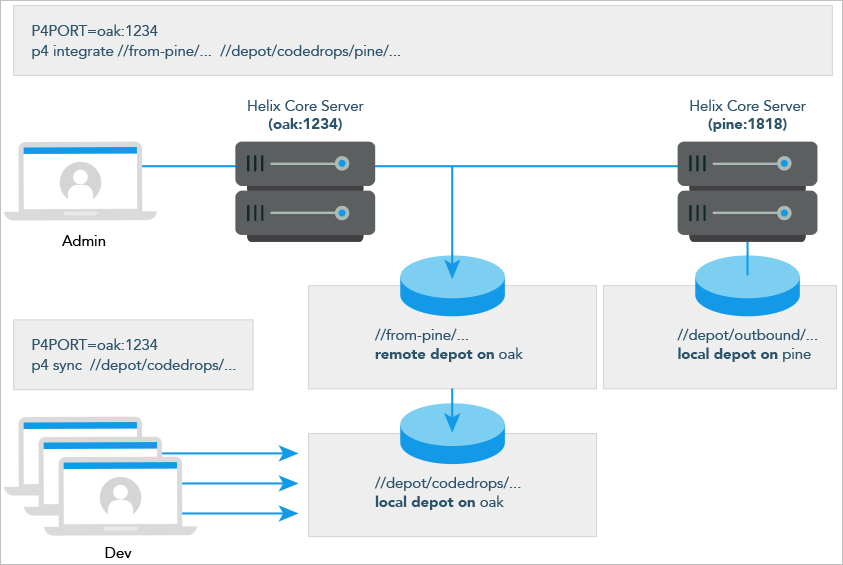
Receive a code drop
To perform a handoff or code drop between two Helix Core Server installations:
- Developers on
pine:1818complete work on a body of code for delivery. - The build or release manager on
pine:1818branches the deliverable code into an area ofpine:1818intended for outbound code drops. In this example, the released code is branched to//depot/outbound/.... - A
Helix Core Server
administrator at
oak:1234configures a remote depot called//from-pineon theoakserver. This remote depot contains aMap:field that directs theoakserver to the//depot/outboundarea ofpine:1818. - Upon notification of the release’s availability, a build or release
manager at
oak:1234performs the code drop by integrating files in the//from-pine/...remote depot into a suitable area of the local depot, such as//depot/codedrops/pine. -
Developers at
oak:1234can now use thepineorganization’s code, now hosted locally under//depot/codedrops/pine. Should patches be required topine's code,oakdevelopers can make such patches under//depot/codedrops/pine. Thepinegroup retains control over its code.