Groups
Groups make it easier to manage project and repository roles for multiple users at the same time. Groups can contain only user accounts. Nested groups are not supported.
The Groups view is where you add and delete groups. You can then manage team members from the Groups > Members view.
Creating a new group
Follow these steps to create a new group:
- Click the company name or logo in the top left corner to make sure you are at the company scope level. Then click Groups.
-
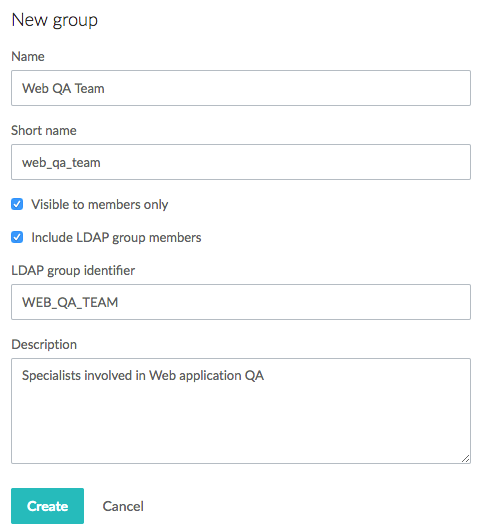
In the Groups view, click the plus icon to the right of the search field to open the New group form.

-
Provide the following information:
- Name: Enter a human readable name for the group.
- Short name: Enter a human readable identifier for the group. TeamHub automatically generates the short name from the name. You can modify it before creating the group, but once the group exists, you cannot change it.
- Visible to members only: Select to hide the group's members and details from other users.
- Include LDAP group members: Select to bring up LDAP group identifier input for mapping an LDAP group to the Helix TeamHub group by using either the distinguished name (dn) or the common name (cn) of the LDAP group. You can use this option with LDAP authentication, or when users are synchronized from LDAP. Only users that exist in Helix TeamHub are linked to the group.
- Description: (Optional) Enter a free-form description for the group.
After creating the group, you can manage these settings (except for Short name) from the group settings form (Groups tab > click cogwheel icon next to the group name) or from the Groups > Members view (only visible if you are an admin). Admin users can also delete a group using the group settings form.
Group members
After creating a group, you can manage its members by navigating to the Groups > Members view from the Groups tab. In the Groups tab, click the group whose members you want to view or manage.

Groups have two categories of members: direct members and linked members. Members of both categories behave the same way regarding privileges assigned to the group, but only direct members can be managed from the UI.
Direct members
Direct members can have one of the following roles:
- Member: Get the privileges assigned to the group and can always see the group and its details.
- Administrator: Behave the same way as users with the Member role but can also manage group members and group details and delete the group.
Linked members
Linked members behave the same way as users with the Member role, but you cannot manage their group membership from the UI. Instead, you manage linked members on the external LDAP directory. You can also add a linked member as a direct member to the group to grant the Administrator role for the group.


