Version control with Subversion
Subversion is an open source version control system developed as a project of the Apache Software Foundation. In Helix TeamHub, you can create any number of Subversion repositories in your projects.
The below is the list of resources to help you learn Subversion:
Setting up
Download and install the latest version of Subversion client and open your Terminal.
Configure your SSH keys under your Helix TeamHub Profile settings and start working with Subversion.
For example, to checkout the "bar" Subversion repository from the "foo" project in "acme" company with SSH, issue the following command in the Terminal:
svn checkout svn+ssh://[email protected]/acme/projects/foo/repositories/subversion/bar
To checkout the same repository with HTTPS:
svn checkout --username [HELIX TEAMHUB USERNAME] https://helixteamhub.cloud/acme/projects/foo/repositories/subversion/bar
Instructions for using Subversion over SSH in Windows
This article goes through step by step instructions on how to use Subversion over SSH in Windows. We are going to use TortoiseSVN in combination with SSH keys generated with Putty.
Prerequisites
In order to use subversion over SSH in Windows we are going to use TortoiseSVN application. You can download TortoiseSVN from their official site. We are also using Putty to generate a SSH key and handle communication with Helix TeamHub. You can download Putty from their official site. Download and install the Windows MSI installer package for Putty to have everything needed.
In order for TortoiseSVN to find Putty executables, you need to add the Putty install directory path to the Path variable. You can do this from the control panel. If you are using the Windows MSI installer package for Putty, this is done automatically at least for version 0.67.
In addition to having the aforementioned software installed, you should have a Helix TeamHub project and Subversion repository under it.
Configure TortoiseSVN to use SSH
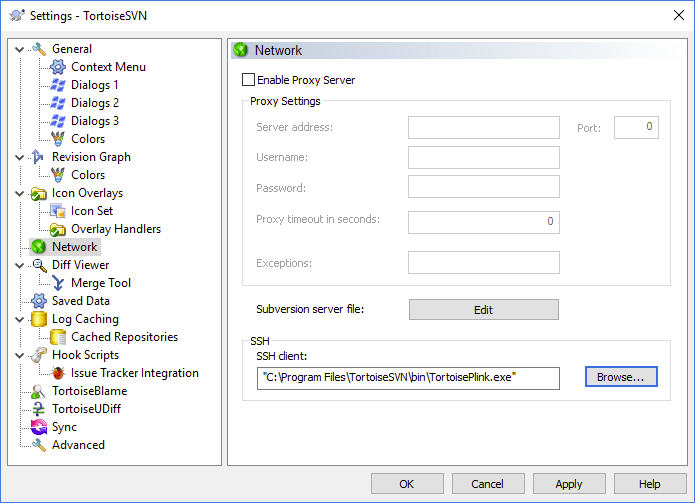
Open TortoiseSVN settings from the start menu. Go to the Network tab, and setup TortoisePlink.exe as your SSH Client. You may find TortoisePlink.exe under bin directory from the TortoiseSVN installation directory, e.g. C:\Program Files\TortoiseSVN\bin.
Generate SSH key with Putty
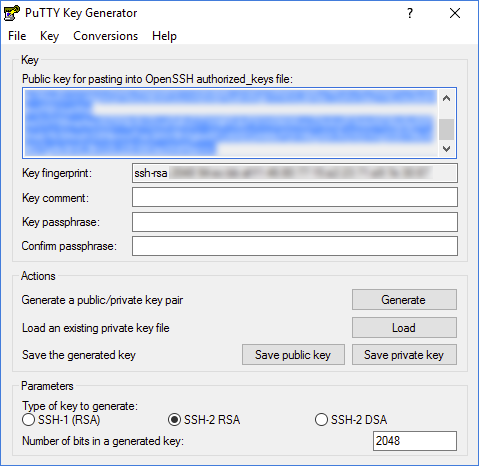
Generate the SSH key using PuttyGen. Use the default settings (SSH-2 RSA, 2048 bits). Save the private key to a directory of your choosing. Copy the Public key for pasting into OpenSSH authorized_keys file key into clipboard or to a file of your choosing. You need the public key in the next step.
Copy the public key to Helix TeamHub user profile
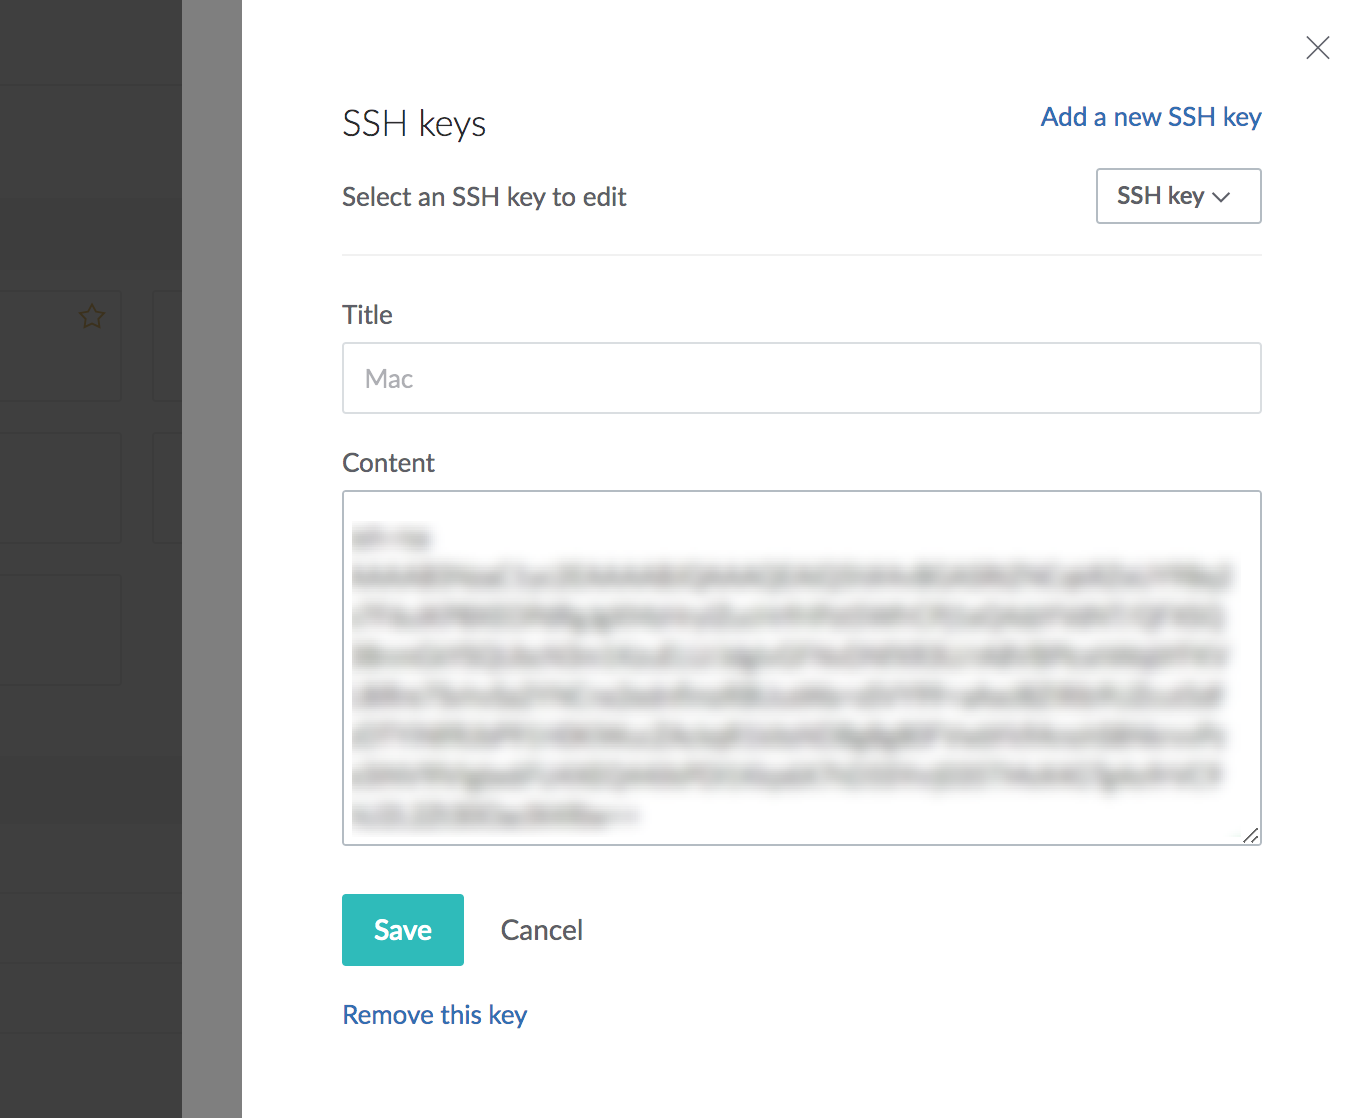
In Helix TeamHub, SSH keys are managed under user preferences. You may find user preferences by clicking the avatar icon top-right of the screen. Add public key to your preferences with a describing name.
Make a PuTTY Session for the SSH Key
Open Putty from the start menu and copy the hth@hostname part of the SVN repository SSH clone URL to the hostname field. Omit the svn+ssh:// prefix and the path suffix. Write a descriptive name to the saved sessions field, and press save. If you are using the Helix TeamHub cloud instance for example, the configuration might look like the below.
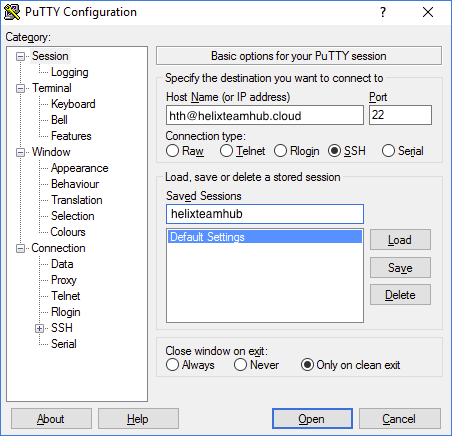
Next go to the Connection -> SSH -> Auth from the left sidebar, and add the private key you saved to Private key file for authentication. Go back to the Session from the left sidebar, select session you saved earlier and press save again.
Run Pageant to Activate the SSH Key
Start Pageant from the start menu and access it from the system tray. Add the private key you generated earlier, and click close.
Pageant needs to be running when you are using TortoiseSVN with SSH protocol.
Checkout the repository
Next you can browse to a directory you wish to checkout your repository. You can copy-paste the clone url as it is directly from the Helix TeamHub web client. With the first checkout using a new SSH key, TortoiseSVN will ask to trust the host key.
Instructions for Migrating a Subversion (SVN) repository to Helix TeamHub
This article walks you through how to migrate an existing Subversion repository to Helix TeamHub.
Prerequisites
In order to migrate your existing Subversion repository to Helix TeamHub by yourself, you need at least Subversion 1.7.X series. If you have issues with your migration, contact Perforce Support or your local IT support to get assistance.
Get full dump from existing repository
If you are using Windows, we recommend that you create the dump file using the native Windows command line interpreter (cmd.exe). Creating the dump file using PowerShell can result in data corruption.
First step is to create a dump file from your existing repository. If you have shell access to the Subversion server, you can use svnadmin dump as follows:
svnadmin dump /path/to/repository > svn-repo-dump.dump
where /path/to/repository is the repository path in the local disk and svn-repo-dump.dump is the dump file name.
If you do not have shell access to the Subversion server, you need to use svnrdump dump to dump the repository. This would be accomplished as follows:
svnrdump dump <REPOSITORY-CHECKOUT-URL> > svn-repo-dump.dump
where <REPOSITORY-CHECKOUT-URL> is the repository checkout url. You may need to add --username <NAME> and --password <PASSWORD> options to svnrdump command if your Subversion server uses authentication and authorization.
Create new project and repository in Helix TeamHub
- Log in to your account in Helix TeamHub
- Create a new project or navigate to a existing project
- Create a new Subversion repository. If you want to keep the original repository UUID, enter the UUID now.
- Disable your repository hooks from the Maintenance tab of the Repository settings page, see Repository hooks .
- Copy the checkout URL from the repository view to clipboard
Disabling repository hooks is only recommended when you import a repository to TeamHub. When repository hooks are disabled, no events are created for this repository and features that depend on events will no longer work. After importing the repository, enable hooks to allow repository events to be created.
Do not checkout the repository or commit any changes to it.
Migrate the data
- Use
svnrdump loadto load the dump file you got from the existing repository to the freshly created Helix TeamHub repository as follows: - When the data has been migrated, enable your repository hooks from the Maintenance tab of the Repository settings page, see Repository hooks .
svnrdump load <HELIX-TEAMHUB-REPOSITORY-CHECKOUT-URL> < svn-repo-dump.dump
where <HELIX-TEAMHUB-REPOSITORY-CHECKOUT-URL> is the repository checkout URL you copied to clipboard and svn-repo-dump.dump is the dump filename.
If you need assistance in migrating your Subversion repository to Helix TeamHub cloud, contact Perforce Support. If you wish to migrate your Subversion repository to Helix TeamHub on-premises installation, contact your local IT support.


