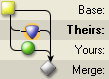
Merging Files
If you and another user have edited the same file, Perforce requires you to resolve
those changes. One way of resolving is by merging your changes with the other changes
using P4Merge. P4Merge enables you to compare two text files with a common base file to
locate differences and to select the text that you want in the merged result file. The
purple icon ( ) is associated with the file that another user edited
(their file), and purple bands highlight text that unique to
that file. The green icon (
) is associated with the file that another user edited
(their file), and purple bands highlight text that unique to
that file. The green icon ( ) is associated with file that you edited
(your file), and green bands highlight text that is in the
second file but not the first file. The base file is indicated by
the yellow icon (
) is associated with file that you edited
(your file), and green bands highlight text that is in the
second file but not the first file. The base file is indicated by
the yellow icon ( ) and yellow highlighting indicates text that is in the base file
but not in the other files.
) and yellow highlighting indicates text that is in the base file
but not in the other files.
In the top half of the window, P4Merge displays the base file surrounded by the two changed versions of the revision being merged. In the bottom half of the window, P4Merge displays the merge results file, where you select or enter the text that you want to check in. Make your changes as described below, and be sure to save them before exiting P4Merge.
Navigate Diffs
To move forward and back through individual differences, or to locate specific text or lines, click the toolbar buttons listed below.
| Go to next/previous diff |
 |
| Find text |
 |
| Go to line number |
 |
Merge Text
To merge files, you can either choose text from one of the files or enter changes directly into the merge results file.
Choose Text Chunks
To choose the entire contents of a file, click the corresponding icon in the merge diagram, as shown below.
To choose a single chunk of text from a set of diffs, click the corresponding button to the right of the chunk, as shown below.
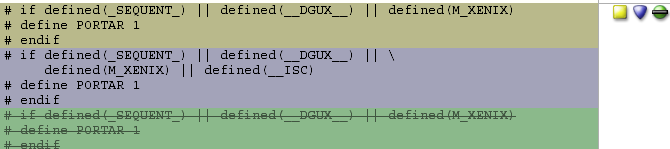
The buttons indicate the origin of the text and the way it was changed:
|
|
Base file text |
|
|
Same in theirs and base. |
|
|
Same in theirs and base. |
 |
Text added to their file. Not in yours or base. |
 |
Text added to your file. Not in theirs or base. |
 |
Text deleted from their file. |
 |
Text deleted from your file. |
 |
Same in yours and theirs, different from base. |
 |
Added to both yours and theirs. |
 |
Deleted from both yours and theirs. |
Note that the buttons are toggles: click once to select the corresponding text, click again to deselect it.
If P4Merge encounters too many changes to display all the required buttons, it
displays this button:  . Click it to view the details.
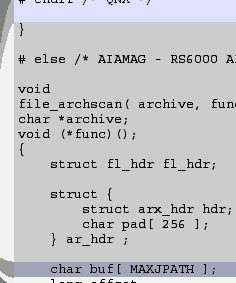
Edit Text
To edit the text in the merge result file, click on the text in the bottom pane and enter your changes. Manually-edited text is displayed with a gray highlight, like the middle chunk in the following example:
Set Preferences
To configure P4Merge settings to display or
suppress differences in white space and line endings, click ![]() or choose File > Comparison
Method. To configure other settings, choose Edit>Preferences (Windows) or P4Merge >
Preferences (Mac).
or choose File > Comparison
Method. To configure other settings, choose Edit>Preferences (Windows) or P4Merge >
Preferences (Mac).
To toggle the display of line numbers, click  .
.
Note
If you are comparing Unicode files, selection of the correct character set is essential. If you select the wrong character set, P4Merge cannot correctly compare files.