P4EXP User Guide
This User Guide provides an overview of P4EXP, the Helix Plugin for File Explorer, including its menu options and troubleshooting. P4EXP enables you to perform Helix Server tasks on files in the context of your file browser (for example, File Explorer). For information about Helix Server, see the Documentation page of the Perforce Website.
Connecting to Helix Server
To perform Helix Server version control actions on files in
File Explorer, you must be connected to a Helix Core Server, also referred to as Helix Server, with a
valid user and workspace![]() See client workspace..
See client workspace..
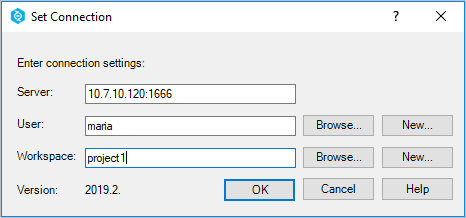
Set Connection dialog configuration
The graphic user interface provides a convenient Set Connection dialog.
Enter the values for your Server, user name, and workspace, then click OK.
When you are connected, you can Log off by using the More... menu.
Command-line configuration
If you do not want to use Set Connection dialog, consider the command-line alternatives.
You can set these connection variables in
the Windows environment, per directory with a P4CONFIG file, or a
combination of both. (Note that P4CONFIG files will override Windows
environment settings for the current working directory.)
To set Helix Server variables in the Windows environment:
- Open a command window.
-
Set the individual Helix Server variables with the following commands:
- Server:
p4 set P4PORT=<server:port> - User:
p4 set P4USER=<user_name> - Workspace:
p4 set P4CLIENT=<workspace_name>
- Server:
- Open File Explorer and navigate to a location under the workspace root defined by the workspace named in P4CLIENT.
To set Helix Server variables with P4CONFIG files:
- Open a command window.
-
Set the Helix Server variable for P4CONFIG with the following command:
- P4CONFIG:
p4 set P4CONFIG=<config_file_name>
- P4CONFIG:
-
For each workspace root location on the local disk, create a file named
<config_file_name>; inside the file add:# # Perforce configuration file # P4PORT=<server:port> P4USER=<user_name> P4CLIENT=<workspace_name>
- Open File Explorer and navigate to a location under a workspace root containing a P4CONFIG file.
Environment variables should be an adequate way to set connection settings if you are working with a single server, user, and workspace. If you have more than one workspace that you use on a regular basis, you may benefit from the flexibility of using P4CONFIG files.
For additional information, see:
Menu options
When you right-click a file in your file browser and select Perforce,
P4EXP displays some or all of the following menu options, depending
on the state of the file.
|
Log In... |
Enables you to enter your password and log in if you are not logged in to Helix Server and you have a password. Note
If the server you are connecting to is configured with multi-factor authentication (MFA), you are prompted for another layer of verification. Depending on the setup, you may need to select a method of verification before you can enter your credentials. For more information, see Note
[P4VS-2753/P4V-23511/P4EXP-476] If the server you are connecting to is configured for authentication with Helix Authentication Service, the Identity Provider (IdP) web page opens, prompting you for the credentials registered with your Identity Provider (IdP). For details, see Helix Authentication Service Administrator Guide or contact your Helix Core Server administrator. |
|
Get Latest Revision |
|
|
Submit... |
Checks in the default changelist |
|
Check Out |
Opens the files for edit in your
default changelist. A changelist logs the changes you make to files in the depot. After you have made your changes, you submit |
|
[P4EXP-489]Removes selected files locally and marks them for delete in Helix Server. Depending on your preferences, P4EXP prompts you for confirmation before it proceeds. Note
Selecting the Don't confirm deletes in the future check box turns off the related preference. When you confirm, P4EXP marks the files for delete in Helix Server and displays a confirmation message with the number of files marked for delete. Files marked for delete still exist in Helix Server. They are now included in a pending changelist |
|
|
Add to Source Control |
Adds the selected files to the default changelist. When you submit the changelist, the files are added to the depot. Only files that reside in directories in your workspace view can be added to a depot. |
|
Revert |
Discards all changes you have made to the file. Helix Server restores the head revision |
|
Revert Unchanged Files |
Closes unchanged files in a changelist. The files are no longer checked out. |
|
[P4V-391]Opens the Pending Changelists dialog, which lists all changelists that have not been submitted. This is helpful when you need to submit files that you marked for delete with the Delete in Helix Server option because such files no longer show in File Explorer. |
|
|
Diff Against Have Revision |
Launches your diff |
|
File History |
Displays the History dialog, which enables you to view any of the selected file's revisions, get a desired revision into your workspace, or compare two revisions of the same file. |
|
Properties |
Displays Helix Server information about a file. |
|
Show in P4V |
Opens P4V with the selected file highlighted. |
|
Remove from Workspace |
Removes files from your workspace. The files remain in the depot. To restore a file to your workspace, select the file in P4V and choose Get Latest Revision. |
|
Refresh File State |
Refreshes the state of the files under Helix Server control. |
|
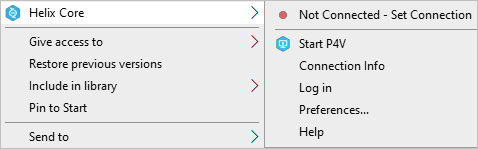
More |
Set Connection: Displays the dialog for configuring a connection to your Helix Server. Connection Information: Displays information about your Helix Server connection. |
|
Preferences: Enables you to configure P4EXP as follows:
|
|
|
Log Off: Logs you out if you have a password set in Helix Server. |
|
|
Help: Displays this help page. |
Troubleshooting
If you experience issues viewing P4EXP icons, this might be related to file overlay icon limitations on Windows. For more information and a workaround, see the article Inconsistent Icon Overlays with P4EXP in the Perforce Knowledgebase.


