Create and manage workspaces
Your Helix Core Server administrator can set up your workspace for you, but it is advisable to learn about configuring the workspace root directory and workspace specification (or "view").
The workspace root, also referred to as client root![]() The topmost directory of a client workspace. If two or more client workspaces are located on one machine, they should not share a client root directory., specifies the location on your workstation under which Helix Core Server stores copies of depot files. Give it a meaningful name and make sure it is not set to your computer's root directory.
The topmost directory of a client workspace. If two or more client workspaces are located on one machine, they should not share a client root directory., specifies the location on your workstation under which Helix Core Server stores copies of depot files. Give it a meaningful name and make sure it is not set to your computer's root directory.
A workspace specification defines the portion of the depot that can be
accessed from that workspace and specifies where local copies of files in
the depot are stored. Users of P4V call this location the workspace![]() Directories on your machine where you work on file revisions that are managed by Helix Core Server. By default, this name is set to the name of the machine on which your client workspace is located, but it can be overridden. Client workspaces, labels, and branch specifications cannot share the same name.. (Users of the he
Helix Core Server command line call this location the client.)
Directories on your machine where you work on file revisions that are managed by Helix Core Server. By default, this name is set to the name of the machine on which your client workspace is located, but it can be overridden. Client workspaces, labels, and branch specifications cannot share the same name.. (Users of the he
Helix Core Server command line call this location the client.)
A computer can contain multiple workspaces. Although P4V can connect to the server using only host name and port, a workspace is required to work with files that the Helix Core Server manages.
The mapping of depot files to local files is called the workspace
view![]() A set of mappings that specifies the correspondence between file locations in the depot and the client workspace. Each row in the workspace view consists of a pair of filespecs, first a depot filespec, then white space, and finally a filespec that shows a workspace location relative to the workspace root.. If you are working with streams, the workspace view is
generated by
Helix Core Server, based
on the structure of the stream. If the structure of the stream changes,
the workspace view is updated automatically. You cannot manually edit a stream's workspace view. Helix Core Server streams provide structured branching for version control of related files, such as codelines. Streams affect the way you create depots, define client workspaces, and integrate changes between files. See Work with streams.
A set of mappings that specifies the correspondence between file locations in the depot and the client workspace. Each row in the workspace view consists of a pair of filespecs, first a depot filespec, then white space, and finally a filespec that shows a workspace location relative to the workspace root.. If you are working with streams, the workspace view is
generated by
Helix Core Server, based
on the structure of the stream. If the structure of the stream changes,
the workspace view is updated automatically. You cannot manually edit a stream's workspace view. Helix Core Server streams provide structured branching for version control of related files, such as codelines. Streams affect the way you create depots, define client workspaces, and integrate changes between files. See Work with streams.
If you use a classic depot![]() A repository of Helix Core files that is not streams-based. Uses the Perforce file revision model, not the graph model. The default depot name is depot. See also default depot, stream depot, and graph depot.,
a graph depot
A repository of Helix Core files that is not streams-based. Uses the Perforce file revision model, not the graph model. The default depot name is depot. See also default depot, stream depot, and graph depot.,
a graph depot![]() A depot of type graph that is used to store Git repos managed by Helix Core Server. See also Git Connector and classic depot., or a hybrid workspace
A depot of type graph that is used to store Git repos managed by Helix Core Server. See also Git Connector and classic depot., or a hybrid workspace![]() A client workspace that supports both repos of type graph (see 'Git Connector') and the classic Helix Core file revision model., you must define and maintain the
workspace view manually. For information about graph depots and hybrid workspaces, see Work with graph depots.
A client workspace that supports both repos of type graph (see 'Git Connector') and the classic Helix Core file revision model., you must define and maintain the
workspace view manually. For information about graph depots and hybrid workspaces, see Work with graph depots.
Workspace types
Consider creating a client workspace of type partitioned-jnl, which has advantages over the default type, writeable:
-
partitioned-jnlmight improve performance because Helix Core Server tracks eachpartitioned-jnlclient workspace separately. Workspaces of typewriteableare tracked in one central db.have The list of file revisions currently in the client workspace. list, which means that users of a
 writeableworkspace might wait while the server deals with other workspaces. -
unlike the other workspace types that have an independent db.have list, a
partitioned-jnlworkspace supports journaling The process of recording changes made to the metadata.,. This means that your administrator can perform the tasks that are necessary to back up and recover your work.
The Type of a client workspace cannot be changed, with the exception that a readonly client workspace can be changed to partitioned.
-
By default, clients are created with the type
writeable, and theTypefield is not shown in the spec. -
The Helix Core Server uses a central
db.havetable to track the have list The list of file revisions currently in the client workspace. for writeableclients. However, when many clients syncing a large number of files at the same time, the central table is subject to contention. -
Other client types can reduce this contention because, for them, Helix Core Server uses independent
db.havetables, each of which pertains only to one client instance. -
To enable this feature, an administrator uses the
client.readonly.dirconfigurable to set the location on the server for the independentdb.havetables.
| Type | Independent db.have? | Journaled, checkpointed, and recoverable? | Use Case |
writeable
|
No | Yes |
For general use. |
partitioned-jnl
|
Yes | Yes | For general use in situations where client workspaces might otherwise experience contention for the server's central db.have table. |
readonly
|
Yes | No | For short lived clients used in build automation scripts that do not edit or submit files. |
partitioned
|
Yes | No |
For short lived clients used in build automation scripts that do edit or submit files. |
graph
|
No | Yes | For use with depots and repos of type graph and Git Connector. To learn more, see Work with Git. |
The types that are journaled, checkpointed, and recoverable also support Replication, except that between commit and edge servers, only the client spec is replicated. To learn more, see Setting global client views in Client workspaces and client views.
Create a workspace
When you create a new workspace, P4V immediately creates the workspace directory.
To learn how to create a workspace, watch this video or review the instructions following the video.
To create a new workspace:
-
Use of the following three alternatives:
-
On the top menu, choose Connection > New Workspace.
- In the Streams tab (in the right pane), right-click a stream and select New Workspace.
- In the Workspaces tab (in the right pane), right-click and select New Workspace.
-
-
If P4V is configured to prompt for a new workspace name, the Workspace Name dialog appears.
Enter a name that does not contain any blank space, and click OK.
Otherwise, in the Workspace dialog, on the Basic tab, accept or change the default workspace name and root.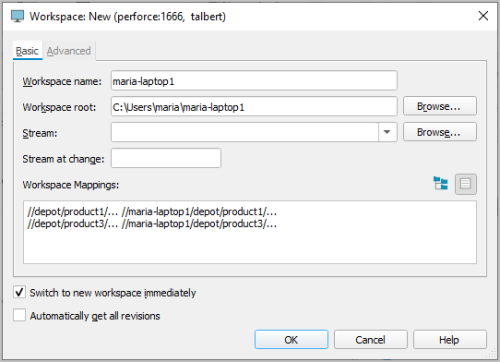
The default workspace type is
Writeable, but the Advanced tab allows you to select from the Workspace types, such asPartition-Jnl:
-
Map the workspace to the depot:
Classic depots (free-form branching):
Configure the workspace view (mappings) in the Workspace Mappings field by doing one of the following:
- Select the View workspace mapping as text icon
 and enter your
view specification using
Helix Core Server
client view syntax.
and enter your
view specification using
Helix Core Server
client view syntax. -
Select the View workspace mapping as tree icon
 and browse to
the files and folders you want.
and browse to
the files and folders you want.Build your workspace mapping by selecting a depot, folder, or file and using the Include
 , Exclude
  , and Clear
  buttons above the field.
Alternatively, right-click and select the Include, Exclude, and Clear options in the context menu.
For more information about mapping workspaces, including an example, see Define a workspace view.
Stream depots (structured branching):
-
Stream: Enter or browse for the stream that will be associated with this workspace.
If you enter a stream, the workspace view is populated automatically under Workspace Mappings; you cannot edit it.
To dissociate a workspace from a stream, delete the entry in the Stream field.
-
Stream at change: If you want to work using a stream definition as of a specific changelist, enter the changelist number here.
When a change is made to a stream definition, the stream is versioned using the current value of the change counter. Use Stream at change when you want your stream workspace to use a view generated from the stream definition as of a prior changelist.
Using a stream-at-change view is useful if you need to work with a set of directories and files that are not identical to the set in the current stream. For example, your stream may no longer include certain libraries that were included in an early version of the stream, but now you need those libraries to test a build. Enter the number of the last changelist to include those libraries. When you work in this workspace, P4V syncs to that changelist, allowing you to perform the test builds. Stream-at-change workspaces are read-only; you cannot check files into a previous changelist.
For more information about streams, see the "Streams" chapter in the Helix Core Command-Line (P4) Guide.
- Select the View workspace mapping as text icon
-
Specify the following settings on the Advanced tab as needed.
Owner
The user who created the specification.
Locked
If selected, only the owner of the workspace can use, change, or delete the workspace specification. Other users can see the workspace, but they cannot edit or delete its spec or use it to sync, open files, or do anything else.
Description
Your own explanation of the purpose of the workspace, or any related information you need to specify.
The Description field accepts HTML tags for marking up and hyperlinking text. For details, see Format text in Description fields.
Host
(Optional) The computer where the workspace resides. To enable the workspace to be used from any machine, leave this field blank.
AltRoots
For workspace specifications used from hosts on different platforms, a list of workspace roots in host-platform-specific syntax.
File Options
- Allwrite: All files in the workspace are writable (can be modified).
- Clobber: Syncing files overwrites writable files on the workspace.
- Compress: Compresses data sent between the workspace and Helix Core Server.
- Modtime: Get Latest and Submit preserve the file modification time instead of updating it.
- Rmdir: Deletes a workspace folder if all the files contained in the folder are removed.
- Altsync: Only get file metadata when getting revisions.
(See Helix Core Virtual File Service (P4VFS) Guide)
Line ending characters for text files
The line-end convention used for storing text files on the workspace computer:
- Local: Uses the workspace platform default
- Unix: LF
- Mac: CR
- Win: CRLF
- Share: Line endings are LF. Any CR prior to a line ending is removed for storage or syncing (for disks shared between UNIX and Windows)
On submit
Configures what happens when users submit files. The following options are available:
- Submit all selected files: Default. All open files are submitted.
- Don't submit unchanged files: Files that have content, type, or resolved changes are submitted, Unchanged files are moved to the default changelist.
- Revert unchanged files: Files that have content, type, or resolved changes are submitted. Unchanged files are reverted.
Check out submitted files after submit
If selected, P4V reopens submitted files in the default changelist.
ImportantThe
Typeof a client workspace cannot be changed, with the exception that areadonlyclient workspace can be changed topartitioned.-
By default, clients are created with the type
writeable, and theTypefield is not shown in the spec. -
The Helix Core Server uses a central
db.havetable to track the have list The list of file revisions currently in the client workspace. for writeableclients. However, when many clients syncing a large number of files at the same time, the central table is subject to contention. -
Other client types can reduce this contention because, for them, Helix Core Server uses independent
db.havetables, each of which pertains only to one client instance. -
To enable this feature, an administrator uses the
client.readonly.dirconfigurable to set the location on the server for the independentdb.havetables.
Type Independent db.have? Journaled, checkpointed, and recoverable? Use Case writeableNo Yes For general use.
partitioned-jnlYes Yes For general use in situations where client workspaces might otherwise experience contention for the server's central db.have table. readonlyYes No For short lived clients used in build automation scripts that do not edit or submit files. partitionedYes No For short lived clients used in build automation scripts that do edit or submit files.
graphNo Yes For use with depots and repos of type graph and Git Connector. To learn more, see Work with Git. NoteThe types that are journaled, checkpointed, and recoverable also support Replication, except that between commit and edge servers, only the client spec is replicated. To learn more, see Setting global client views in Client workspaces and client views.
Backup
Not currently in use. Applies only to clients bound to cluster workspace servers. Server clustering is no longer supported in Helix Core Server. For additional information, see the Perforce Server Clustering Update.
- Click Save to save your entries and create the workspace specification.
Define a workspace view
The workspace view determines which portions of the depot are visible in your Workspace tab (in the left pane) and where local copies of depot files are stored in your workspace. If you use streams, the workspace view is generated and updated automatically. If you use classic depots, you must maintain the view manually, as described here.
To define or change your workspace view:
-
If the Workspace form is not already open, do the following:
- Go to View > Workspaces to open the Workspaces tab.
- In the Workspaces tab, right-click the workspace and select Edit Workspace.
-
In the Workspace dialog, edit the Workspace Mappings field.
You can define the view syntactically and graphically, as described in Syntactic view specification and Graphical view specification.
-
You can add comments to the mappings, provided they are preceded by
##
- When you have finished editing, save your changes.
Syntactic view specification
In the Workspace dialog, on the Basic tab, above the Workspace Mappings field, click the View workspace mapping as text icon and type your view specification using
Helix Core Server
client view syntax. Views consist of mappings, one per line. The
left-hand side of the mapping specifies the depot files and the
right-hand side specifies the location in the workspace where the depot
files reside when they are retrieved from the depot:
//depot/...         //maria/depot/...
//user_depot/...    //maria/user_depot/...
//projects/...      //maria/myprojects/...
This workspace path includes the workspace name (maria), not the workspace root (C:\Users\Perforce\maria).
For details about client view syntax, see the Configure clients chapter in the Helix Core Command-Line (P4) Guide, which explains, among other things:
-
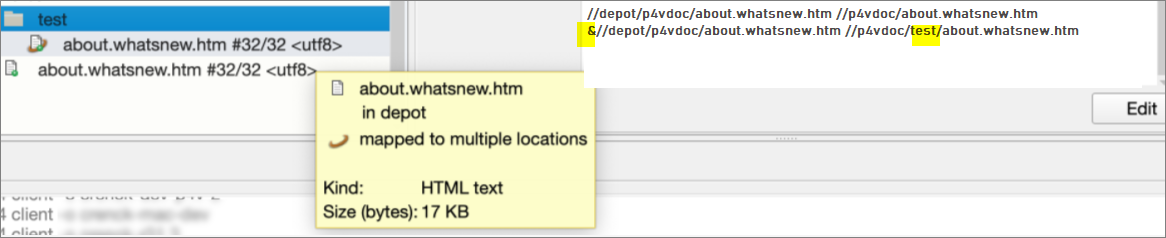
Map a single depot path to multiple locations in a workspace (ditto mapping with
&) -
Map different depot locations to the same workspace location (overlay mapping with
+)
Graphical view specification
Click the View workspace mapping as tree icon . The depot is displayed as a tree of folders and
files. Right-click the file or folder you want to map and choose the
mapping, as follows:
- Include tree/Exclude tree: Include or exclude all files below the selected folder.
- Include file/Exclude file: Include or exclude a specific file.
- Include Special/Exclude Special: Use depot syntax to specify the workspace view.
- Clear: Remove mapped folders or files from the mapping.
Alternately, double-click files or folders and use the resulting Special Edit dialog to define the view. This dialog enables you to specify options by clicking radio buttons or using the Expressions field to enter the left and right-hand components of a client view mapping.
To quickly add a depot path to the client view, go to Search > Filter Depot > Entire Depot Tree, right-click the desired folder in the Depot Tree, and choose Map to Workspace View.
Switch workspaces
How to change from one workspace to another depends on whether you work with classic depots or streams.
Classic depots
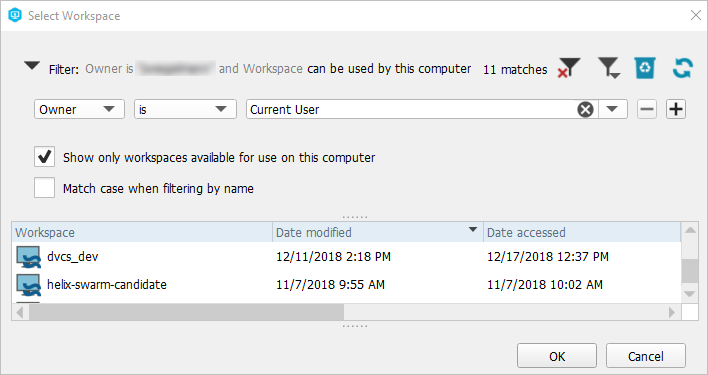
When working with classic depots, you can switch your workspace using the Select Workspace dialog. To open the Select Workspace dialog, do any of the following:
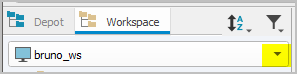
- In the drop-down list at the top of the tree pane, click the drop-down arrow and select Switch to Workspace.
- Go to Connections > Switch to Workspace.
- Open the Open Connection dialog and click Browse next to the Workspace field.
The Select Workspace dialog provides an Filter option to Show workspaces from all servers that is useful if you have workspaces that are on an edge server or commit server. The Show only workspaces available for use on this computer option focuses on the workspaces that reside on your client host machine.
You can also switch your workspace by right-clicking a workspace in the Workspaces tab (on the right) and selecting Switch to Workspace <workspace name>.
Stream depots
When working with streams, you can switch workspaces using the same methods you use when working with classic depots. In addition, you can switch stream workspaces by merging or copying to a stream (in this case, P4V prompts you to switch to the target stream's workspace), or by doing the following:
-
In the Streams tab or the Stream Graph, right-click a stream and select Work in this Stream.
- In the Stream Graph, drag the Workspace
 icon from your current
stream to the one you want to work in.
icon from your current
stream to the one you want to work in.
If your stream preferences are set to use a different workspace and to show an information dialog when switching workspaces, P4V prompts you to switch workspaces or create a new workspace. In this case, click the Create New Workspace button (if you have only one workspace), Switch Workspaces button (if you have two workspaces), or the Select Workspaces button (if you have more than two workspaces) to switch your workspace. If more than one workspace is associated with the stream, the Select Workspace dialog opens, where you can search for and select the workspace you want.
If your preferences are set to use the same workspace when you switch between streams, the workspace view changes to include the stream you are switching to. In other words, the Stream field value in the workspace definition changes to the new stream. When you do this and your Helix Core Server version is 2019.1 or later, then if you have files checked out to:
- The default changelist: P4V shelves them automatically in a numbered changelist with the description "Switched branch shelf" and unshelves them again to the default changelist when you switch back to that stream. However, note that the numbered changelist created for the interim shelf does not get deleted and remains in the system.
- A numbered changelist:P4V prompts you to shelve those files before switching. When you switch back to that stream, those files remain shelved in the numbered changelist. You have to unshelve them manually.
Submit a stream before switching streams
If you reuse a workspace between streams and you have checked out the stream, you cannot switch streams. You first need to check in the stream. See also Edit a stream privately.
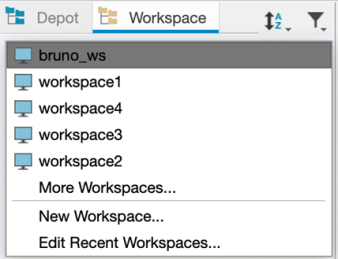
Edit recent workspaces
- Open the workspace list:
- Click Edit Recent Workspaces...
- To remove a workspace, unselect its check box.
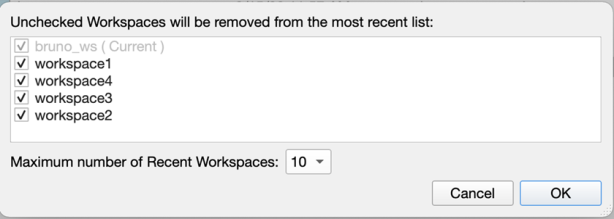
Note that the current workspace cannot be removed.
To change the Maximum number of recent workspaces to display on the workspace list, select a value from the drop-down list.
View workspaces
To view workspaces for the server to which you are connected, do one of the following:
-
Go to View > Workspaces. Then double-click a workspace row in the Workspaces tab to display the details of the client workspace specification.
-
Open the Select Workspace dialog (for details, see Switch workspaces). Then double-click a workspace row to display the details of the client workspace specification.
Search for workspaces
You can use filters to search for workspaces in the Workspaces tab and the Select Workspace dialog. You can filter workspaces by any combination of the following:
- Owner: Select current user or enter a user ID.
- Workspace Name
- Stream name
You can also choose to Show only workspaces available for use on this computer.
For more information on filters, see Search and filter.
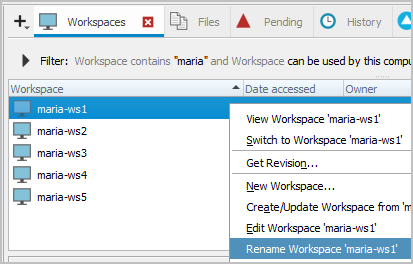
Rename a workspace
By default, users can rename workspaces that they created, even the current workspace.
To rename a workspace:
-
On the Workspaces tab, select the workspace, and on the context menu, click Rename Workspace.
-
In the Rename workspace dialog, type the new name you want, and click Rename workspace.
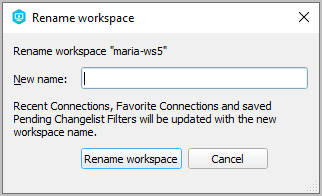
The workspace is renamed for pending changelists but not for submitted changelists.
Limitations:
The Helix Core Server must be at version 2022.2 or later.
The Helix Core administrator can prevent users from renaming their workspaces by using the run.renameclient.allow configurable.
Delete and unload workspaces
Deleting a workspace removes the Helix Core Server record of the workspace but does not remove files from the workspace or depot. You cannot delete a workspace that has files checked out (open for edit) in P4V.
Unloading transfers infrequently used metadata from the Server's database files to a set of flat files in an unload depot. If you unload a workspace, you can reload it if you change your mind and want to use it again.
To delete a workspace:
- Submit or revert any pending or shelved changelists associated with the workspace.
- Go to View > Workspaces to open the Workspaces tab.
- Right-click the workspace and select Delete Workspace 'workspace_name'.
To unload a workspace:
- Submit or revert any pending or shelved changelists associated with the workspace.
- Go to View > Workspaces to open the Workspaces tab.
- Right-click the workspace and select Unload Workspace 'workspace_name''.
To reload an unloaded workspace:
- Go to View > Workspaces to open the Workspaces tab.
- Select the Unloaded icon
 in the filter pane to open the Unloaded Workspaces dialog, where you
can filter for and select unloaded workspaces to reload.
in the filter pane to open the Unloaded Workspaces dialog, where you
can filter for and select unloaded workspaces to reload. - Right-click the workspace and select Reload Workspace 'workspace_name'.
For more information about unloading, see the p4 unload command in the Helix Core Command-Line (P4) Reference.


