Configuring
The authentication service is configured by setting environment variables. Because there are many settings, it is easiest to create a file called .env that contains all of the settings.
The choice of process manager affects how these settings are defined. For details, see Starting HAS.
If you installed by using the packager or the installation script, HAS is already running and its helix-auth is its service name.
The example.env and .env files
We recommend that you use the example.env file as your starting point. The example.env file is in your installation directory. The example.env file is a plain text file that contains:
-
NAME=VALUE pairs
-
comment lines starting with
#
For example:
# this is a comment
CA_CERT_FILE='certs/ca.crt'
NODE_ENV='production'
OIDC_CLIENT_ID='client_id'
OIDC_CLIENT_SECRET_FILE='secrets/oidc_client.txt'
OIDC_ISSUER_URI='http://localhost:3001/'
If you use example.env as your starting point, rename it to .env because the service needs that name to operate.
Make sure your .env file is located in the current working directory when the service is started. Typically this is the same directory as the package.json file of the service code.
Configuring the service to work with your identity provider might require some assistance from Perforce Support.
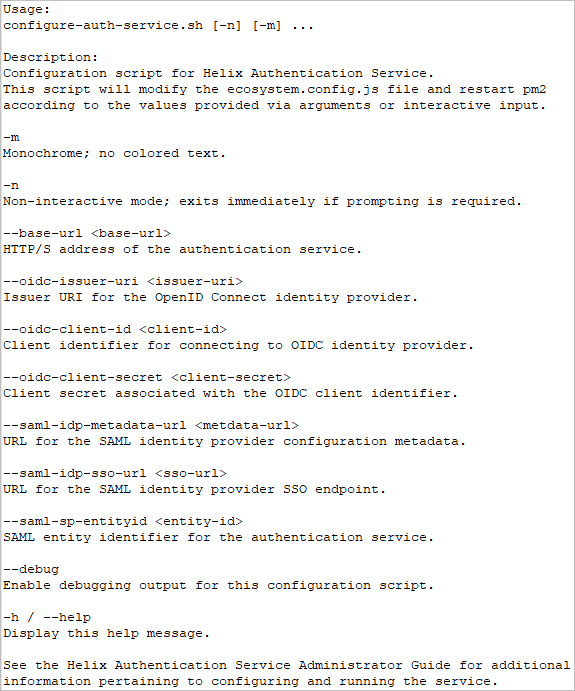
Recommended: configure-auth-service.sh
We recommend that you use the configure-auth-service.sh script because it is easier than a manual configuration of .env file.
The configuration script is in the bin directory of your installation. For example, if you installed HAS using the package, to get the help for the configuration script, type
/opt/perforce/helix-auth-svc/bin/configure-auth-service.sh -h
The output is:
Certificates
Helix Authentication Service requires certificates for several of the connections involved:
-
Connecting to the IdP because HAS reads its:
-
Helix products that connect to HAS, such as Helix ALM License Server, require a client certificate. The path for the CA certificate is read from the CA_CERT_FILE or
CA_CERT_PATHenvironment variable. Providing a CA file is only necessary if the CA is not one of the root authorities whose certificates are already installed on the system. Clients accessing the /requests/status/:id route require a valid client certificate signed by the certificate authority.
Security and certificates
Use proper certificates and a trusted certificate authority (CA) because a self-signed certificate might be rejected at any time.
Updating certficates
For security, certificates expire periodically, which means you might need to update certificates. To update HAS certificates, you update the files referenced by the CERT_FILE and KEY_FILE settings.
Be aware that a package update overwrites the server.crt and server.key files.
If the service is signing or encrypting SAML requests to the identity provider, changing the certificates in HAS means that the IdP configuration must be updated with the new public certificate that HAS is using.
If you are using the HAS integration with Helix Swarm, when you change the HAS certificates, copy the HAS public certificate to the Swarm configuration. By default, HAS uses the CERT_FILE and KEY_FILE public/private key pair for both HTTPS and the SAML to Swarm integration. However, if SAML_CERT_FILE and SAML_KEY_FILE are provided, those files will be used for SAML and Swarm only.
The 2021.2 release and later also support the use of a PFX_FILE. If a PFX_FILE is given, CERT_FILE and KEY_FILE are ignored.
In 2022.1 and later, CERT_FILE and KEY_FILE are the aliases we recommend instead of SP_CERT_FILE and SP_KEY_FILE.
Restart the service
After you update the certificate files, restart the service because the service only reads the files when it starts up.
OpenID Connect settings
| Variable Name | Description |
|---|---|
AUTH_PROVIDERS_FILE |
Allows you to configure HAS to support any number of both OIDC and SAML providers. See Multiple providers. |
| OIDC_CLIENT_ID | The client identifier as provided by the OIDC identity provider. |
| OIDC_CLIENT_SECRET | The client secret as provided by the OIDC identity provider. |
| OIDC_CLIENT_SECRET_FILE | Path of the file containing the client secret as provided by the OIDC identity provider. This setting should be preferred over OIDC_CLIENT_SECRET to prevent accidental exposure of the client secret. |
| OIDC_CODE_CHALLENGE_METHOD |
The default behavior is to detect the supported methods in the OIDC issuer data. Therefore, in most cases it is optional to specify the authorization code challenge method, which is either S256 or plain. However, not all identity providers supply this information, in which case this setting becomes necessary. |
| OIDC_ISSUER_URI | The OIDC provider issuer URL. |
OIDC_MAX_AGE
|
Maximum age (in seconds) of an authenticated session, after which the user must re-authenticate. If set to If Important
Before deploying the service to your users, make sure to test the effect of this setting. This setting affects only the IdP, and the IdP might ignore this setting. The use case for this setting is if the client application, such as ALM License Server, forces any user who is authenticating with that application to also authenticate with the IdP, even if that user already has a session with that IdP. |
OIDC_SELECT_ACCOUNT
|
To prompt the user to select an account when authenticating with an OIDC identity provider, set to |
OpenID Connect has a discovery feature in which the identity provider advertises various properties via a "discovery document". The URI path will be /.well-known/openid-configuration at the IdP base URL, which is described in the OpenID Connect (OIDC) specification. This information makes the process of configuring an OIDC client easier.
The OIDC client identifier and secret are generally provided by the identity provider during the setup and configuration of the application, and this is unique to each identity provider. For guidance with several popular identity providers, see Example Identity Provider configurations.
The OIDC issuer URI value is advertised in the discovery document mentioned above, and will be a property named issuer. Copy this value to the OIDC_ISSUER_URI service setting. Do NOT to use one of the "endpoint" URL values, because those are different from the issuer URI.
SAML settings
SAML identity providers advertise some of the information for the variables through their metadata URL (or metadata file).
The URL is different for each provider, unlike OIDC. See Example Identity Provider configurations.
When configuring the service as a "service provider" within a SAML identity provider, provide an entityID that is unique within your set of registered applications. By default, the service uses the value https://has.example.com, which can be changed by setting the SAML_SP_ENTITY_ID environment variable. Anywhere that https://has.example.com appears in this documentation, replace it with the value you defined in the identity provider.
Warning and workaround for SAML security
For continuity when upgrading to the 2022.2 release or later, the two following SAML-related settings do not impose a requirement that the SAML assertion or the SAML response be cryptographically signed. However, given the security alert issued by the U.S. government at https://nvd.nist.gov/vuln/detail/CVE-2022-39299, we provide a means to configure the 2022.2 release or later of HAS to require a cryptographic signature for the SAML assertion and/or the SAML response. Requiring that both be signed is the most secure:
SAML_WANT_RESPONSE_SIGNED=true
and
SAML_WANT_ASSERTION_SIGNED=true
| Name | SAML_WANT_ASSERTION_SIGNED |
| Description |
|
| Default |
unset prior to 2022.2, |
| Name | SAML_WANT_RESPONSE_SIGNED
|
| Description |
|
| Default |
unset prior to 2022.2, |
Make sure that your IdP configuration is compatible with these two settings and meets your security requirements.
Details for SAML settings
SAML identity providers advertise some of the information for the variables through their metadata URL (or metadata file).
The URL is different for each provider, unlike OIDC. See Example Identity Provider configurations.
When configuring the service as a "service provider" within a SAML identity provider, provide an entityID that is unique within your set of registered applications. By default, the service uses the value https://has.example.com, which can be changed by setting the SAML_SP_ENTITY_ID environment variable. Anywhere that https://has.example.com appears in this documentation, replace it with the value you defined in the identity provider.
| Name | AUTH_PROVIDERS_FILE
|
| Description |
Allows you to configure HAS to support any number of both OIDC and SAML providers. See Multiple providers. |
| Default | none |
| Name | SAML_AUTHN_CONTEXT |
| Description |
The authn context defines the method by which the user will authenticate with the IdP. Normally the default value works on most systems, but it may be necessary to change this value. For example, Azure might want this set to urn:oasis:names:tc:SAML:2.0:ac:classes:Password in certain cases. The If you specify multiple values, enclose them as a comma-separated list within square brackets. The entire value of the
Spaces and quotes are optional. |
| Default |
urn:oasis:names:tc:SAML:2.0:ac:classes:PasswordProtectedTransport |
| Name | SAML_CERT_FILE |
| Description |
Public key of the certificate used by HAS when connecting to the SAML IdP, and when servicing SAML authentication requests from other applications, such as Helix Swarm. If this setting is not defined, |
| Default |
undefined |
| Name | SAML_DISABLE_CONTEXT |
| Description |
If set to true, do not request a specific authentication context from the SAML IdP. Instead, allow Active Directory Federation Services (ADFS) to decide. Some configurations use different contexts depending on how the user is authenticating. For example, accessing the server from outside the corporate network might correspond to a different context than accessing the server from inside the corporate network. |
| Default |
false |
| Name | SAML_FORCE_AUTHN |
| Description |
If set to true, forces the user to authenticate. If Important
Before deploying the service to your users, make sure to test the effect of this setting. This setting affects only the IdP, and the IdP might ignore this setting. The use case for this setting is if the client application, such as ALM License Server, forces any user who is authenticating with that application to also authenticate with the IdP, even if that user already has a session with that IdP. |
| Default |
false |
| Name | SAML_IDP_ENTITY_ID |
| Description | The entity identifier for the identity provider. This is not required, but if provided, then the IdP issuer will be validated for incoming logout requests/responses. |
| Default | none |
| Name | SAML_IDP_METADATA_FILE |
| Description |
Specifies the path of a local file that contains the identity provider's metadata in XML format. An example of a SAML IdP that uses a file instead of a URL is Google Workspace. If you use SAML_IDP_METADATA_FILE, it takes precedence over SAML_IDP_METADATA_URL. |
| Default | none |
| Name | SAML_IDP_METADATA_URL |
| Description |
URL of the IdP metadata configuration in XML format. If you fetch the IdP metadata by the SAML_IDP_METADATA_URL setting, several other settings might be configured automatically by the service. The settings that are configured automatically depends on the information the IdP advertises via the metadata. Possibilities include:
In the unlikely scenario that the IdP returns data that needs to be modified, set the correct value in the appropriate environment variable, such as SAML_NAMEID_FORMAT Tip
A more secure option is to set the individual SAML IdP values: |
| Default |
none |
| Name | SAML_IDP_SLO_URL |
| Description | URL of IdP Single Log-Out service. |
| Default |
none |
| Name | SAML_IDP_SSO_URL |
| Description | URL of SSO IdP provider to which the user is redirected to establish authentication. |
| Default |
none |
| Name | SAML_KEY_FILE |
| Description |
The private key that corresponds to |
| Default |
undefined |
| Name | SAML_NAMEID_FIELD |
| Description | Name of the property in the user profile to be used if nameID is missing, which is likely to be the case when using another authentication protocol (such as OIDC) with the identity provider (such as Okta). |
| Default |
none Note: Changing the configuration file requires restarting the service because Node caches the file contents in memory. |
| Name | SAML_NAMEID_FORMAT |
| Description |
Specifies the SAML name identifier format for the IdP to return during a successful authentication request. The default value allows the IdP to choose the value. However, you might need to specify the format to avoid getting different results for different users. A typical value is For the list of possible values, see section 8.3 of the SAML Core specification. |
| Default |
|
| Name | SAML_SP_AUDIENCE |
| Description | Service provider audience value for AudienceRestriction assertions. |
| Default |
none |
| Name | SAML_SP_ENTITY_ID |
| Description |
The entity identifier (entityID) for the Helix Authentication Service. |
| Default | https://has.example.com |
Settings for JSON web token authentication
If you have fully- or semi-automated users, such as build systems, they can authenticate with JSON web token authentication when they need to. This is an alternative to you setting up long-lived tickets to avoid the burden of authenticating frequently. In the case of Azure, JSON web token authentication has the additional advantage of being managed by the cloud service provider, making it both convenient and secure.
The /oauth/validate endpoint takes a JSON web token via the Authorization header and verifies it. To enable HAS to verify the authenticity of the token, set the following settings:
| Name | Description | Default |
|---|---|---|
OAUTH_ALGORITHM
|
The algorithm used to cryptographically sign the JSON Web Token. This setting is optional. The list of supported values is found here: https://github.com/auth0/node-jsonwebtoken | none |
OAUTH_AUDIENCE
|
The "audience" value that will be compared to the aud field of the JSON Web Token to ensure that the token is valid for this service. | none |
OAUTH_ISSUER
|
The issuer that provided the JSON Web Token to the client, to be compared to the iss field of the JSON Web Token to ensure that it is from a trusted source. |
none |
OAUTH_JWKS_URI
|
The URI that provides the JSON Web Key Sets used to validate an JSON Web Token that was issued by the issuer identified in the OAUTH_ISSUER setting. |
none |
OAUTH_TENANT_ID
|
The "tenant identifier" that can be used to further restrict access to clients that have been granted permission to use this service. This setting is optional. | none |
JSON web token authentication
JSON web token authentication involves the extension running in p4d, the client system by means of P4LOGINSSO, and the authentication service.
The loginhook extension checks the P4USER against a configured list of users and/or groups (configuration settings to be named client-sso-users and client-sso-groups), and indicates to p4d that the user must authenticate using the traditional SSO mechanism (using the P4LOGINSSO client-side program). When the client returns the token to p4d, the extension will send it to HAS to be verified. The returned payload must contain an identifier that can be mapped to the Helix Core Server user spec. Similar to web-based SSO, the administrator configures the name of the IdP property via the client-name-identifer setting, and the P4 user field is named via the client-user-identifiersetting, which can be user, email, or fullname.
The new settings, client-name-identifer and client-user-identifier, are necessary because the extension can still be used to authenticate other users via web-based SSO, which does not rely on P4LOGINSSO and web tokens, and thus will likely compare different sets of attributes than the "client-sso" users. For instance, web-based SSO users might use their email address, while client-sso users might use an "oid" that is compared to the user name.
Other Settings
| Name | Description | Default |
|---|---|---|
ALLOW_USER_RENAME
|
For the Helix Core user and group provisioning feature. Defaults to false, which means that any attempt by the cloud service provider to rename a user will be rejected with a “mutability” error. |
false
|
| BEARER_TOKEN_FILE | Path of the file containing the shared secret. The configure script creates the BEARER_TOKEN_FILE by default during the configuration process. This setting prevents exposure of the shared secret if you choose to sends your .env configuration file to Perforce support. |
none |
| BIND_ADDRESS |
Define the IP address upon which the service will listen for requests. Setting this to 127.0.0.1 (that is, localhost) means that only processes on the same host can connect, while a value of 0.0.0.0 means requests made against any address assigned to the machine will work. This setting cannot be changed during runtime. |
0.0.0.0 |
DEBUG_PROXY
|
Set to any value to enable debugging a service configuration that runs behind a load balancer or reverse proxy. When a login request comes for either OIDC or SAML, the following are logged: HTTP request headers, protocol ( |
none |
DEBUG_SAML
|
Set to any value to enable debugging for SAML. The output is verbose, so use solely when debugging. Dumps into the log the SAML configuration information for each and every SAML request. The log will show the entire SAML request from Swarm as well as the response to Swarm. This setting requires configuring LOGGING with This setting cannot be changed during runtime. |
none |
DEBUG_SCIM
|
Set to any value to enable debugging for user and group provisioning. The output is verbose, and might include passwords in plain text, so use solely when debugging. Dumps into the log the entire request body to the This setting cannot be changed during runtime. |
none |
| CA_CERT_FILE | Path of certificate authority file for service to use when verifying client certificates. | none |
| CA_CERT_PATH | Path of directory containing certificate authority files for service to use when verifying client certificates. All files in the named directory will be processed. | none |
| CERT_FILE | The service provider public certificate file, needed with SAML. | none |
|
CLIENT_CERT_CN |
By default, HAS accepts any valid client certificate that is signed by the designated certificate authority. Tip
If you want additional security, consider using this setting or Specify a name or pattern to match against the Common Name in the client certificate used to acquire the user profile data. The patterns supported are described in the library at https://github.com/isaacs/minimatch, with the asterisk (*) being the most common wildcard. For example: client.example.com *.example.com *TrustedClient* You can also use a bracketed list with comma-separated values, like the example for |
none |
CLIENT_CERT_FP
|
Tip
This setting is more secure than Can be set to the SHA256 digest of the client certificate (also called fingerprint) where a colon separates each byte. For example,
Alternatively, you can use a bracketed list with comma-separated values. For example,
If set, the auth service compares this value to that of the client certificate used to retrieve the user profile data. To generate the fingerprint, use the openssl command:
|
none |
| DEFAULT_PROTOCOL | The default authentication protocol to use. Can be oidc or saml. | saml |
| FORCE_AUTHN |
If set to any non-empty value, causes the HAS service to require the user to authenticate, even if the user is already authenticated.
Some SAML IdPs do not support this setting, and few OIDC providers support it. Tip
If utmost security is a high priority, we recommend setting FORCE_AUTHN. Important
Before deploying the service to your users, make sure to test the effect of this setting. This setting affects only the IdP, and the IdP might ignore this setting. The use case for this setting is if the client application, such as ALM License Server, forces any user who is authenticating with that application to also authenticate with the IdP, even if that user already has a session with that IdP. |
none |
| KEY_FILE | The service provider private key file, typically needed with SAML. | none |
KEY_PASSPHRASE
|
Passphrase to decrypt the private key of the PFX_FILE public/private key pair or the private key of KEY_FILE. The passphrase is provided as a string. For example, "3my$2eR*5tJ" |
none |
KEY_PASSPHRASE_FILE
|
This alternative to KEY_PASSPHRASE specifies the path to a UTF-8 encoded file that contains the passphrase to decrypt the private key of PFX_FILE or KEY_FILE. If KEY_PASSPHRASE_FILE is provided, KEY_PASSPHRASE is ignored. |
none |
| LOGGING |
Path of a logging configuration file. See the LOGGING section below. Setting this will override the DEBUG setting. This setting cannot be changed during runtime. |
none |
| LOGIN_TIMEOUT | How long in seconds to wait for user to successfully authenticate before a timeout occurs in the login process. | 60 |
REDIS_CERT_FILE
|
These two settings:
You can specify a value for these settings even if the Redis server does not currently use client certificates. |
none |
REDIS_KEY_FILE
|
||
REDIS_URL
|
When connecting to Redis,
|
none |
SENTINEL_CONFIG_FILE
|
For Redis Sentinel. Specifies the simplified JavaScript configuration file, which must have the This setting cannot be changed during runtime. |
none |
PFX_FILE
|
Path to a PKCS#12 formatted public/private key pair for TLS/SSL communications. Typically, the filename ends with .pfx and often PFX is used to refer to this file type. If the private key is encrypted, a passphrase must be provided to decrypt it. See KEY_PASSPHRASE and KEY_PASSPHRASE_FILE. |
none |
| SESSION_SECRET | Password used for encrypting the in-memory session data. | keyboard cat |
| SP_KEY_ALGO | The algorithm used to sign the requests. | sha256 |
STATUS_ENABLED
|
Enables the /status endpoint on the service, which returns the service status as a JSON blob. To enhance security, set the value to false, which hides the version numbers of the HAS service. |
true
|
| SVC_BASE_URI |
The authentication service base URL visible to end users. Needs to match the application settings defined in IdP configuration. Load Balancer If you use a load balancer in front of HAS, such as Amazon Web Services Elastic Load Balancing (ELB), the load balancer can have a certificate installed and use SSL termination (decryption). Such a process requires a protocol to forward the traffic to a port. Therefore, HAS supports setting the PORT and PROTOCOL configuration variables. If SVC_BASE_URI is defined, it sets the value of PORT and PROTOCOL. For example, https://has.example.com:443explicitly sets PROTOCOL to https and PORT to 443. In this scenario, 443 might also be considered the DNS name of the load balancer. The default value of PORT is 3000, and the default value of PROTOCOL is http. You can explicitly set PROTOCOL to http or https. The PORT value can be implicitly defined because http defaults to 80 and https defaults to 443. Note that the PORT for SVC_BASE_URI is distinct from the syslog port described under LOGGING. For information about configuring the service to treat the connection to the load balancer and/or proxy as secure, use the |
none |
SVC_GROUP
|
The name of the group or user that runs the HAS process. HAS starts as the These two settings cannot be changed during runtime. |
none |
SVC_USER |
none | |
VALIDATE_ENABLED
|
If set to "true", enables the Swarm troubleshooting script to inspect the Swarm config file to report any issues. | "false" |
Changing an existing configuration of HAS
Most settings can be configured without restarting the service. The following settings are exceptions:
| Setting that require restarting HAS | |
|
|
|
Restarting HAS
There are multiple ways to restart HAS:
-
If you installed the HAS by using the package or install script, use the
systemdsystem manager to restart thehelix-authservice. -
If you are running the service under Windows, see Starting and Stopping the HAS Window Service.
-
Signal the service process to reload the configuration by invoking the kill command with the USR2 signal and the process identifier:
kill -USR2 <pid>An example of this command and the correct process ID are written to the log at info level when the service starts up
Web-based administration settings
These settings enable you to manually enable Web-based administration.
| Variable Name | Description |
|---|---|
ADMIN_ENABLED
|
To enable web administration, set to true |
ADMIN_USERNAME
|
A string that represents the administrator's login name |
ADMIN_PASSWD_FILE
|
Specifies the file that contains the administrator's password |
Logging
The authentication service will, by default, write only HTTP request logs to the console. With the DEBUG environment variable set to any value, additional logging will be written to the console. For more precise control, the LOGGING environment variable can be used to specify a logging configuration file. The format of the logging configuration file can be either JSON or JavaScript. Name the logging file with an extension of .json for a JSON file, or .cjs for a JavaScript file.
Top properties include the log level and the log transport:
| Name | Description | Default |
|---|---|---|
| level | Messages at this log level and above will be written to the named transport; follows syslog levels per RFC5424, section 6.2.1. Levels in order of priority: emerg, alert, crit, error, warning, notice, info, debug | none |
| transport | console, file, or syslog | none |
An example of logging messages to the console, starting explicitly at debug and including emerg:
module.exports = {
    level: 'debug',
    transport: 'console'
}
Logging to a named file can be achieved by setting the transport to file. Additional properties can then be defined within a property named file, as described in the table below.
| Name | Description | Default |
|---|---|---|
| filename | Path for the log file. | auth-svc.log |
| maxsize | Size in bytes before rotating the file. | none |
| maxfiles | Number of rotated files to retain. | none |
An example of logging messages to a named file, starting at the level of warning and including emerg, is shown below. This example also demonstrates log rotation by defining a maximum file size and a maximum number of files (maxfiles) to retain.
module.exports = {
    level: 'warning',
    transport: 'file',
    file: {
        filename: '/var/log/auth-svc.log',
        maxsize: 1048576,
        maxfiles: 10
    }
}
Logging to the system logger, syslog, is configured by setting the transport to syslog. Additional properties can then be defined within a property named syslog, as described in the table below. Note that the syslog program name will be helix-auth-svc for messages emitted by the authentication service.
| Name | Description | Default |
|---|---|---|
| facility | Syslog facility, such as auth, cron, daemon, kern, mail, etc. | local0 |
| path | Path of the syslog unix domain socket. For example, /dev/log | none |
| host | Host name of the syslog daemon. | none |
| port | Port number on which the syslog daemon is listening. | none |
| protocol | Communication protocol, such as tcp4, udp4, unix | none |
An example of logging all messages at levels from info up to emerg, to the system log, is shown below. This example demonstrates logging to syslog on Ubuntu 18, in which the default installation uses a unix domain socket that has /dev/log as its name.
module.exports = {
 level: 'info',
transport: 'syslog',
syslog: {
   path: '/dev/log',
   protocol: 'unix'
   }
}
Next
See Starting HAS.


