Helix Proxy
This topic assumes you have read the Guidelines for setting up multi-server services
To improve performance obtained by multiple Helix Core Server users accessing a shared Helix Core Server repository across a WAN,
- Configure P4P on the side of the network close to the users.
- Configure the users to access the service through P4P.
- Configure P4P to access the master Perforce service.
System requirements
To use Helix Proxy, you must have:
- Helix Core Server release 2002.2 or later (2012.1 or later to use SSL)
- Sufficient disk space on the proxy host to store a cache of file revisions
Install P4P
In addition to the basic steps described next, see:
UNIX
To install P4P on UNIX or Linux, do the following:
- Download the
p4pexecutable to the machine on which you want to run the proxy. - Select a directory on this machine (
P4PCACHE) in which to cache file revisions. - Select a port (
P4PORT) on whichp4pwill listen for requests from Helix Core Server applications. - Select the target
Helix Core Server (
P4TARGET) for which this proxy will cache.
Windows
Install P4P as an option when running the Helix Core Server installer for Windows:
Run P4P
To run
Helix Proxy, invoke the
p4p executable, configuring it with environment
variables or command-line options. Options you specify on the command
line override environment variable settings.
For example,
p4p -p tcp64:[::]:1999 -t central:1666 -r /var/proxycacheroot
which starts a proxy that:
-
communicates with a central Helix Core Server located on a host named
centralthat listens for proxy requests on port1666 -
stores its cache of file revisions in its
/var/proxycacherootdirectory (See the-roption under General options for P4P.)
To use the proxy,
Helix Core Server
applications connect to
P4P
on port 1999 on the machine that runs the proxy. The proxy listens on
both the IPv6 and IPv4 transports.
See P4PORT in the Helix Core Command-Line (P4) Reference.
Run P4P as a Windows service
To run
P4P
as a Windows service, either install
P4P
from the Windows installer, or specify the -s option when
you invoke p4p.exe, or rename the
P4P
executable to p4ps.exe.
To pass parameters to the P4Proxy service, set the
P4POPTIONS registry variable using the p4 set command. For example, if you normally run the Proxy
with the command:
C:\> p4p -p 1999 -t ssl:mainserver:1666
You can set the P4POPTIONS variable for a Windows service
named Helix Proxy by setting the
service parameters as follows:
C:\> p4 set -S "Perforce Proxy" P4POPTIONS="-p 1999 -t ssl:mainserver:1666"
When the "Helix Proxy" service starts,
P4P
listens for plaintext connections on port 1999 and communicates with the
Helix Core Server
via SSL at ssl:mainserver:1666.
Proxy options
There are multiple types of proxy options.
Proxy-specific options
| Option | Meaning |
|---|---|
|
|
Run as daemon - fork first, then run (UNIX only). |
|
|
Do not fork - run as a single-threaded server (UNIX only). |
|
|
Run for |
|
|
Run quietly; suppress startup messages. |
|
|
Do not compress data stream between the Helix Core Server to P4P. (This option reduces CPU load on the central server at the expense of slightly higher bandwidth consumption.) |
|
|
Run as a Windows service (Windows only). Running |
|
|
Disable cache fault coordination. The proxy maintains a table of concurrent sync operations,
called When |
--cache-purge
|
Delete inactive files from the proxy cache. Running p4p --cache-purge removes inactive files that exceed the threshold set by the proxy.clearcachethresh configurable. Make sure that the file system has enabled access-time tracking for the directories that are cached by the proxy. You can perform this operation manually or automate it with a scheduled task or cron job. |
General options for P4P
| Option | Meaning |
|---|---|
|
|
Display a help message. |
|
|
Display the version of the Helix Proxy. |
|
|
Specify the directory where revisions are cached. Default is
|
|
|
Specify the directory where the proxy database is stored. See Note
This is the directory to use with the Do not confuse the proxy's |
|
|
Specify the location of the log file. Default is
|
|
|
Specify the port on which
P4P
will listen for requests from
Helix Core Server
applications. Default is |
|
|
Specify the port of the target
Helix Core Server
(that is, the
Helix Core Server for which
P4P
acts as a proxy). Default is |
|
|
Cache only those files that are larger than
|
|
|
For proxy servers, authenticate as the specified
|
|
|
Specifies server trace level. Debug messages are stored in the
proxy server’s log file. Debug messages from
For a full discussion with examples, see Using P4LOG. |
|
|
Display (or set) the proxy server’s Note
The |
Certificate-handling options for P4P
| Option | Meaning |
|---|---|
|
-Gc |
Generate SSL credentials files for the proxy: create a private
key ( Requires that |
|
-Gf |
Display the fingerprint of the proxy’s public key, and exit. Administrators can communicate this fingerprint to end users,
who can then use the |
Proxy monitoring options
| Option | Meaning |
|---|---|
|
|
List pending archive transfers |
|
|
List pending archive transfers, summarized |
|
|
Set the file status interval in seconds. |
|
|
0: (default) Monitoring disabled 1: Proxy monitors file transfers only 2: Proxy monitors all operations 3: Proxy monitors all traffic for all operations |
|
|
Proxy monitoring interval, in seconds. If not set, defaults to 10 seconds. |
|
|
Show currently-active connections and their status. Requires |
Proxy archive cache options
See the lbr.proxy.case configurable in the Helix Core Command-Line (P4) Reference.
Proxy and broker protections
When a user is accessing the Helix Core Server through a Helix Proxy or Broker, the string proxy- is automatically prepended to the user's IP address used by the Helix Core Server. That string can be used in the protections table to define whether a user must connect by means of a proxy or broker, or can connect directly to the Helix Core Server.
To apply the IP address of a replica user’s workstation against the protections table:
-
Make sure that a broker or proxy is in place.
-
Prepend the string
proxy-to the workstation’s IP address.
For instance, consider an organization with a remote development site
with workstations on a subnet of 192.168.10.0/24. The
organization also has a central office where local development takes
place. The central office exists on the 10.0.0.0/8 subnet. A
Perforce
service resides in the 10.0.0.0/8 subnet, and a replica
resides in the 192.168.10.0/24 subnet. Users at the remote
site belong to the group remotedev, and occasionally visit
the central office. Each subnet also has a corresponding set of IPv6
addresses.
To ensure that members of the remotedev group use the
replica while working at the remote site, but do not use the replica when
visiting the local site, add the following lines to your protections
table:
list    group    remotedev     192.168.10.0/24              -//...
list    group    remotedev     [2001:db8:16:81::]/48        -//...

write   group    remotedev     proxy-192.168.10.0/24         //...
write   group    remotedev     proxy-[2001:db8:16:81::]/48   //...

list    group    remotedev     proxy-10.0.0.0/8             -//...
list    group    remotedev     proxy-[2001:db8:1008::]/32   -//...

write   group    remotedev     10.0.0.0/8                    //...
write   group    remotedev     [2001:db8:1008::]/32          //...
The first line denies list access to all users in the
remotedev group if they attempt to access
Helix Core Server
without using the replica from their workstations in the
192.168.10.0/24 subnet. The second line denies access in
identical fashion when access is attempted from the IPV6
[2001:db8:16:81::]/48 subnet.
The third line grants write access to all users in the
remotedev group if they are using the replica and are
working from the 192.168.10.0/24 subnet. Users of
workstations at the remote site must use the replica. (The replica itself
does not have to be in this subnet, for example, it could be at
192.168.20.0.) The fourth line grants access in identical
fashion when access is attempted from the IPV6
[2001:db8:16:81::]/48 subnet.
Similarly, the fifth and sixth lines deny list access to
remotedev users when they attempt to use the replica from
workstations on the central office’s subnets (10.0.0.0/8 and
[2001:db8:1008::]/32). The seventh and eighth lines grant
write access to remotedev users who access the
Helix Core Server
directly from workstations on the central office’s subnets. When
visiting the local site, users from the remotedev group must
access the
Helix Core Server directly.
Connections
When Helix Core Server evaluates protections table entries, it also considers the setting of the dm.proxy.protects configurable.
dm.proxy.protects defaults to 1, which causes
the proxy- prefix to be prepended to all client host
addresses that connect through an intermediary proxy, broker, or replica. The proxy- prefix indicates that the connection is not direct. If you
specify proxy-* for the Host field,
that will affect all connections made via proxies, brokers, and
replicas. A value such as proxy-10.0.0.5 identifies a
client machine with an IP address of 10.0.0.5 that
is connected to the server through an intermediary.
If dm.proxy.protects is set to 0, the
proxy- prefix is removed. This allows you to write a single set of
protection entries that apply both to directly-connected clients and clients that connect through a proxy, broker, or replica. A single set of protection entries is more convenient. However, in some cases a connection through one or more intermediaries might be less secure. If you use the 0 setting, all intermediaries must be at
release 2012.1 or higher.
Commands served by the replica
The example above allows only commands that are executed by the master server to run. For example, p4 edit in a forwarding-replica scenario. Commands that are served by the replica, such as p4 files, are disallowed.
| If the dm.proxy.protects configurable is set to its default value of 1 |
To run commands against the replica directly, such as p4 files, you need:
To run a command that needs to be passed over Helix Proxy to the master, such as p4 sync or p4 edit, you need two entries: write user fred 1.2.3.4 //depot/...
|
|
If dm.proxy.protects is set to 0
|
One entry is sufficient for all commands: write user fred 1.2.3.4 //depot/... |
Administer P4P
The following sections describe the tasks involved in administering a proxy.
No backups required
You never need to back up the P4P cache directory.
If necessary, P4P reconstructs the cache based on Helix Core Server metadata.
Stop P4P
P4P
is effectively stateless. To stop
P4P
under UNIX, kill the p4p process with
SIGTERM or SIGKILL. Under Windows, click End
Process in the Task Manager.
Upgrade P4P
After you have replaced the p4p executable with the
upgraded version, you must also remove the pdb.lbr and
pdb.monitor files (if they exist) from the proxy root before
you restart the upgraded proxy.
Enable SSL support
To encrypt the connection between a
Helix Proxy
and its end users, your proxy must have a valid private key and
certificate pair in the directory specified by its P4SSLDIR
environment variable. Certificate and key generation and management for
the proxy works the same as it does for the
Helix Core Server. See
SSL encrypted connections. The users'
Helix Core Server
applications must be configured to trust the fingerprint of the
proxy.
To encrypt the connection between a
Helix Proxy
and its upstream
Perforce
service, your proxy installation must be configured to trust the
fingerprint of the upstream
Perforce
service. That is, the user that runs p4p (typically a
service user) must create a P4TRUST file (using p4
trust) that recognizes the fingerprint of the upstream
Perforce
service.
See the Perforce Knowledge Base article, Enabling SSL Support for the Server/Broker/Proxy.
Defend from man-in-the-middle attacks
You can use the net.mimcheck configurable to enable checks
for possible interception or modification of data. These settings are
pertinent for proxy administration:
- A value of 3 checks connections from clients, proxies, and brokers for TCP forwarding.
- A value of 5 requires that proxies, brokers, and all Helix Core Server intermediate servers have valid logged-in service users associated with them. This allows administrators to prevent unauthorized proxies and services from being used.
You must restart the server after changing the value of this
configurable. See net.mimcheck.
Localize P4P
If your
Helix Core Server has localized error messages (see Localizing server error messages),
you can localize your proxy’s error message output by shutting down the
proxy, copying the server’s db.message file into the proxy
root, and restarting the proxy.
Manage disk space consumption
P4P caches file revisions in its cache directory. These revisions accumulate until you delete them. P4P does not delete its cached files or otherwise manage its consumption of disk space.
If you do not delete cached files, you will eventually run out of disk space. To recover disk space, remove files under the proxy’s root.
Although you do not need to stop the proxy to delete its cached files or the
pdb.lbr file, removing the cache or pdb.lbr file is NOT recommended during a sync operation because it might cause the following error: "Proxy could not update its cache".
If you delete files from the cache without stopping the proxy, you must
also delete the pdb.lbr file at the proxy’s root directory.
(The proxy uses the pdb.lbr file to keep track of which
files are scheduled for transfer, so that if multiple users
simultaneously request the same file, only one copy of the file is
transferred.)
Determine if applications use the proxy
If your
Helix Core Server
application is using the proxy, the proxy’s version information appears
in the output of p4 info.
For example, if a
Perforce
service is hosted at ssl:central:1666 and you direct your
Helix Core Server
application to a
Helix Proxy
hosted at outpost:1999, the output of p4
info resembles the following:
export P4PORT=tcp:outpost:1999p4 info
User name: p4adm
Client name: admin-temp
Client host: remotesite22
Client root: /home/p4adm/tmp
Current directory: /home/p4adm/tmp
Client address: 192.168.0.123
Server address: central:1666
Server root: /usr/depot/p4d
Server date: 2012/03/28 15:03:05 -0700 PDT
Server uptime: 752:41:23
Server version: P4D/FREEBSD4/2012.1/406375 (2012/01/25)
Server encryption: encrypted
Proxy version: P4P/SOLARIS26/2012.1/406884 (2012/01/25)
Server license: P4 Admin <p4adm> 20 users (expires 2013/01/01)
Server license-ip: 10.0.0.2
Case handling: sensitive
P4P and protections
For setting protections on proxies and brokers, see "Proxy and protections" under Set protections with p4 protect.
Determine if specific files are from the proxy
Use the -Zproxyverbose option with p4
to display messages indicating whether file revisions are coming from the
proxy (p4p) or the central server
(p4d). For example:
p4 -Zproxyverbose sync noncached.txt
//depot/main/noncached.txt - refreshing /home/p4adm/tmp/noncached.txt
p4 -Zproxyverbose sync cached.txt
//depot/main/cached.txt - refreshing /home/p4adm/tmp/cached.txt
File /home/p4adm/tmp/cached.txt delivered from proxy server
Case-sensitivity issues and the proxy
If you are running the proxy on a case-sensitive platform such as UNIX,
and your users are submitting files from case-insensitive platforms (such
as Windows), the default behavior of the proxy is to fold case. For example,
FILE.TXT can overwrite File.txt or
file.txt.
In the case of text files and source code, the performance impact of
this behavior is negligible. If, however, you are dealing with large
binaries such as .ISO images or .VOB video
objects, there can be performance issues associated with this
behavior.
After any change to lbr.proxy.case, you must clear the
cache before restarting the proxy.
Maximize performance improvement
In addition to the topics in this chapter, see the Perforce Knowledge Base article on tuning tips for Proxy Performance, including how to minimize the syncing of small files.
Reduce server CPU usage by disabling file compression
By default,
P4P
compresses communication between itself and the
Helix Core Server
versioning service, imposing additional overhead on the service. To
disable compression, specify the -c option when you invoke
p4p. This option is particularly effective if you
have excess network and disk capacity and are storing large numbers of
binary file revisions in the depot, because the proxy (rather than the
upstream versioning service) decompresses the binary files from its cache
before sending them to
Helix Core Server
users.
Network topologies versus P4P
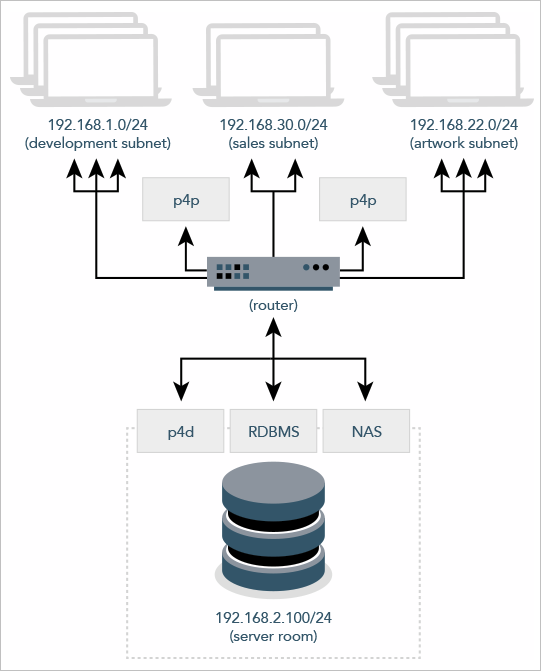
If network bandwidth on the subnet with the Perforce service is nearly saturated, deploy the proxies on the other side of a router so that the traffic from end users to the proxy is isolated to a subnet separate from the subnet containing the Perforce service. You might split the subnet into multiple subnets and deploy a proxy in each resulting subnet:
Preload the cache directory for optimal initial performance
Helix Proxy stores file revisions only when one of its users submits a new revision to the depot or requests an existing revision from the depot. That is, file revisions are not prefetched. Performance gains from P4P occur only after file revisions are cached.
After starting
P4P, you can
prefetch the cache directory by creating a dedicated client
workspace and syncing it to the head revision. All other users who
subsequently connect to the proxy immediately obtain the performance
improvements provided by
P4P. For example, a
development site located in Asia with a
P4P
server targeting a
Helix Core Server
in North America can preload its cache directory by using an
automated job that runs a p4 sync
By default, p4 sync writes files to the client
workspace. If you have a dedicated client workspace that you use to
prefetch files for the proxy, however, this step is redundant. If this
machine has slower I/O performance than the machine running the
Helix Proxy, it can
also be time-consuming.
To preload the proxy’s cache without the redundant step of also writing
the files to the client workspace, use the -Zproxyload
option when syncing. For example:
export P4CLIENT=prefetchp4 sync //depot/main/written.txt
//depot/main/written.txt - refreshing /home/prefetch/main/written.txt
p4 -Zproxyload sync //depot/main/nonwritten.txt
//depot/main/nonwritten.txt - file(s) up-to-date.
Both files are now cached, but nonwritten.txt is never
written to the prefetch client workspace. When
prefetching the entire depot, the time savings can be considerable.
Distribute disk space consumption
P4P stores revisions as if there were only one depot tree. If this approach stores too much file data onto one filesystem, you can use symbolic links to spread the revisions across multiple filesystems.
For instance, if the
P4P
cache root is /disk1/proxy, and the
Helix Core Server it supports has two depots named //depot and
//released, you can split data across disks, storing
//depot on disk1 and //released on
disk2 as follows:
mkdir /disk2/proxy/releasedcd /disk1/proxyln -s /disk2/proxy/released released
The symbolic link means that when
P4P
attempts to cache files in the //released depot to
/disk1/proxy/released, the files are stored on
/disk2/proxy/released.


