Blog
February 28, 2023
How to Sync Unreal nDisplay Nodes with Unreal Switchboard + Helix Core

Version Control,
Digital Creation & Collaboration
Unreal nDisplay is an important tool for virtual production teams who film with large LED screens. Unfortunately, getting the right version of your files to every nDisplay node is time-consuming. Learn how to set up the Unreal Switchboard with Perforce Helix Core version control to quickly and easily sync your project to all Unreal nDisplay nodes.
Read on for a step-by-step guide to syncing Unreal nDisplay nodes, or skip ahead to the section on nDisplay or Unreal Switchboard that interests you most:
Back to topWhat Is nDisplay in Unreal Engine?
nDisplay is a plugin included with Unreal Engine. It allows a single project to be simultaneously rendered by multiple machines — called nodes — from different points of view based on the real-world physical dimensions and location of the screens.
nDisplay can also be attached to motion trackers to allow all of the displays to alter their point of view relative to motion-tracked objects, such as a camera.
nDisplay is an essential tool for powering the large, high-definition LED displays in realtime at 60+ frames per second and calculating all of the inner and outer frustum views for each screen. By setting up an nDisplay blueprint based on the actual physical measurements of each screen on an LED volume — including any curves, angles, and additional displays — a production can distribute the rendering of the screen across multiple computers in order to achieve the necessary frame rates for in-camera VFX.
Back to topWhat Is Unreal Switchboard in Unreal Engine?
Switchboard is another tool included with Unreal Engine that is used to remotely control, coordinate, and sync data between all the different render nodes and control computers used by nDisplay. Each node runs the Switchboard Listener, while the main control machine runs the main Switchboard application to control them.
Back to topWhy Use Perforce Helix Core with Unreal nDisplay?
One very important step to ensure that the nDisplay nodes can work together is to ensure each one has exactly the same copy of the project, including any recent changes. Doing this manually is a time-consuming and error-prone process. Fortunately, Unreal Switchboard has a built-in integration with Helix Core version control. Helix Core streamlines the process of syncing each nDisplay node, updating them all simultaneously, and even rolling back to previous versions of the project — including custom Unreal Engine builds, if desired.
Back to topBack to topBecome a Virtual Production Pro
Get free, on-demand training to master the tools of the trade with Perforce U College of Virtual Production.
Step-By-Step Guide to Setting Up Unreal Switchboard with Perforce Helix Core
You can greatly improve the efficiency of syncing your project to all nDisplay nodes using Helix Core. Follow the steps below to learn 1) what you need before you get started and 2) how to set up Switchboard + Helix Core, step by step.
Prerequisites
UE Multi-User Editing
Running Switchboard and nDisplay requires all the computers to be able to join a multi-user session in Unreal Engine. This usually relies on all the machines being on the same local area network (LAN) and may involve adjusting some UDP settings in the Unreal Editor. You can check Epic’s documentation about it here:
📙 Getting Started with Multi-User Editing in Unreal Engine
Be sure that all the machines can connect to a multi-user editing session before proceeding.
Helix Core Setup for Game Engines
In order to sync your project to the nDisplay nodes running Switchboard Listener, you will need your project set up correctly in Helix Core. Be sure you have set up things like your typemap and p4ignore properly and can enable the Source Control integration in Unreal Engine with Perforce.
You can read and watch a guide about Helix Core and Game Engines in our Quick Start Guide:
➡️ Helix Core Quick Start Guide
📘 Related Reading: How to Use Unreal Engine 5 with Perforce Helix Core
Also, be sure that each listener machine has at least the P4 CLI installed. It will be easier to set up each machine if they also have P4V installed. You can download those here. Then, create a workspace and sync the Unreal Project to each of the render and controller machines you will be setting up.
Step 1: Enable Plugins
The easiest way to get started with nDisplay is to start from the nDisplay template project in Unreal Engine. This project already has the nDisplay and Switchboard plugins enabled. Epic has documentation about adding nDisplay to an existing project here:
📙 Adding nDisplay to an Existing Project in Unreal Engine
Be sure to go to Edit > Plugins and enable nDisplay and Switchboard if they aren’t already, then restart the editor.


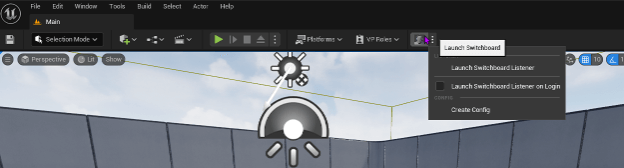
Step 2: Launch Unreal Switchboard
On the computer that will be controlling the cluster, click on the Run Switchboard button that is now shown at the top of the editor. The first time it runs it will prompt you to install dependencies.
Similarly, on all the other machines in the cluster, from the Unreal Editor click the three-dots menu next to Switchboard and select “Launch Switchboard Listener.” Be sure to allow access through Windows firewall if prompted. If this machine will always be working as a render node, then you can check the box to “Launch Switchboard Listener on Login.”
You can also run the Switchboard Listener on its own by going to your Unreal Engine install path and running …/Engine/Binaries/Win64/SwitchboardListener.exe
When the listener machine is activated via Switchboard, it will open a new instance of Unreal Engine, so you do not need it to be running already.
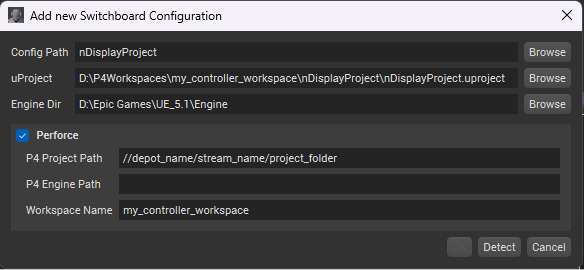
Step 3: Create a New Configuration in Unreal Switchboard
Each project that you run with Switchboard will use its own Config to store information about the project paths and which nodes will run it. Usually, your node setup will remain the same between projects, but your project path and workspace name will change. In that case, you can open a previous Config and then go to Configs > Save Config As… to save time when setting up new projects.
Once you go to Configs > New Config you will be presented with a dialog:
Config Path: This is the name of the config file. By default it will save in Engine/Plugins/VirtualProduction/Switchboard/Source/Switchboard/configs
uProject: Browse to the .uproject file on the machine running the Switchboard controller.
Engine Dir: This can be adjusted to a different Engine/directory for custom builds on Unreal but can be left on the default if you are using a standard Unreal Engine install.
Check the Perforce box and then fill in the info below:
P4 Project Path: This is the Helix Core depot path to the folder containing your .uproject file. For example, //depot_name/stream_name/project_folder
P4 Engine Path: If you are using Unreal GameSync to track custom UE editor builds, you can specify that depot path here or leave it blank if not.
Workspace Name: Enter the name of the Helix Core workspace associated with this project on the host machine. (This is the same workspace you would use in the Unreal Editor source control settings.)
Step 4: Add Unreal Device for Unreal nDisplay
Now you can click the Add Device dropdown to add machines that will be part of this nDisplay cluster. To add controller machines, which can be used to edit the scene in realtime while it is being rendered to the render nodes, select “Unreal” from the dropdown. For this example, let’s add an Unreal device for our controller computer.
When prompted, give it a name and then enter the local private IP address. You can find this by looking for your main Ethernet or Wi-Fi adapter by entering ipconfig on a command prompt or powershell window.
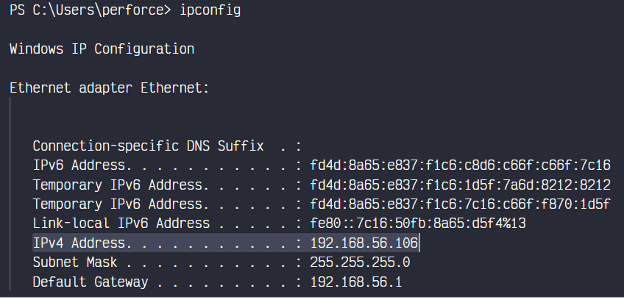
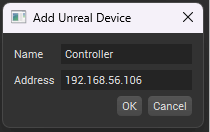
Because this is the same machine we began our configuration from, we shouldn’t need to make any more changes.
Step 5: Add Unreal nDisplay node(s)
Each node that will render part of your nDisplay setup can be added as an nDisplay device. The number of nodes will be determined by the nDisplay Config file that you choose. If you are using the nDisplay template project, there are several configurations included. To see the lists on the dropdown, click Populate to the right. Or, you can Browse to a specific configuration file, but you must make sure it matches the nDisplay blueprint in your project. For the template project, NDC_Basic.ndisplay is the default setup and includes just one nDisplay node, which makes it easy for testing.
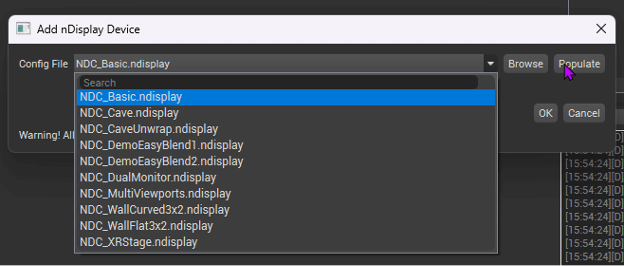
After selecting a configuration, all of the nDisplay devices will be added to Switchboard automatically. However, the devices will likely not work until we adjust our settings since each machine will likely have a different ip address, workspace name and/or filepaths.
Step 6: Adjust Settings
Open the settings from the Settings menu by clicking the gear icon in the upper left.
There are a lot of settings on this page, but they are organized into categories, which can be filtered by clicking the tabs on the left side.
First, make sure that Switchboard > Address is set to the private ip address of the host machine, or else the multi-user session will not work.
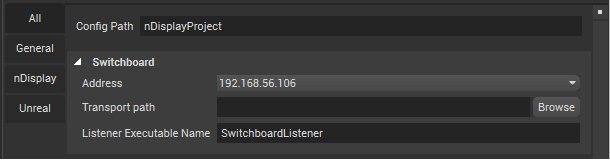
The Project Settings section can most likely be left alone since we already configured this when creating our Config.
Skipping to the Unreal Settings section, we should also be able to leave this alone if our Unreal controller machine is the same machine that we are running Switchboard on. If not, then update the Address to that machine’s IP address and adjust the Engine Directory, Workspace Name, and uProject Path if necessary. (Note, if this is on a separate machine, the Browse button will not work since it is only looking at your local file system.)
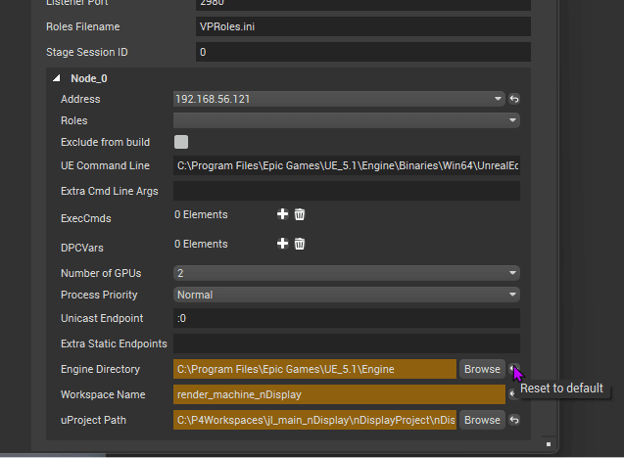
The nDisplay Settings section is where you will likely need to make the most changes. You will see each node listed in its own dark grey box. For each one, be sure to update the Address to the private IP address for that machine and update the Engine Directory, Workspace Name, and uProject Path to be correct for that machine. You will notice that any settings that have been changed from the configuration’s defaults will be highlighted and will show a “Rest to default” button on the right.
Step 7: Connect to the Machines
Now you can click the Connect buttons for all the listener machines. Make sure that Switchboard Listener is running on all the machines.
The first time you set this up, you should connect one at a time so you can check and diagnose any errors. To diagnose errors, be sure to check the log box on Switchboard as well as the Terminal output from the Switchboard Listener on the machine you are connecting to (it may be minimized by default).
Some common issues to check are:
- Incorrect paths or typos in workspace names.
- Incorrect private IP address
- Project not yet synced to the render node
NOTE: If you get a warning about missing a file called VPRoles.ini, it may not have been created by default. Check the file path being displayed (usually inside the project at Config/Tags/VPRoles.ini) and simply create a blank text file at that location. Then add it to Helix Core via P4V, submit it to the depot, and then sync all the machines being connected.
Once you have connected all of the machines, you can use the buttons on the Switchboard interface to check that they all have the latest Helix Core changelist, check the Auto-join multi-user session button, and then click the button to simultaneously launch the project on all of them.
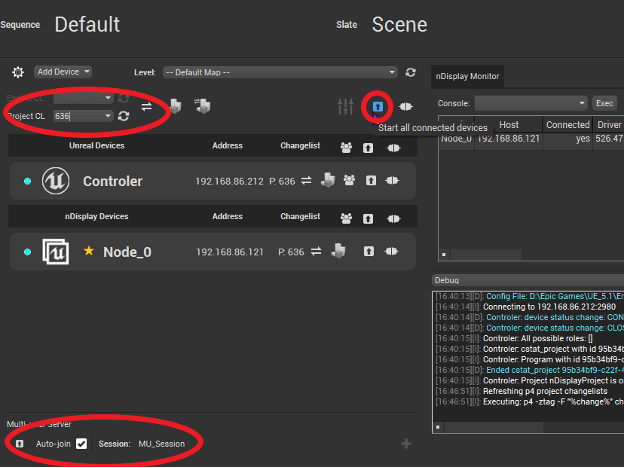
Once you have all the nDisplay nodes connected, you can view your changes in realtime synced across all of your devices!
Don’t Have Helix Core Yet?
Helix Core is the version control system of choice for teams who use a game engine. It gives virtual production teams a single source of truth, allowing them to collaborate more efficiently on large projects and game engine builds. Plus, you Helix Core greatly improves the efficiency of syncing your project to all nDisplay nodes.
📹 See virtual production solutions by Perforce
Back to topAccelerate Virtual Production with Tools from Perforce
You can use Helix Core free for up to five users. Try it for your next virtual production project and see how it boosts efficiency for your team.