
Industry-Standard Version Control
Perforce P4 gives your global development and design teams a version control foundation for creating without limits. With an unrivaled ability to handle the expanding size and complexity of today’s projects, P4 accelerates production, eliminates file sharing chaos, and makes it easy to restore your previous versions.
Whether your team is working across time zones or tackling tight deadlines, P4 empowers everyone to collaborate efficiently—anywhere, anytime.

Keep Work Moving — Without Collisions or Conflicts
Give your team the speed they need with P4’s fast, reliable syncs and built-in file locking that prevents overwrite disasters before they happen.
- Prevent merge conflicts with Exclusive File Locking.
- Deliver lightning-fast access to teams anywhere with proxy and edge servers.
- Reduce sync and submit times with intelligent Delta Transfers.

Set Up Repeatable Frameworks and Streamline Operations
In P4, set up smart from the start with controls that reduce manual work and minimize maintenance across your project’s lifecycle.
- Go beyond basic branching and structure your workflows for scale with Streams.
- Tune your workflows for performance or cost-savings with advanced storage controls.
- Trace root cause with audit logs and full traceability.

Give Your Team the Tools to Stay in Flow. Securely.
Keep creators focused and productive with P4’s secure system that removes distractions and is adaptable to their unique workflow.
- Let your team only see the files they need with granular permissions controls.
- Automate your pipeline (and use the tools you want) with our flexible architecture.
- Work faster with our suite of purpose-built tools tailored to every role on your team.
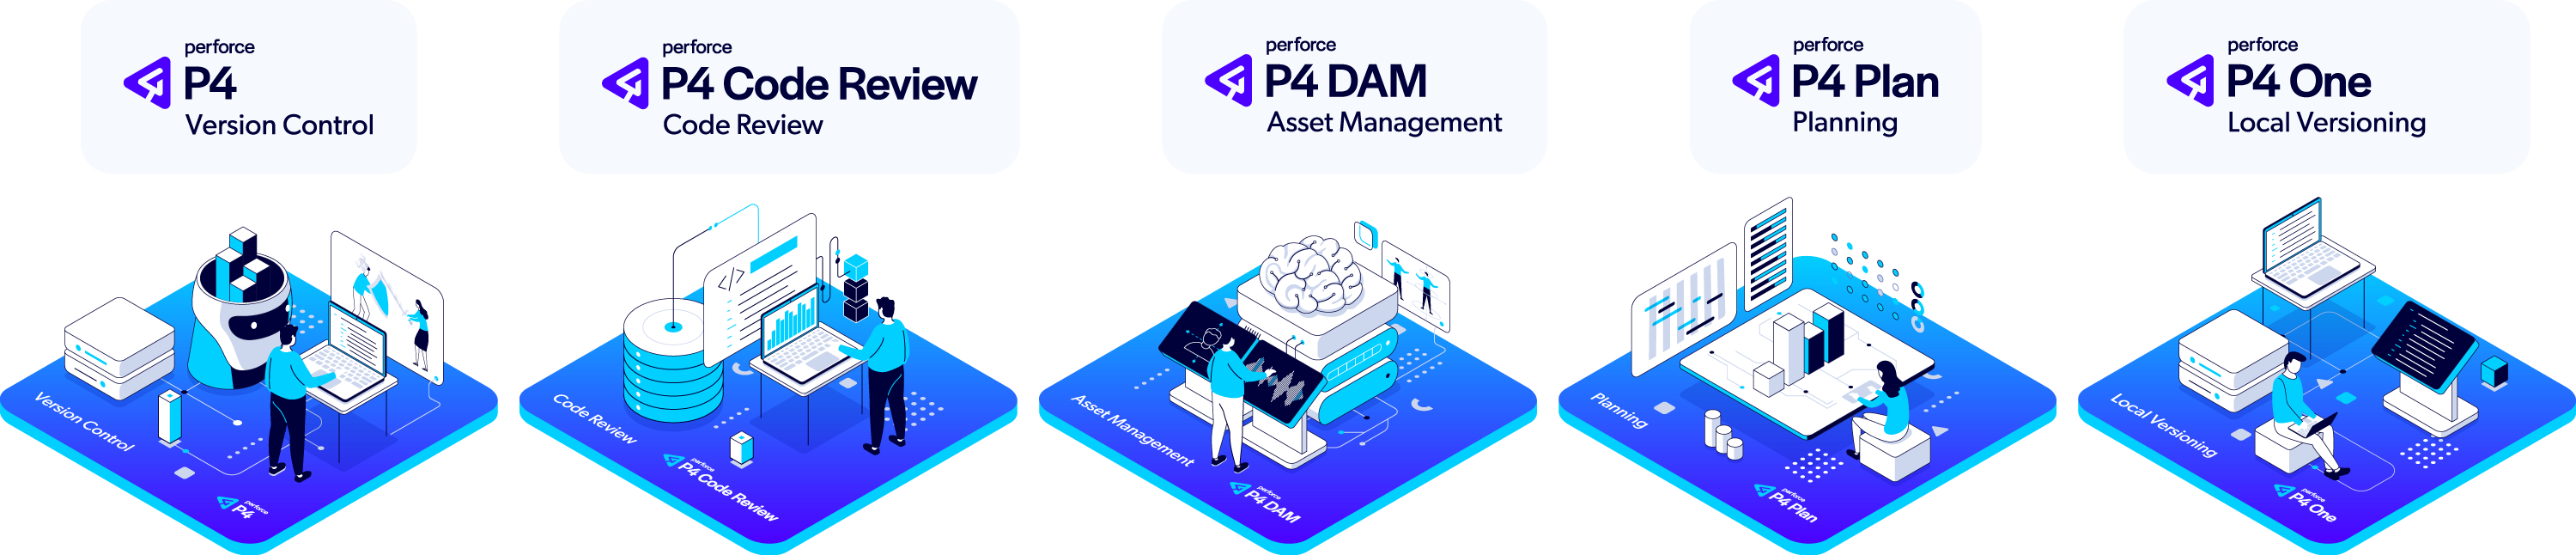
Purpose-Built Tools for Your Entire Team
P4 goes beyond basic version control with a comprehensive suite of integrated applications and tools that address the unique needs of every team member. While other solutions force compromises with one-size-fits-all interfaces, P4 delivers specialized tools that help each contributor work their way—all connected to the same powerful foundation.
Accelerating Innovation Across Industries
Top Use Cases of P4
P4 is the Perforce P4 server itself, and the industry standard version control platform for game development. Trusted by 19/20 of the top AAA game development studios, and award-winning studios large and small, P4 is extended and integrated into a gaming studio’s core workflows to provide a scalable source control foundation and single source of truth.
Game studios utilize our web-based code review tool to track code reviews, give feedback, and tailor the review process according to the pre-commit and post-commit models needed for each phase of game development.
Indies and AAAs alike utilize this intuitive digital asset management system to manage the specialized 2D and 3D file formats they work with. P4 DAM (formerly Helix DAM) makes finding assets fast and easy with AI-powered tagging, customizable metadata, and high-resolution thumbnails with native USD support.
For teams that need to use Git, our free P4 Git Connector provides a secure path for your developers to use their preferred Git tools (including GitHub, GitLab, and Bitbucket), while your art and design teams use a version control solution that won’t slow your studio down.
Game studios use P4 Plan (formerly Hansoft) to scope projects and manage their backlog, across a mix of development methodologies, as quick as they can type. With professional grade configurations and features, P4 Plan can be used across the lifecycle of your game development.
This is just the beginning. Every P4 user gains access to a powerful suite of free applications, tools, clients, plug-ins, and APIs, to optimize their development and their team’s core workflows.

P4 is the Perforce P4 server itself, and the industry standard version control platform used across industries. Trusted by award-winning studios like DNEG and Halon Entertainment, P4 is extended and integrated into a studio’s core workflows to provide a scalable source control foundation and single source of truth.
Film, television, and virtual production studios alike utilize our web-based code review tool to track code reviews, give feedback, and tailor the review process according to the pre-commit and post-commit models needed for each phase of their project.
Award-winning studios have award-winning IP they want to protect and reuse. P4 DAM is specialized digital asset management that works with the common 2D and 3D file formats used in the entertainment industry. Onboard your vendors and collaborators quicker, and give your artists one central place to find, review, and get feedback on every version of their creations.
For studios with engineering departments that prefer to use Git, our free P4 Git Connector provides a secure path for your developers to use their preferred Git tools (including GitHub, GitLab, and Bitbucket), while your art and design teams use a version control solution that won’t slow you down.
When studios need a professional-grade and robust real-time planning tool, they use P4 Plan. Scope projects at the portfolio and project level, and plan your resources and capacity as quick as you can type. P4 Plan even lets users link tasks to changelists with a native P4 integration.
This is just the beginning. Every P4 user gains access to a powerful suite of free applications, tools, clients, plug-ins, and APIs, to optimize their development and their team’s core workflows.

P4 is a high-performance data management solution that supports global semiconductor teams with storage, access, and versioning of design assets, including binaries, digital and analog design files, and IPs. It easily handles the millions of files that are common in EDA tools, along with the complex file relationships found in semiconductor designs. Global development teams benefit from P4's ability to securely manage all digital content in a single repository. With a robust caching and replication architecture, access for engineers and designers is seamless and nearly instantaneous — no matter where they are in the world.
P4 integrates seamlessly with Perforce IPLM (formerly Methodics), a comprehensive IP lifecycle management platform. With P4 and Perforce IPLM, global semiconductor design companies gain a centralized system for design management across all types of projects and platforms. Perforce IPLM helps large, distributed teams eliminate project-centric design silos to improve collaboration. With it, they can find and reuse IP more effectively, achieve end-to-end traceability to ensure regulatory compliance, and accelerate the release process with automated release flows.

P4 gives OEMs and suppliers the foundation of scalable data management necessary for accelerating global development. At a time when automotive software and systems developers face unprecedented levels of complexity, P4 enables them to improve collaboration, efficiency, and security by providing a single source of truth for all digital assets, from binaries and design files to IPs and Git source code. It effortlessly scales to handle petabytes of data, millions of files keeping IP safe with best-in-class security and meeting the industry’s highest safety, quality, and reliability standards.
Use P4 to streamline automotive development and design by adding data management to your existing tools. It integrates seamlessly with the most popular development tools, including Jenkins, Jira, Maya, and GitHub. Thanks to its tight integrations with Unreal Engine and Unity, it is the data management system of choice for teams using game engines for data-intensive projects like digital twins, visualization, HMI design, and other next-gen automotive technology.
P4 is the only Iso 26262 certified data management solution. Learn more

P4 is the Industry Standard
Trusted by
19/20
Top AAA Game Dev Studios
82%
Rated P4’s ability to scale as “Best in Class”.*
100%
Realized a return on their investment within 2 years.*
Trusted by
9/10
Top Semiconductor companies
*Survey data gathered from 2023 customer survey.
Version Within Your Existing Tools and Workflows
P4 is specialized for your industry, with out-of-the-box integrations that let your developers, artists, and designers version in the background of their core workflows.
See Popular IntegrationsSupercharge Productivity with Tools for the Entire Team
P4 isn’t just the world’s most scalable version control, it’s a platform that offers an integrated suite of tools for your designers, developers, and managers. Support your entire team with tools trusted by today’s leading companies.
Unite Hardware & Software Teams
Tame semiconductor design complexity, improve collaboration, and enable IP reuse with a fully traceable platform for IP management across global teams and projects.

Achieve Continuous Traceability
Deliver the highest quality product—on time—with less risk. Ensure regulatory compliance with unified requirements, issue, and test case management, plus automatic, end-to-end traceability.
Streamline & Secure Creative Workflow
Find any art asset fast with a visual library and smart search tools. Speed up the review process by commenting directly on it. Quickly check its status on the Kanban board.
Turn Chaos Into Clarity
Streamline your backlog and align your dispersed teams with P4 Plan — the Agile planning tool made by game devs, for game devs. Support your teams no matter their methods or location.
Get Started with Perforce P4
You can get started with P4 for free for up to 5 users and 20 workspaces.
Get Started with P4 Cloud
Designed for teams under 50, our Perforce-managed and hosted solution is only $39/user/month.
We’re Here to Help
Get in touch with our experts. They’ll walk through solutions that work best for you and your team.